Easy Crochet Table Runner Pattern

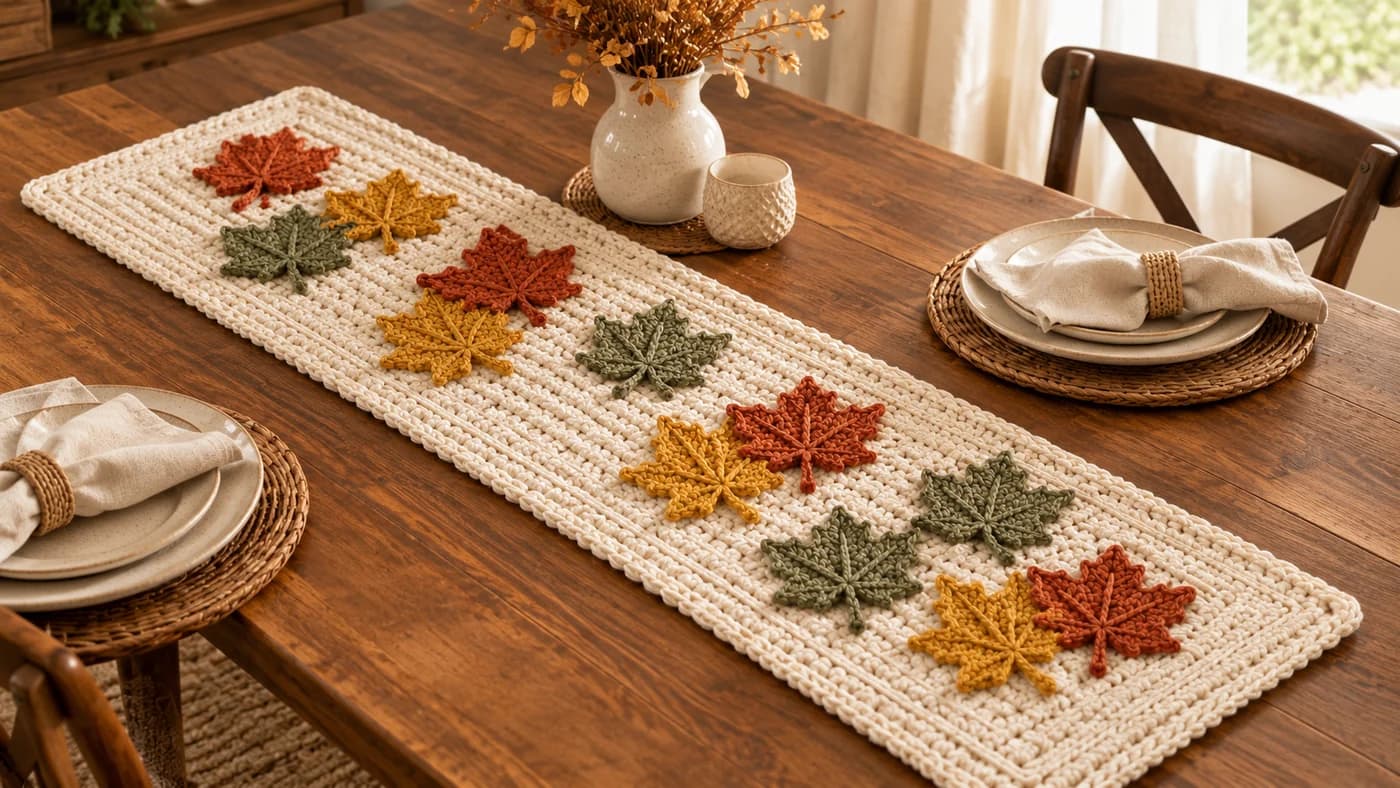
This free easy crochet table runner pattern makes a 40-inch cream runner with a knit-look texture, a framed border and twelve maple leaf appliqués in rust, mustard and sage. The runner is one rectangle in half double crochet, worked in the third loop so it looks knitted. The border is a few simple rounds, and the leaves are sewn on at the end. You'll need about 600 yards of worsted cotton, a 5 mm and a 4 mm hook, and 17 to 20 hours.
Key Takeaways
- One stitch for the whole panel: hdc in the third loop (camel stitch), 35 sts × 100 rows.
- Framed border: a raised line on the inside and the outside, and a crab stitch edge.
- 12 maple leaves: 4 rust, 4 mustard and 4 sage, each with raised veins, sewn in a loose drift down the runner.
- Budget ~600 yd (550 m) of worsted #4 cotton. About 500 yd is the cream runner.
Why I love this runner
I've made two busy fall runners, the autumn leaves runner and the pumpkin table runner. This one is their quiet sister: a calm cream runner that works as a plain runner all year, and becomes a fall runner when the leaves go on. It's the one I'd hand to a beginner who wants a big, finished-looking project.
The center is pure rhythm. It's one stitch, repeated across 35 stitches, row after row. The third-loop trick gives it a knit look without any extra effort, so it looks much fancier than it is.
The leaves are the fun part. Each one takes about 20 minutes, so they're a great one-at-a-time evening project while the runner grows.
Skill level. Easy. You need chains, sl st, sc, hdc, dc and tr, plus reverse single crochet (crab stitch) for the edge and surface slip stitch for the leaf veins. I explain all three below.
What you'll need
Yarn: worsted #4 cotton, such as Lily Sugar 'n Cream. Cotton lies flat, washes well and keeps the leaf points crisp. The cream is about 500 yd, so a 14 oz (400 g) cone is easier than 5 small balls, with no joins in the middle of the panel.
| Color | Used for | Amount |
|---|---|---|
| Cream | Center panel and border | about 500 yd (one 14 oz cone, or 5 balls) |
| Rust | 4 maple leaves | about 32 yd (1 ball) |
| Mustard | 4 maple leaves | about 32 yd (1 ball) |
| Sage green | 4 maple leaves | about 32 yd (1 ball) |
I worked those amounts out from the stitch counts. Plan on 570 to 640 yd in total, depending on your tension.
Hooks and notions
- 5 mm (US H-8) hook for the runner and border.
- 4 mm (US G-6) hook for the leaves.
- A tapestry needle, scissors, 4 stitch markers and about 20 pins.
Gauge and finished size
With the 5 mm hook, 14 hdc and 11 rows = 4 in (10 cm) in the third-loop hdc. The rows are a little shorter than plain hdc, because the stitch leans forward. If you have more stitches than that, go up a hook size.
Finished runner: about 14.5 in (37 cm) wide and 40.5 in (103 cm) long. The center panel is 10 in by 36.5 in, and the border adds about 2.2 in all around.
Each maple leaf is about 4 in (10 cm) across with the 4 mm hook.
Abbreviations (US crochet terms)
- ch = chain
- sl st = slip stitch
- sc = single crochet
- hdc = half double crochet
- dc = double crochet
- tr = treble crochet
- inc = 2 sc in the same stitch
- BLO = back loop only
- MR = magic ring
- st(s) = stitch(es)
- rnd(s) = round(s)
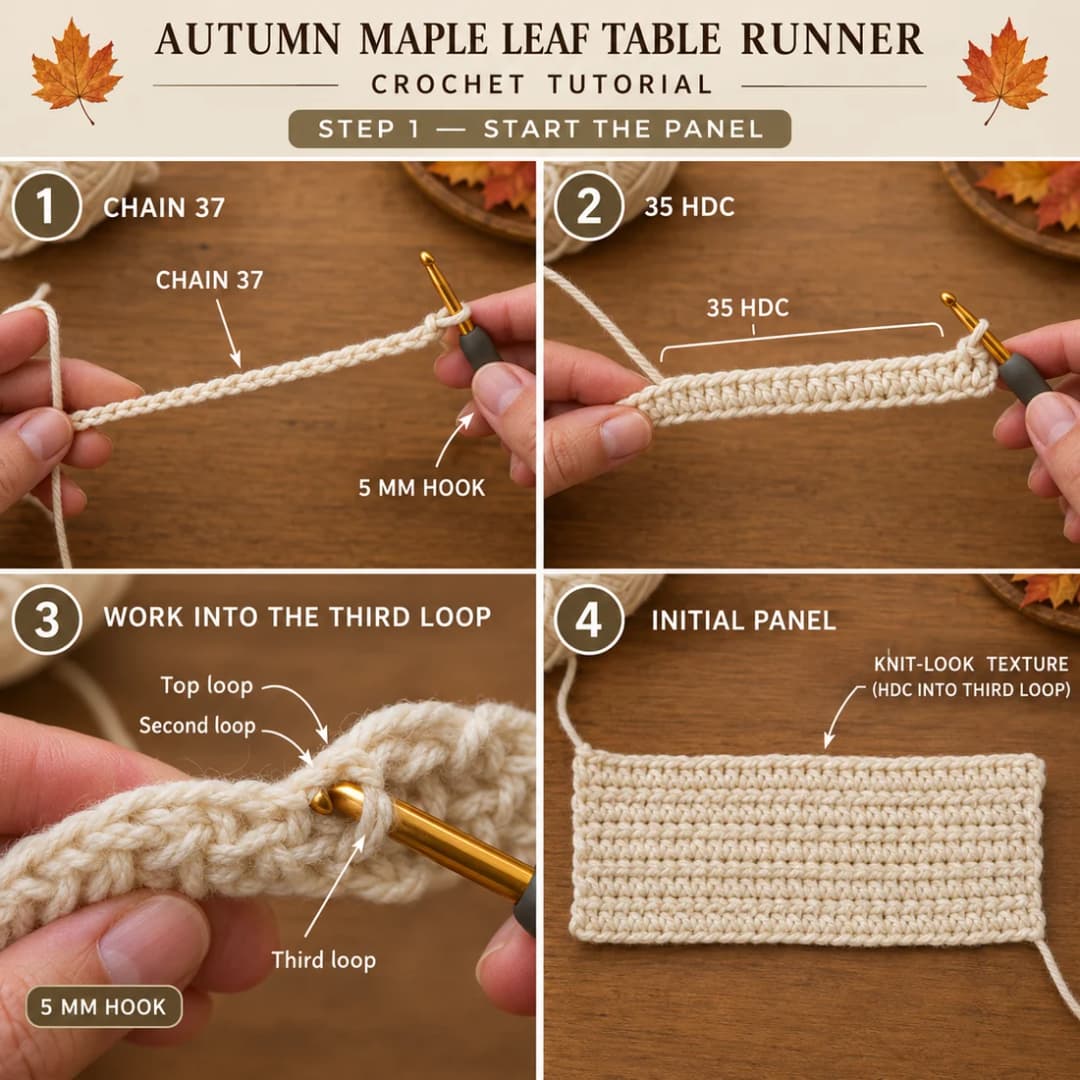
Hdc in the third loop (camel stitch): Every hdc has a third loop, a horizontal bar just below the top two loops, on the side facing away from you. Tilt the row toward you and you'll see it. Work the hdc into that bar only. The top two loops fold toward you and make a line that looks like knit stitches.
Reverse sc (crab stitch): Work sc from left to right instead of right to left (from right to left if you're left-handed). It twists the edge into a firm, rope-like cord.
Surface slip stitch: Hold the yarn under the fabric. Push the hook down through the fabric, catch the yarn, pull a loop up and through the loop on the hook. Repeat, a stitch apart, to draw a raised line on top.
Picot: Ch 3, sl st in the 3rd ch from the hook.
UK crocheters: this pattern uses US terms. US single crochet = UK double crochet, US half double = UK half treble, US double = UK treble, US treble = UK double treble.
The pieces at a glance
| Piece | Make | Hook | Color |
|---|---|---|---|
| Center panel | 1 | 5 mm | cream |
| Border | 7 rounds | 5 mm | cream |
| Maple leaf | 12 | 4 mm | 4 rust, 4 mustard, 4 sage |
The pattern — step by step
Part 1 — The center panel
With the 5 mm hook and cream. The panel is worked across its short width, so the knit-look lines run across the runner.
- Foundation: Ch 37.
- Row 1: Hdc in the 3rd ch from the hook and in each ch across. (35 hdc) The ch 2 at the start of each row doesn't count as a stitch.
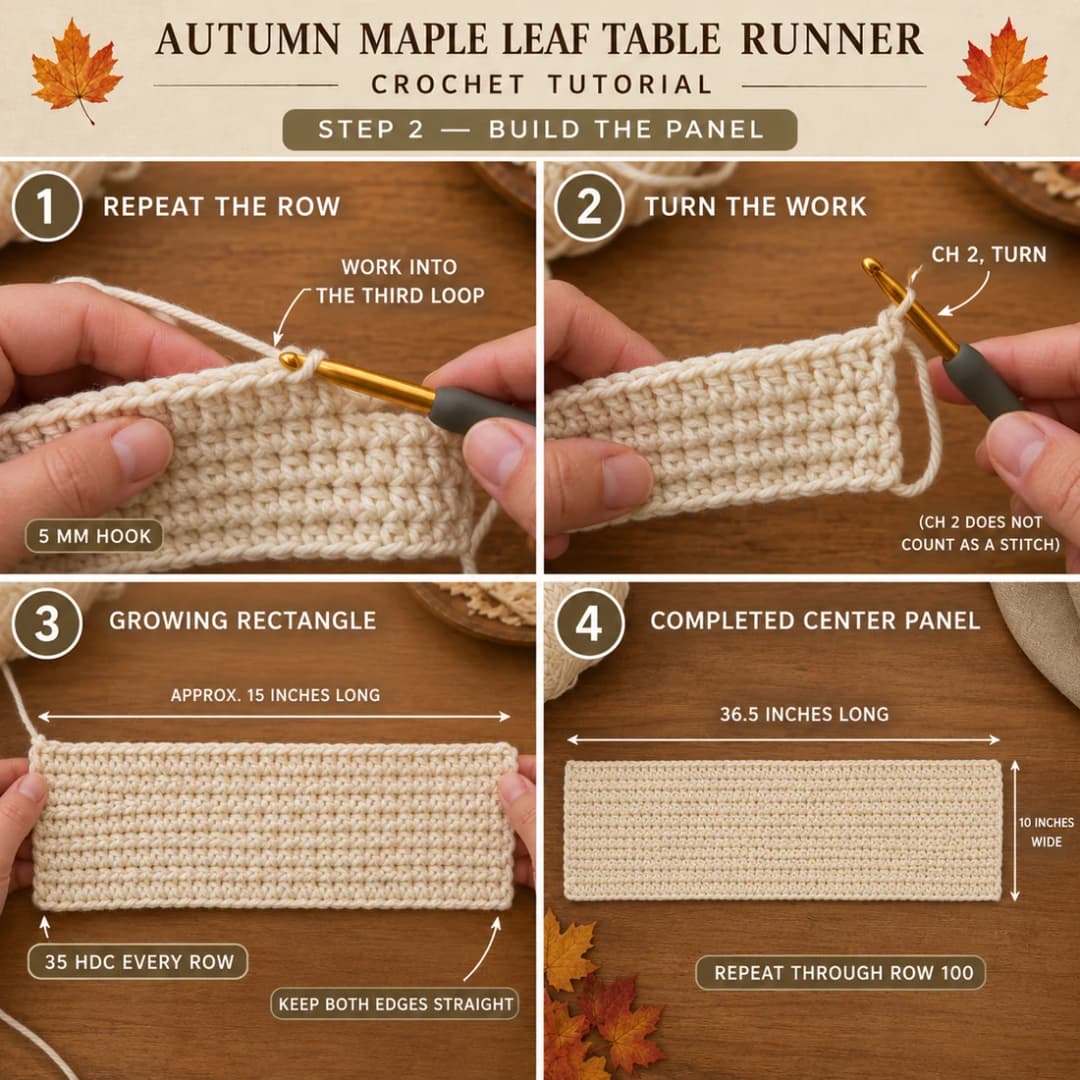
- Row 2: Ch 2, turn. Hdc in the third loop of each st across. (35 hdc)
- Rows 3–100: Repeat Row 2. (35 hdc)
- Fasten off and weave in the ends.
The panel should measure about 10 in wide and 36.5 in long. Count your stitches every 10 rows. It's easy to skip the last stitch of a row, and a lost stitch shows as a slanting edge.
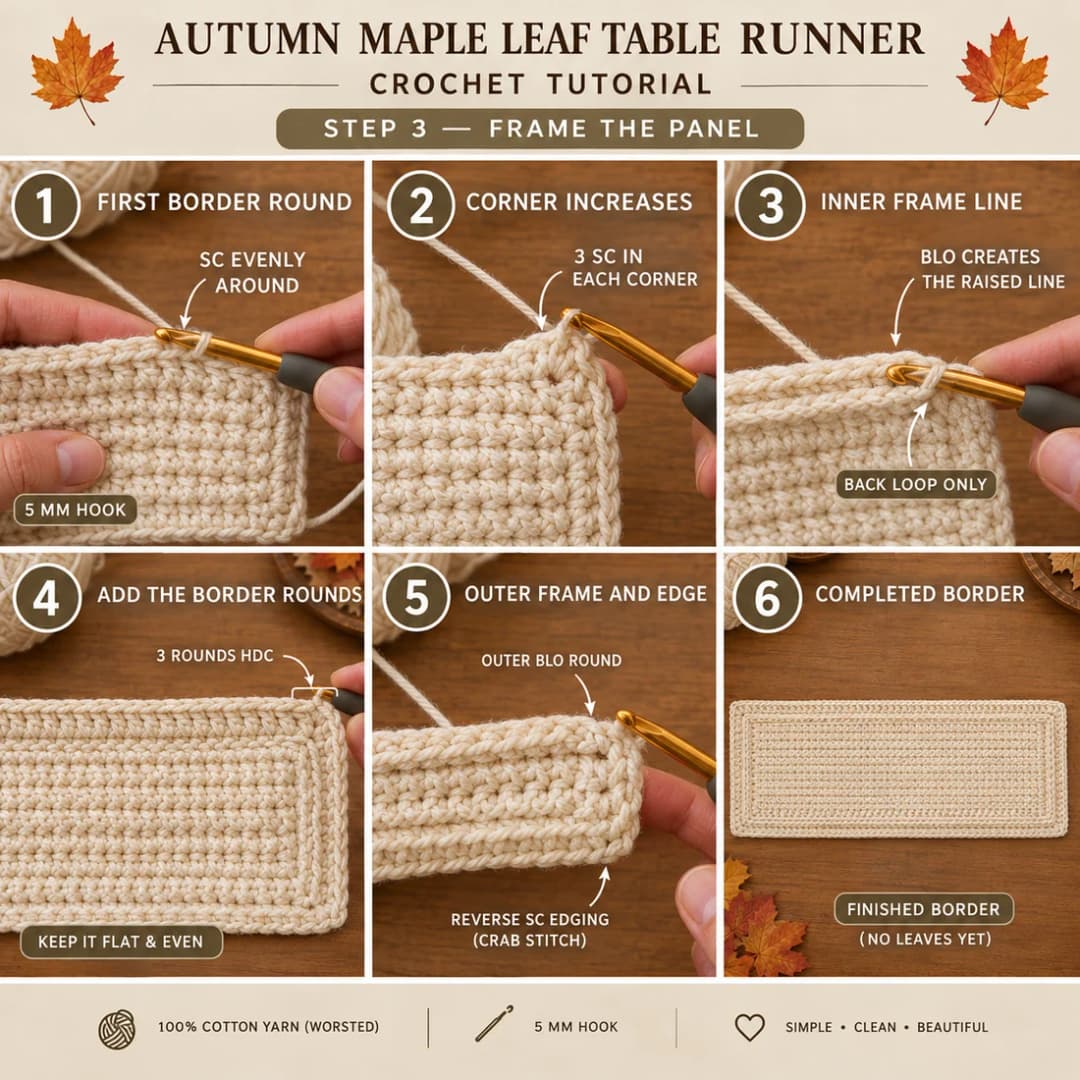
Part 2 — The framed border
Work the border in the round around the panel, with the 5 mm hook and cream. Place a marker in the center stitch of each corner and move it up every round.
Rnd 1: Join cream in any corner. Ch 1. Sc evenly around the panel:
- along each short end, 1 sc in each st (35);
- along each long side, 4 sc over every 3 row-ends (about 133);
- 3 sc in each corner.
Join with a sl st to the first sc. (about 348 sc)
Rnd 2 (inner frame line): Ch 1. Sc in BLO of each st around, with 3 sc in each corner st. Join. (8 sts more than Rnd 1) The unworked front loops of Rnd 1 stay on the surface as a neat raised line around the center.
Rnds 3–5: Ch 2 (doesn't count). Hdc in each st around, with 3 hdc in each corner st. Join to the first hdc. (8 sts more each round)
Rnd 6 (outer frame line): Ch 1. Sc in BLO of each st around, with 3 sc in each corner st. Join.
Rnd 7 (edge): Ch 1. Reverse sc in each st around, with 2 reverse sc in each corner st. Join and fasten off.
Weave in the ends, then block the runner: pin it flat to the finished size on a towel, mist it with water and leave it to dry. The border straightens and the corners square up.
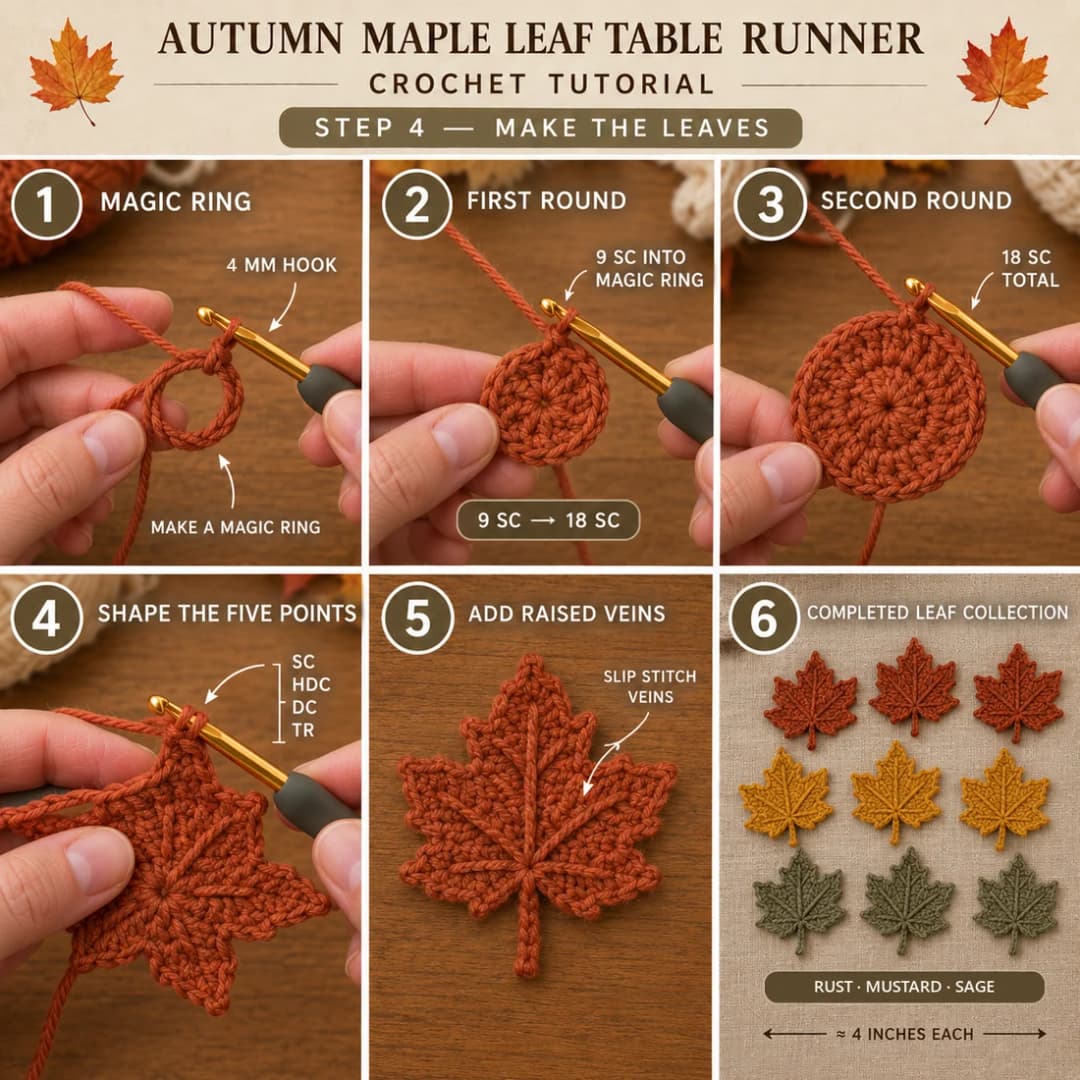
Part 3 — The maple leaves (make 12)
With the 4 mm hook. Make 4 in rust, 4 in mustard and 4 in sage.
- Rnd 1: MR, ch 1, 9 sc in the ring. Pull the ring closed and join with a sl st to the first sc. (9 sc)
- Rnd 2: Ch 1, inc in each st around. Join. (18 sc)
- Rnd 3 (points and stem): The 18 sts make 6 sections of 3 sts. Work them in this order:
- Stem: sl st in the next st, ch 7, sl st in the 2nd ch from the hook and in each of the next 5 ch, sl st in the same st on the leaf, sl st in each of the next 2 sts.
- Small lower point: sc in the next st, (hdc, dc, ch 2, dc, hdc) in the next st, sc in the next st.
- Large side point: sc in the next st, (dc, tr, picot, tr, dc) in the next st, sc in the next st.
- Top point: sc in the next st, (dc, 2 tr, picot, 2 tr, dc) in the next st, sc in the next st.
- Large side point: as section 3.
- Small lower point: as section 2.
- Sl st into the first sl st to join. Fasten off, leaving a 30-in (75 cm) tail for sewing the leaf on.
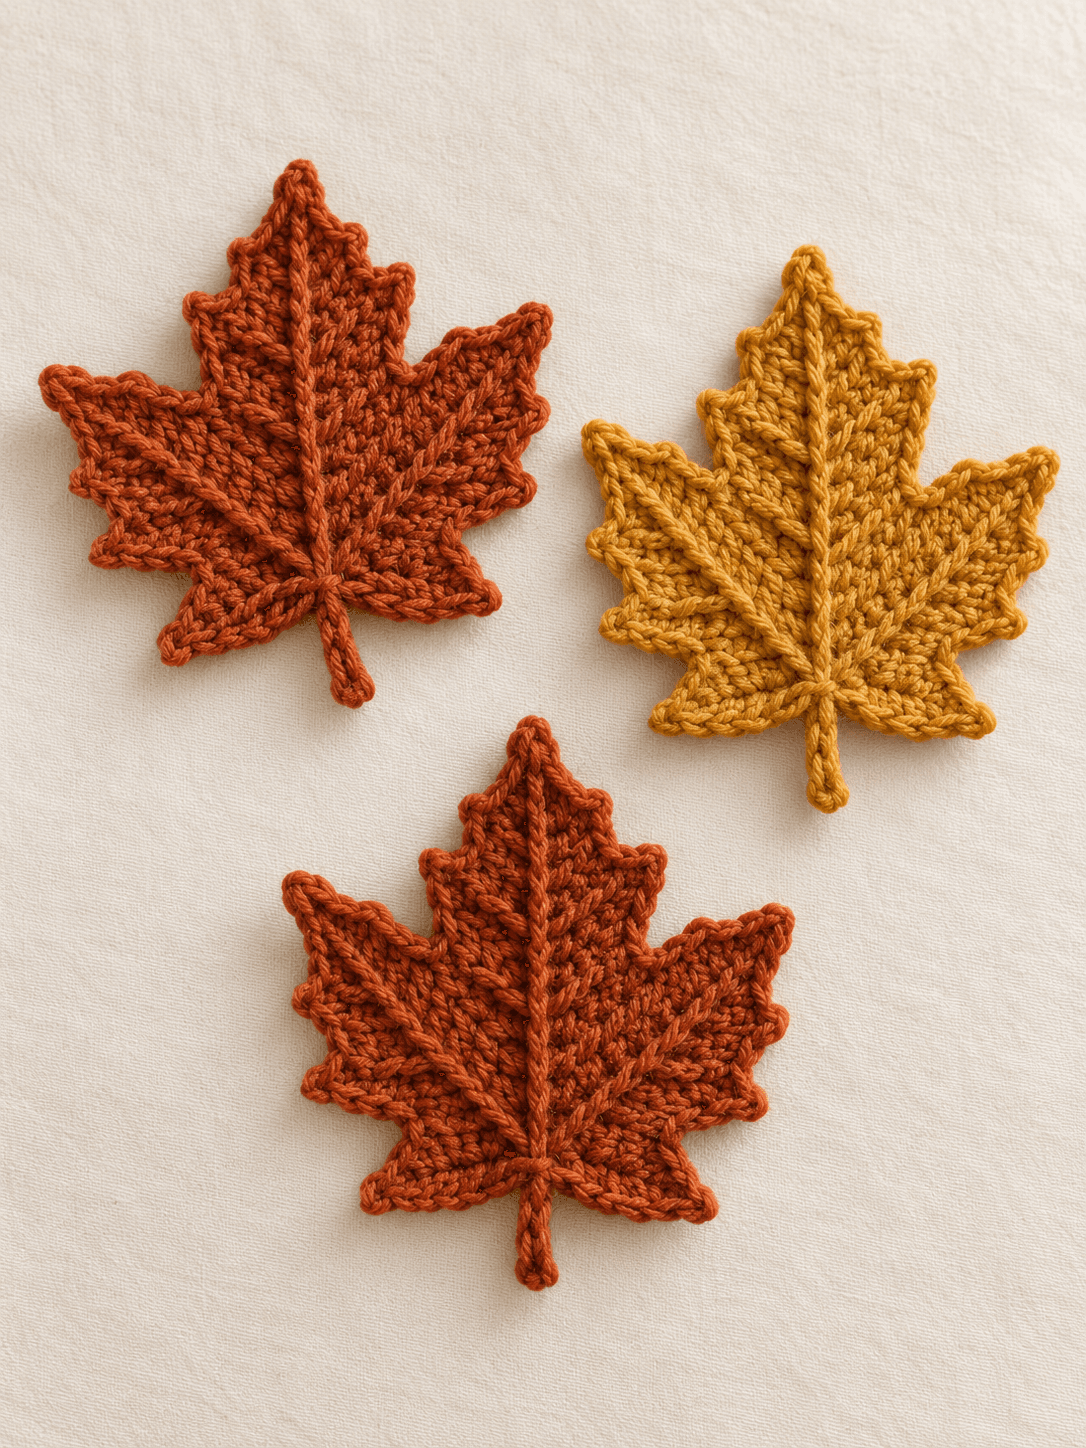
Veins: With a new 30-in (75 cm) strand of the same color, work surface slip stitch from the base of the stem up the center to the tip of the top point. Then work a shorter line from the center out to the tip of each side point. The veins stand up a little, like the ribs of a real leaf. Fasten off on the back and weave in.
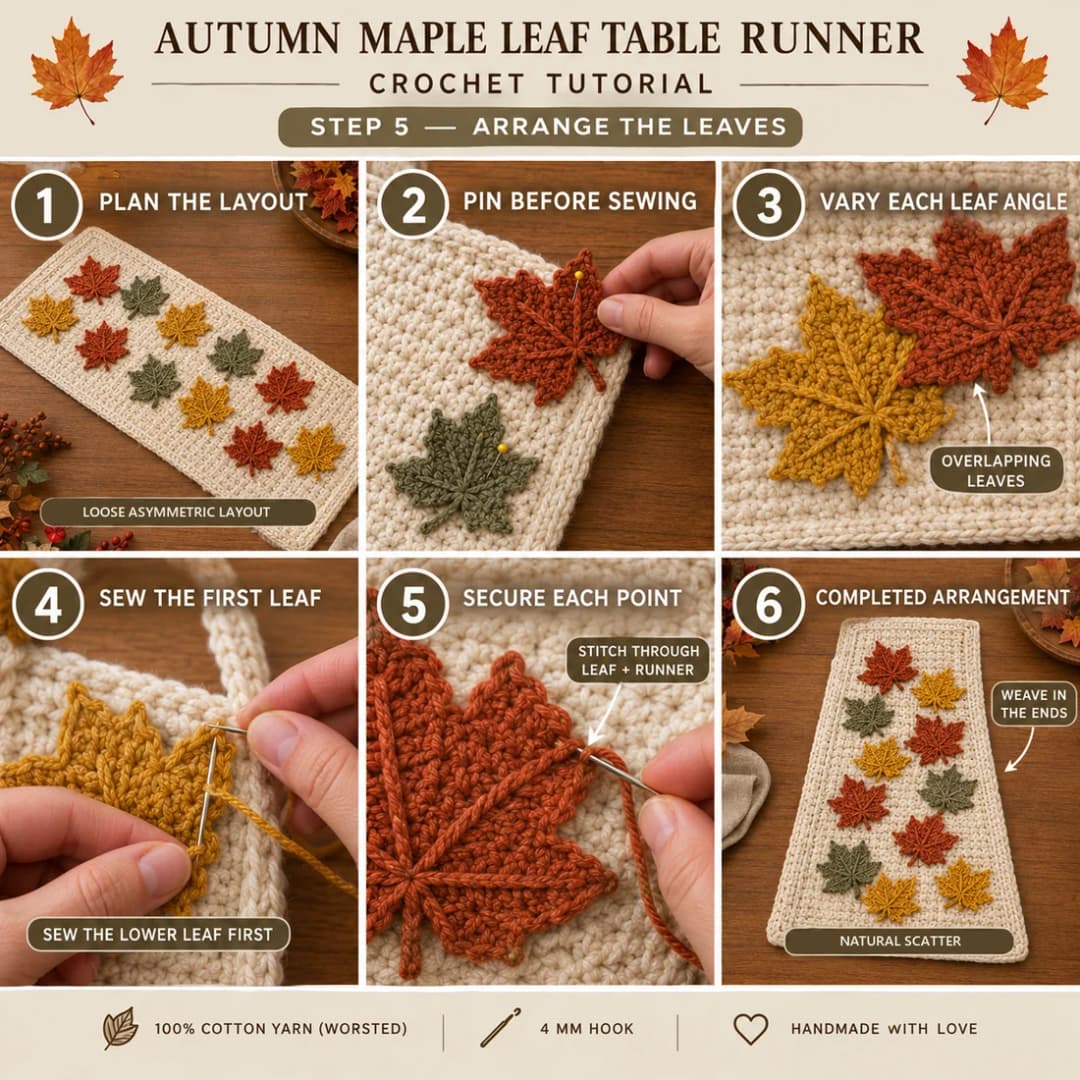
Part 4 — Scatter and sew the leaves
Lay the runner flat, RS up. Treat one short end as the top. Pin every leaf before you sew any of them, and step back to look. The leaves sit inside the inner frame line and drift down the runner in a loose zigzag, not a grid.
From the top end, which is the layout in my photos:
- About 3 in down: a rust leaf on the left and a mustard leaf just to its right, slightly lower.
- About 7 in down: a sage leaf on the left, tucked under the first pair.
- About 11 in down, center: a rust leaf overlapping the top of a mustard leaf.
- About 16 in down, right of center: a sage leaf on its own.
- About 22 in down, right: a mustard leaf with a rust leaf overlapping it on the right.
- About 27 in down: two sage leaves, one left of center and one on the right, staggered so they don't line up.
- About 32 in down, right: a mustard leaf with a rust leaf overlapping it on the right, near the bottom end.
That's 4 rust, 4 mustard and 4 sage. Turn every leaf to a different angle, as if it had just fallen, and keep two leaves of the same color from sitting side by side unless they overlap in a pair.
To sew each leaf: thread the long tail on a tapestry needle. Work small stitches through the leaf's outer edge and the runner, every half inch, going only through the top layer of the runner if you can. Add one stitch at the tip of each point, and a few along the center vein, so the leaf lies flat. For an overlapping pair, sew the bottom leaf first, then the top one. Weave in the tails on the back.
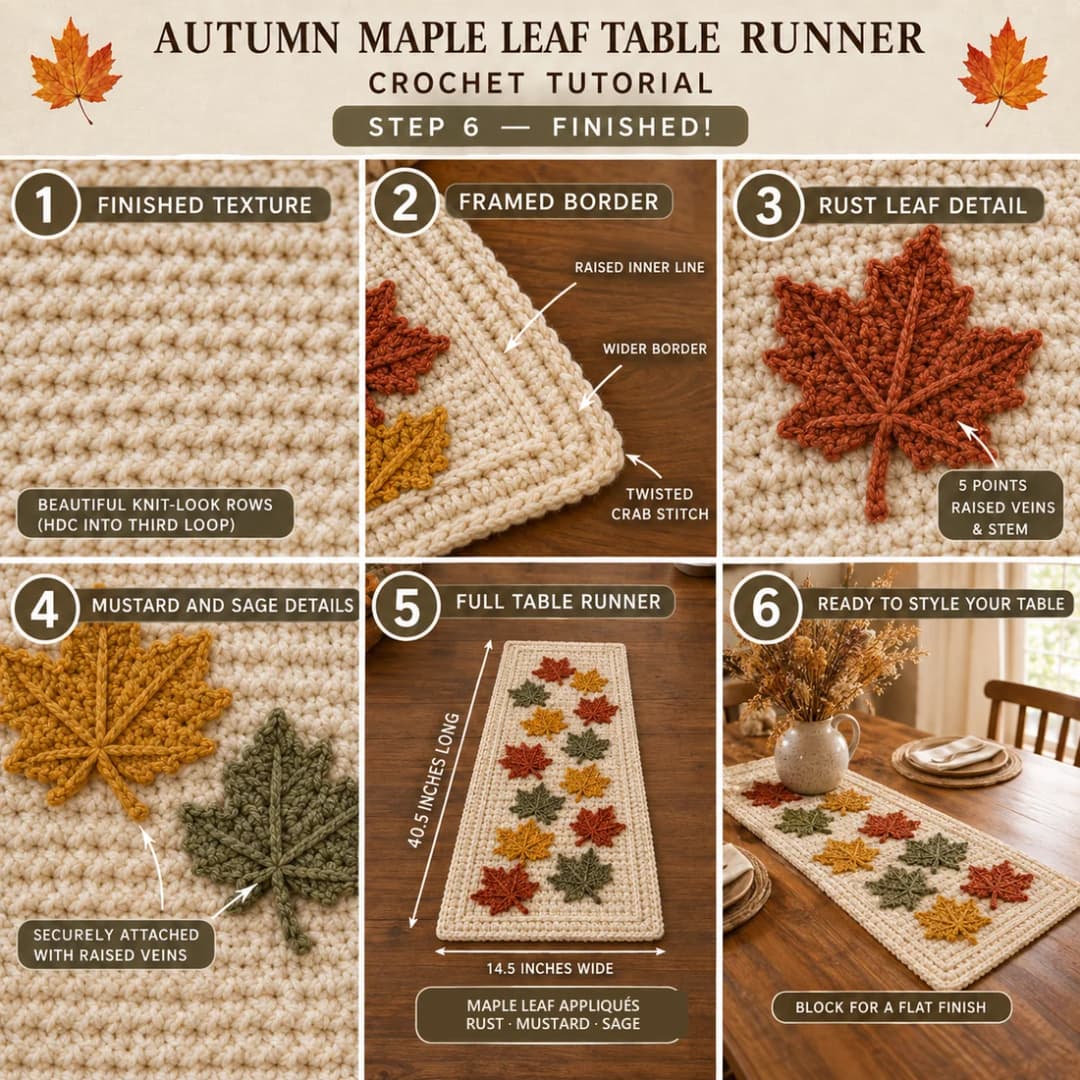
Care. Hand wash in cool water, or machine wash on a gentle cycle in a large mesh bag, and dry flat. Press the leaves flat with your hand while the runner is damp. The leaves are only sewn on, so you can take them off after Thanksgiving and use the runner all year.
Make it yours — quick variations
| Variation | Change from base pattern |
|---|---|
| Longer table (about 52 in) | Work 132 rows instead of 100. Add about 110 yd cream and 4 more leaves. |
| Narrow table or mantel | Ch 29 for 27 hdc (about 7.7 in wide), and use 8 leaves in a single line. |
| Plain all-year runner | Skip the leaves. The cream runner alone is about 500 yd and 12 to 14 hours. |
| Winter version | Swap the maple leaves for white snowflakes or small holly sprigs. |
| Harvest centerpiece | Add a few crochet pumpkins in the middle of the runner, between the leaf drifts. |
Troubleshooting the three things that go wrong
The panel edges aren't straight
You're gaining or losing a stitch at the ends of rows. The last hdc of each row goes into the last stitch, not into the turning chain, because the ch 2 doesn't count. Count to 35 every few rows, and place a marker in the first and last stitch if it helps.
The border ripples or cups
If the border ripples, there are too many sc along the long sides in Rnd 1. If it cups and pulls the runner in, there are too few. Change the ratio in Rnd 1 to 1 sc per row-end (fewer) or 3 sc per 2 row-ends (more), and redo the border.
The leaves curl up at the points
The leaf tension is tight, or the points weren't sewn down. Mist each leaf and pin it flat to dry before you sew it on, then add a stitch at the tip of every point.
Frequently asked questions
How long does this table runner take to crochet? About 17 to 20 hours in total. The center panel takes 10 to 12 hours, the border about 3 and each leaf about 20 minutes, with the veins. Sewing the leaves on takes another hour or so. The panel is simple enough to crochet while watching TV.
How much yarn do I need? About 600 yd (550 m) of worsted #4 cotton, including sewing tails. The cream runner takes about 500 yd. Each leaf takes about 8 yd with its vein and sewing tail, so the 12 leaves add about 100 yd across the three colors. A 14 oz cone of cream saves you from joining new balls in the middle of the panel.
Is this runner good for beginners? Yes. The whole center is one stitch in rows, and the border is plain rounds with corner increases. The only new things are the third-loop hdc, the crab stitch edge and the leaves, which use sc, hdc, dc and tr. If the leaves feel too much, start with the crochet maple leaf pattern, which is flatter and simpler.
Can I use acrylic yarn instead of cotton? Yes, any worsted #4 yarn works. Acrylic is lighter and a little fuzzier, so the knit-look lines are softer and the runner may slide more on a polished table. It won't block as crisply, so steam the border lightly instead of misting it.
Can I sell runners made from this pattern? Yes, you're welcome to sell finished runners and leaves made from this free pattern at markets, on Etsy or as gifts. Please credit "Pattern by Wavode" in your listing and link back to this page. What you can't do is republish this write-up or my photos as your own pattern.
Related patterns on Wavode
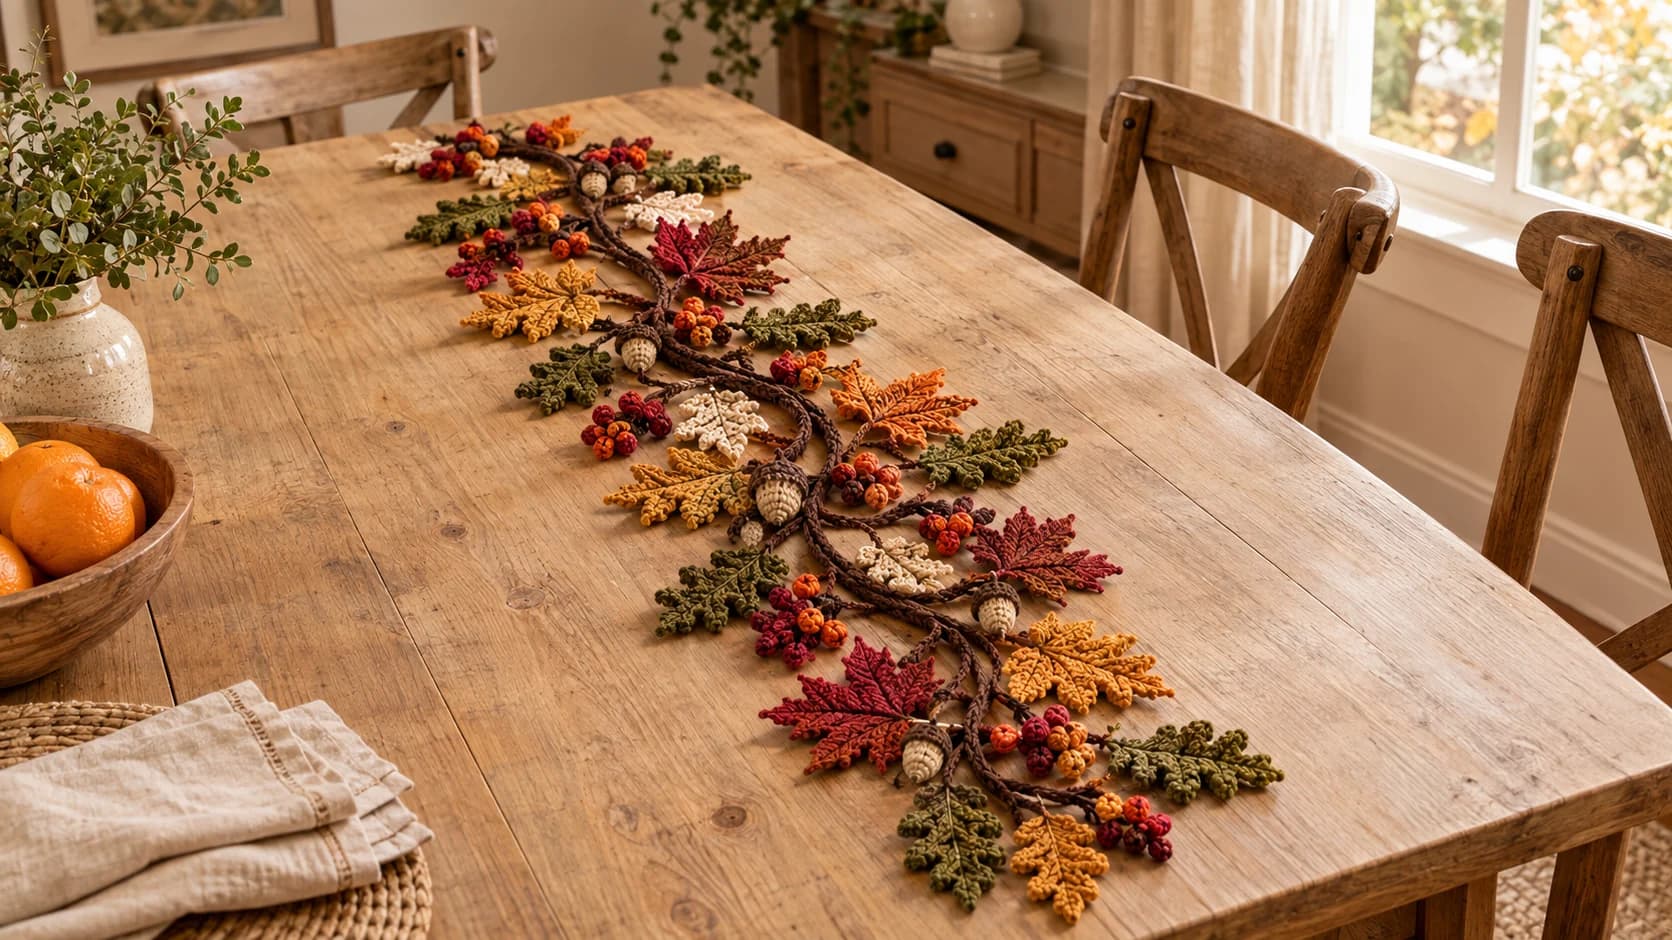
- Autumn leaves table runner: oak and maple leaves, acorns and berries on a winding vine, with no base fabric.
- Pumpkin table runner: a cream filet runner with a scalloped orange edge and harvest clusters.
- Crochet maple leaf pattern: a 20-minute fall appliqué with a raised center vein.
- How to crochet a pumpkin: a no-increase pumpkin for the middle of the table.
- Crochet ribbed beanie: another knit-look project in half double crochet.
Made this runner? Tag #wavodecrochet on Pinterest. I re-pin every finished make and credit the maker.
Pattern by Clara Hartwell for Wavode. Questions? Email me at support@wavode.com.