Autumn Leaves Crochet Table Runner

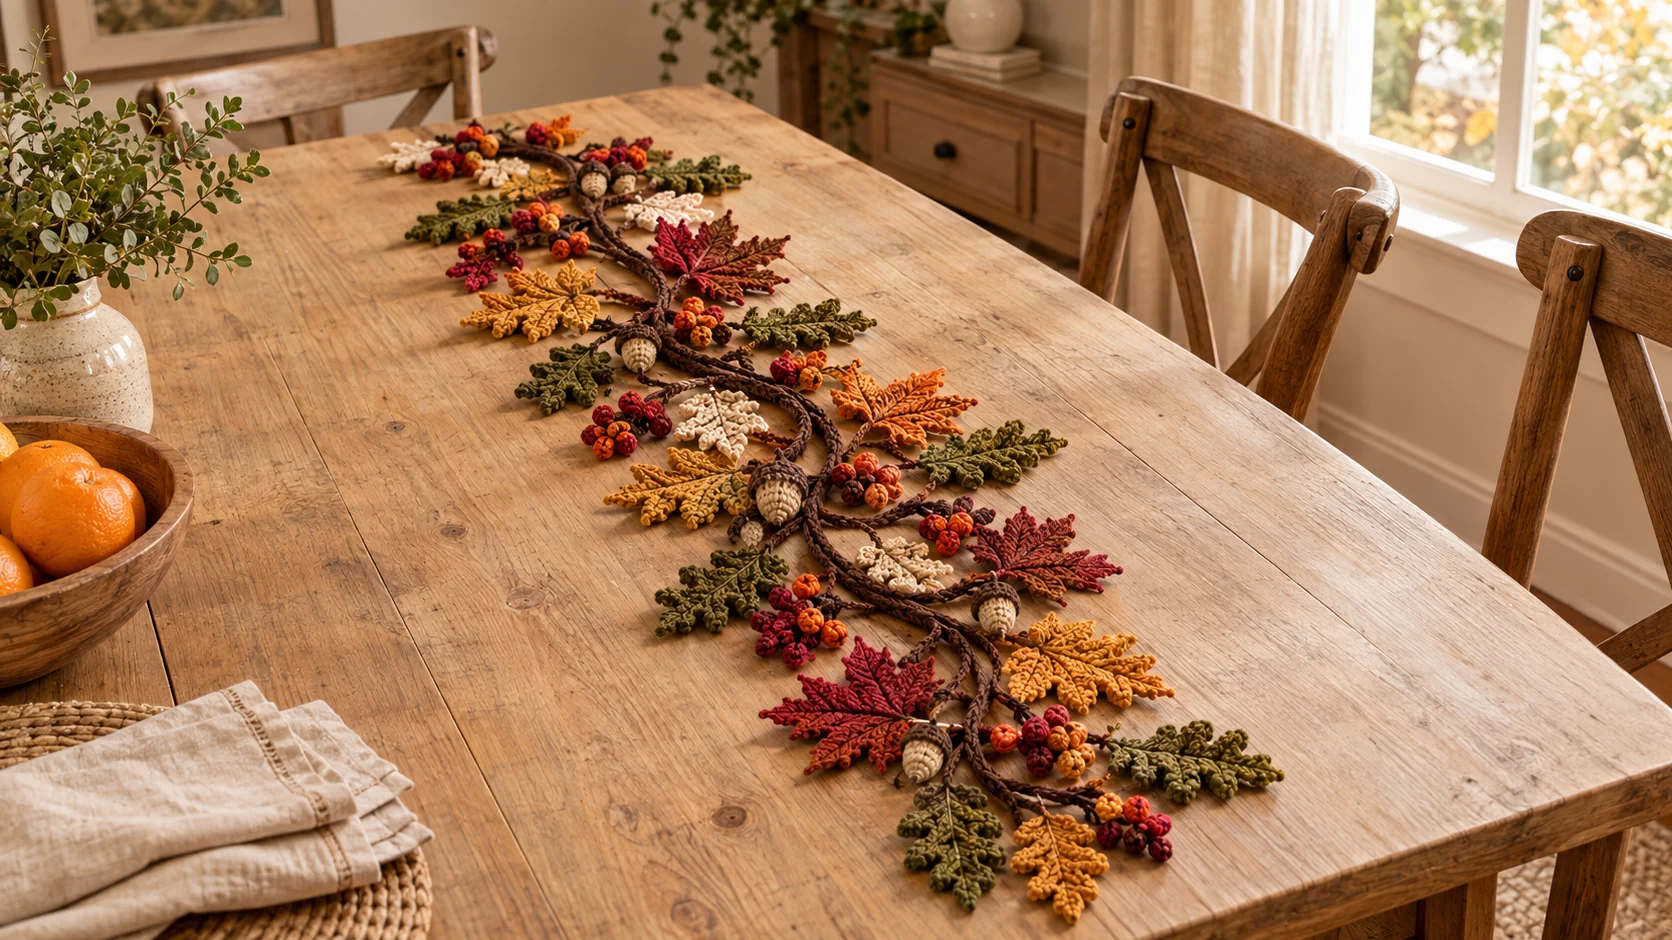
This free autumn leaves table runner crochet pattern makes a 38-inch centerpiece of oak and maple leaves, acorns and berry clusters along a winding brown vine. There's no base fabric. Every piece is a small, quick motif, and you sew them together where they touch so the runner lifts as one piece. You'll need about 330 yards of worsted cotton in 8 fall colors, a 4 mm hook and 10 to 12 hours, spread over as many evenings as you like.
Key Takeaways
- Four small motifs: an oak leaf, a maple leaf, a bobble berry and an acorn. Nothing takes longer than 20 minutes.
- 20 leaves, 5 acorns, 48 berries on a vine of 2 twisted cords and 10 branches.
- Budget ~330 yd (300 m) of worsted #4 cotton in total. One skein of each color is plenty.
- No base fabric. You tack the pieces to each other, so the layout is yours to change.
Why I love this runner
I make this runner in September and leave it out until Thanksgiving. It's the one piece of fall decor that people pick up and turn over, because they want to see how it holds together. The answer is a lot of small stitches in the right places.
What I like most is the rhythm. Each leaf takes 10 to 15 minutes, so it's a perfect "one more before bed" project. You can make the leaves in any order, stash them in a bowl and lay the whole thing out on a free afternoon. There's no big panel to drag around and no row counting past the first few minutes.
It's also generous with scraps. If you've got half-skeins of mustard, olive or rust from other projects, this is where they go.
Skill level. Easy. You need chains, slip stitches, single, half double, double and treble crochet, plus a simple bobble. The only fiddly part is the acorns, which are tiny amigurumi. If you've never made one, my crochet amigurumi acorns walk through the same shape with photos.
What you'll need
Yarn: worsted #4 cotton, such as Lily Sugar 'n Cream (about 120 yd / 71 g per solid-color ball). Cotton holds the leaf points crisp and lies flat on a table. One ball of each color covers the runner.
| Color | Used for | Amount |
|---|---|---|
| Chocolate brown | Vine, branches, acorn caps, sewing | about 80 yd |
| Olive green | 6 oak leaves | about 40 yd |
| Mustard | 5 oak leaves | about 35 yd |
| Cream | 3 oak leaves, 1 maple leaf | about 30 yd |
| Burgundy | 2 maple leaves, 24 berries | about 45 yd |
| Pumpkin orange | 1 maple leaf, 24 berries | about 35 yd |
| Brick red | 2 maple leaves | about 15 yd |
| Tan | 5 acorn nuts | about 20 yd |
The table adds up to about 300 yd. Plan on about 330 yd in total to allow for looser tension and extra sewing.
Hook and notions
- 4 mm (US G-6) hook.
- A tapestry needle and scissors.
- A little polyester fiberfill for the acorns.
- A large towel or a foam board and about 30 pins for the layout.
Gauge and finished size
Gauge isn't critical, but tight stitches keep the points sharp. An oak leaf should measure about 4 in (10 cm) long, stem included, and a maple leaf about 4 in (10 cm) across. If yours are much bigger, go down to a 3.5 mm hook.
Finished runner: about 38 in (97 cm) long and 13 in (33 cm) wide. The layout sets the final size, so you can make it longer or narrower (see the variations).
Abbreviations (US crochet terms)
- ch = chain
- sl st = slip stitch
- sc = single crochet
- hdc = half double crochet
- dc = double crochet
- tr = treble crochet
- inc = 2 sc in the same stitch
- MR = magic ring
- BLO = back loop only
- st(s) = stitch(es)
- rnd(s) = round(s)
Sl st in the back bump: Turn the chain over. Each chain has a little bump on the back. Insert the hook under that bump only and make a sl st. It gives a firm, rope-like cord that doesn't curl.
Picot: Ch 3, sl st in the 3rd ch from the hook. It makes a small pointed tip.
5-dc bobble: *Yarn over, insert the hook in the stitch, yarn over and pull up a loop, yarn over and pull through 2 loops. Rep from * 4 more times in the same stitch (6 loops on the hook). Yarn over and pull through all 6 loops.
UK crocheters: this pattern uses US terms. US single crochet = UK double crochet, US half double = UK half treble, US double = UK treble, US treble = UK double treble.
The pieces at a glance
| Piece | Make | Colors |
|---|---|---|
| Oak leaf | 14 | 6 olive, 5 mustard, 3 cream |
| Maple leaf | 6 | 2 burgundy, 2 brick red, 1 pumpkin, 1 cream |
| Berry | 48 (12 clusters of 4) | 24 burgundy, 24 pumpkin |
| Acorn | 5 | tan nut, brown cap |
| Vine cord | 2 | brown |
| Long branch | 5 | brown |
| Short branch | 5 | brown |
The pattern — step by step
Part 1 — The vine and branches
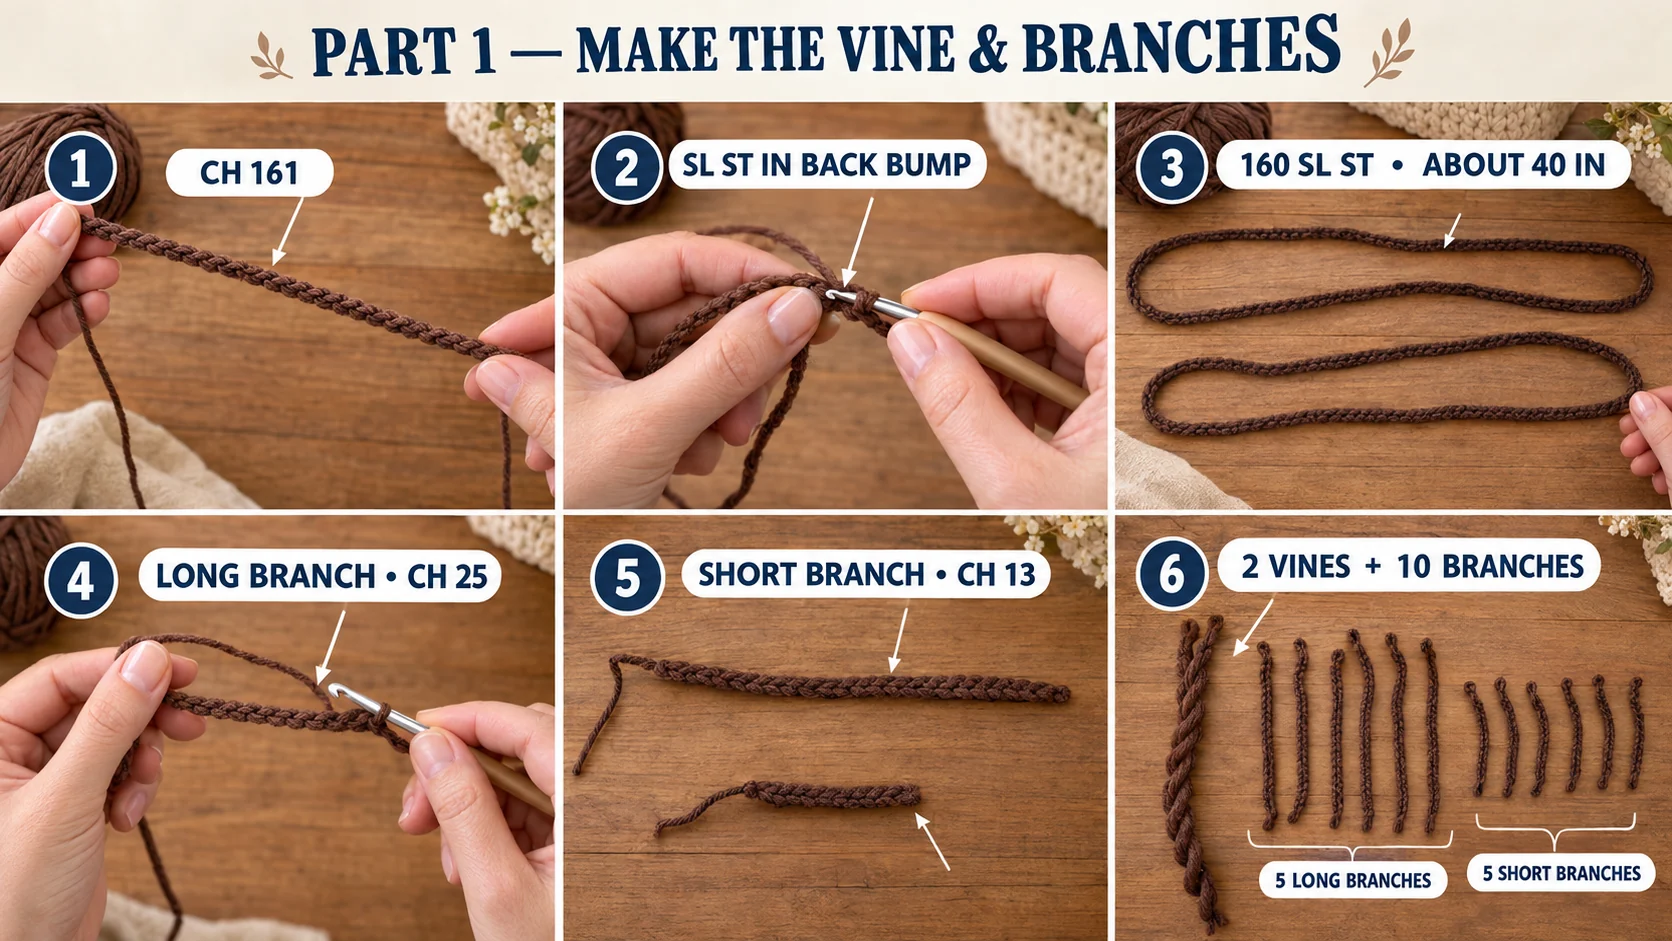
Vine cord (make 2): In brown, ch 161. Sl st in the back bump of the 2nd ch from the hook and of each ch across. Fasten off, leaving an 8-in (20 cm) tail at each end. (160 sl st, about 40 in / 100 cm long)
Long branch (make 5): In brown, leave an 8-in starting tail, ch 25. Sl st in the back bump of the 2nd ch from the hook and of each ch across. Fasten off with a short tail. (24 sl st, about 6 in / 15 cm)
Short branch (make 5): Work as the long branch, but ch 13. (12 sl st, about 3 in / 8 cm)
The 8-in tail on each branch is the end you'll sew to the vine.
Part 2 — Oak leaves (make 14)
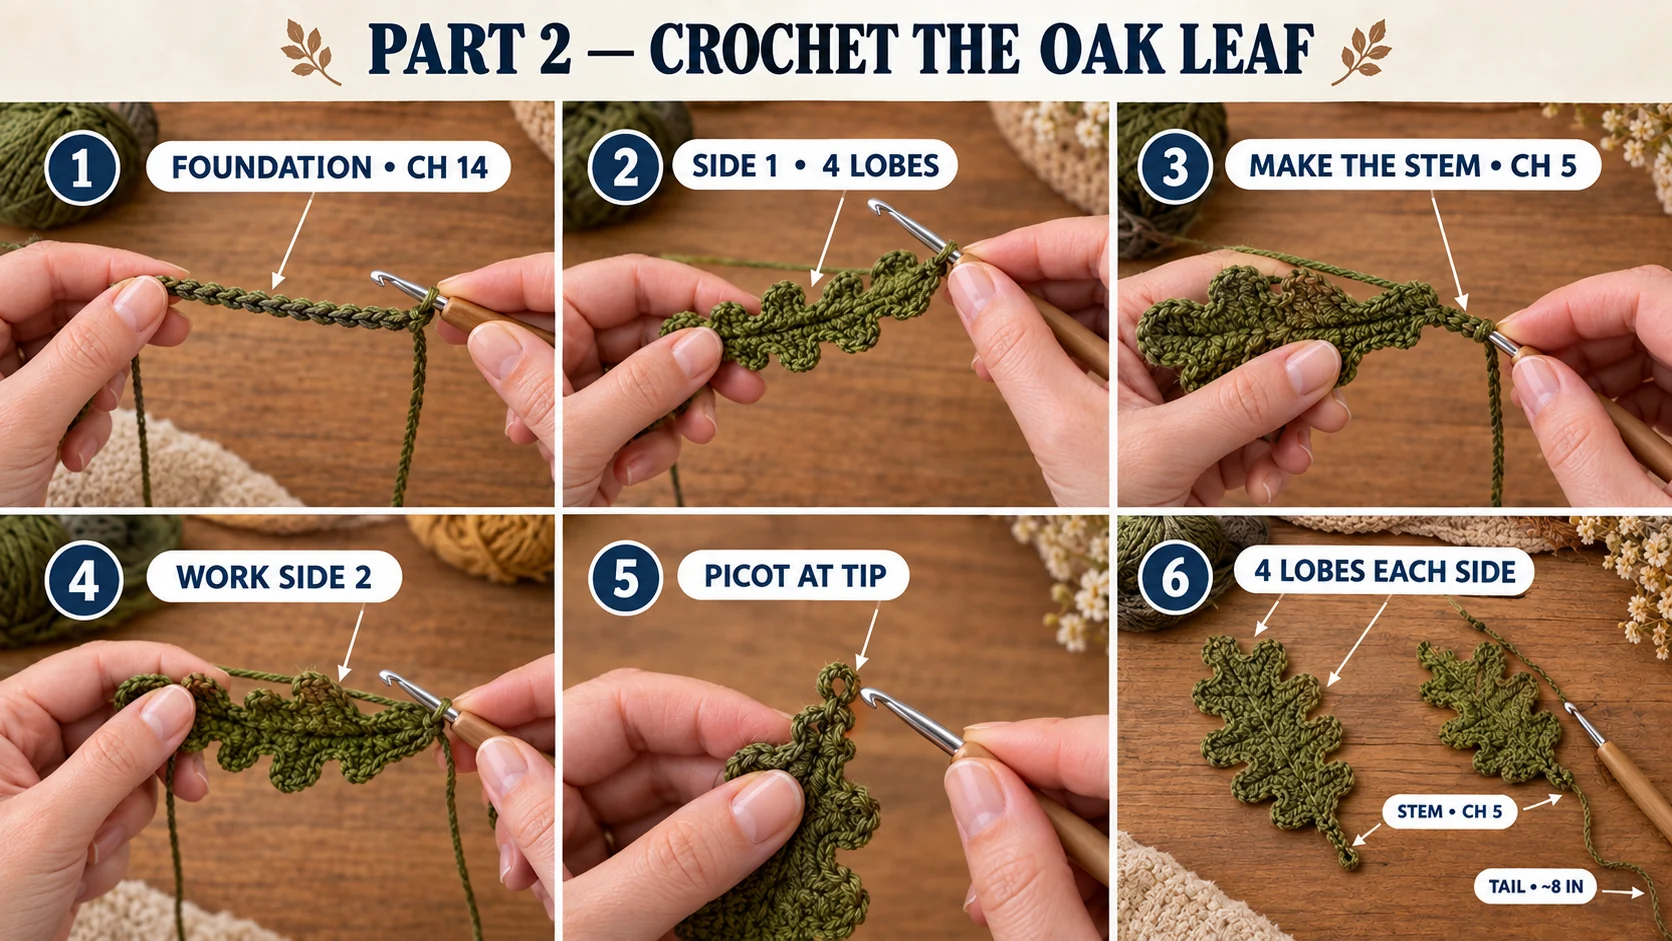
Each oak leaf is worked around a foundation chain. You go down one side toward the stem, round the base, and come back up the other side to the tip.
Leave an 8-in (20 cm) starting tail. That tail ends up at the stem, where you'll sew the leaf on.
Foundation: Ch 14.
Side 1 (tip to base): Sl st in the 2nd ch from the hook. Then:
- sc in the next ch, (hdc, dc, hdc) in the next ch — small lobe;
- sc in the next ch, (hdc, 2 dc, hdc) in the next ch — medium lobe;
- sc in the next ch, (dc, 2 tr, dc) in the next ch — large lobe;
- sc in the next ch, (hdc, 2 dc, hdc) in the next ch — medium lobe;
- sc in each of the next 3 ch.
Base and stem: In the last ch (the one with the starting tail), work sc, ch 5, sl st in the 2nd ch from the hook and in each of the next 3 ch, sc in the same last ch. (a 4-st stem)
Side 2 (base to tip): Now work in the other side of the foundation chain. Sc in each of the next 3 ch, then:
- (hdc, 2 dc, hdc) in the next ch, sc in the next ch;
- (dc, 2 tr, dc) in the next ch, sc in the next ch;
- (hdc, 2 dc, hdc) in the next ch, sc in the next ch;
- (hdc, dc, hdc) in the next ch, sc in the next ch.
Tip: Work a picot, then sl st into the first sl st of Side 1. Fasten off and weave that tail into the center chain, which becomes the leaf's vein.
Each lobe on Side 2 sits right across from its twin on Side 1. Count the lobes on each side: 4 and 4. If one side has 3, you skipped a chain.
Part 3 — Maple leaves (make 6)
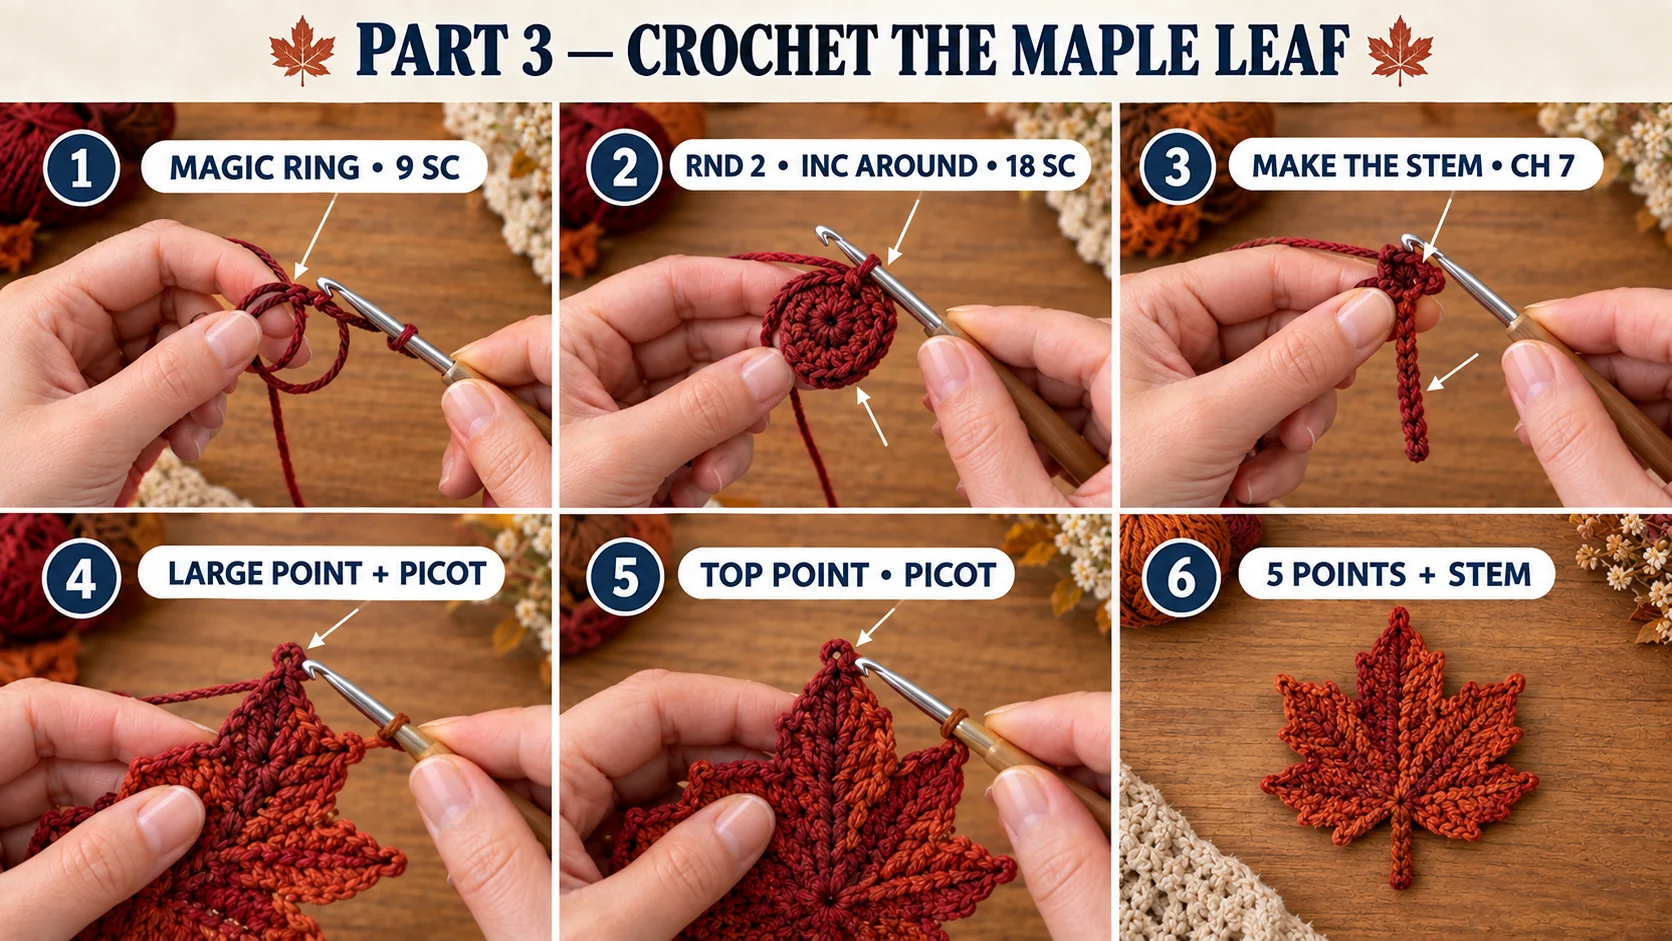
The maple is worked in rounds from the center. The second round makes all five points and the stem in one go.
Rnd 1: MR, ch 1, 9 sc in the ring. Pull the ring closed and join with a sl st to the first sc. (9 sc)
Rnd 2: Ch 1, inc in each st around. Join. (18 sc)
Rnd 3 (points and stem): The 18 sts make 6 sections of 3 sts each. Work them in this order:
- Stem: sl st in the next st, ch 7, sl st in the 2nd ch from the hook and in each of the next 5 ch, sl st in the same st on the leaf, sl st in each of the next 2 sts.
- Small lower point: sc in the next st, (hdc, dc, ch 2, dc, hdc) in the next st, sc in the next st.
- Large side point: sc in the next st, (dc, tr, picot, tr, dc) in the next st, sc in the next st.
- Top point: sc in the next st, (dc, 2 tr, picot, 2 tr, dc) in the next st, sc in the next st.
- Large side point: as section 3.
- Small lower point: as section 2.
Sl st into the first sl st to join. Fasten off, leaving an 8-in (20 cm) tail. It sits right beside the stem, ready for sewing. Pull the magic ring tail to the back and weave it in.
Optional veins: With a single strand of a slightly darker yarn, work surface slip stitch from the center to the tip of each point. On a cream leaf, a line of tan looks lovely.
Part 4 — Berries and acorns
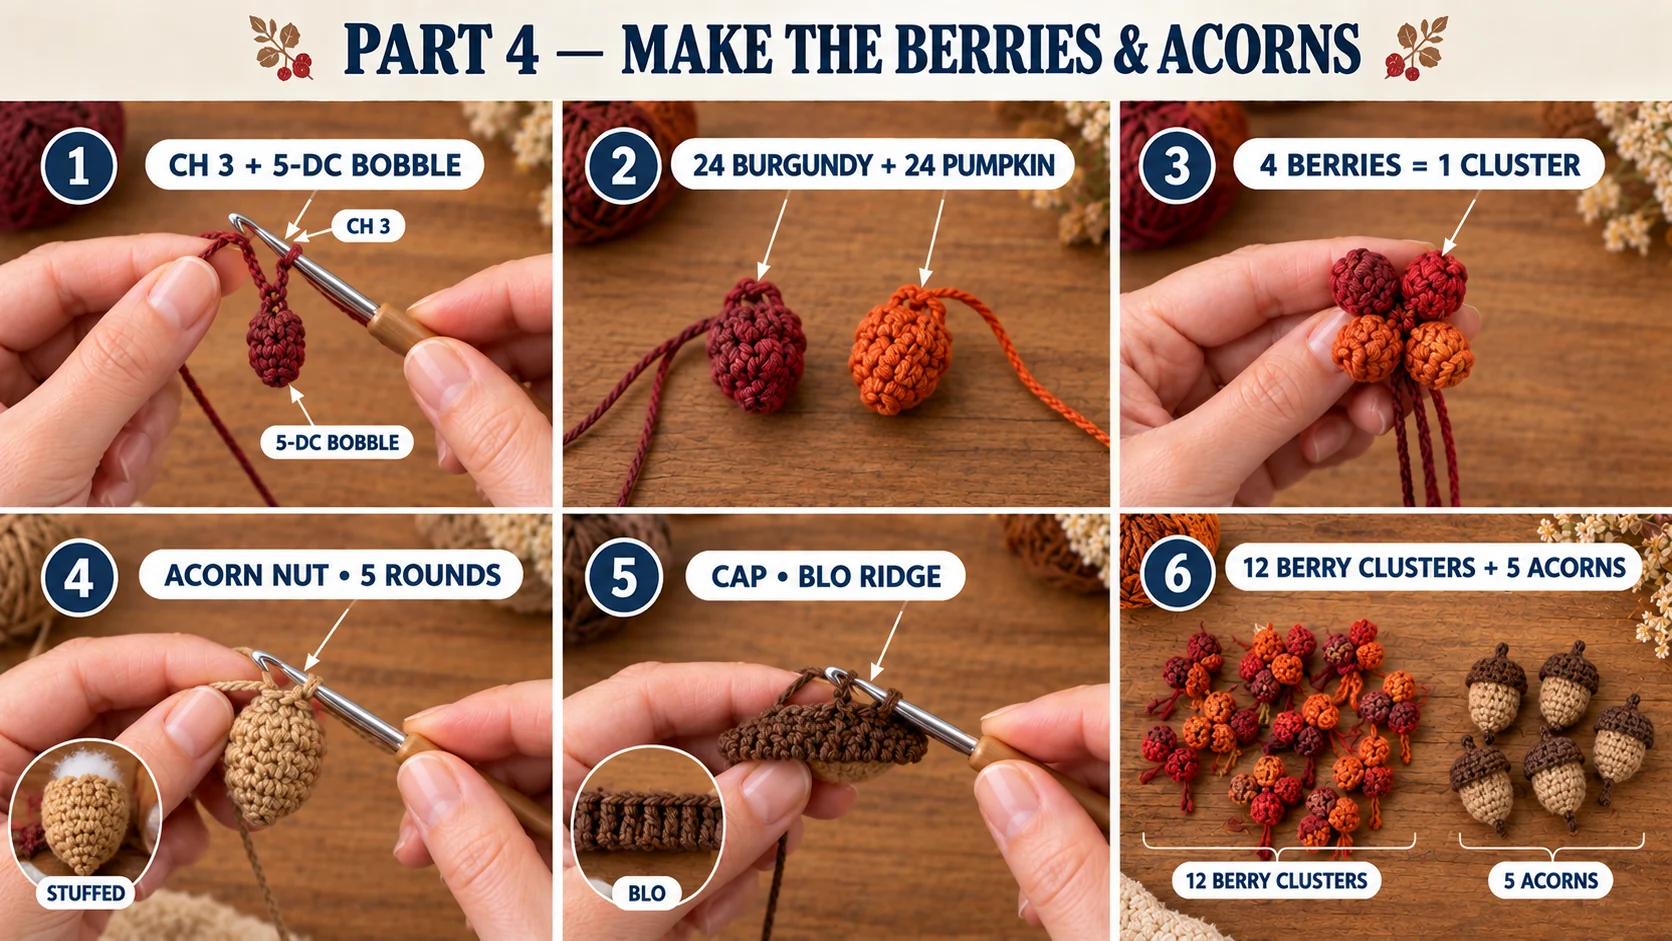
Berry (make 48: 24 burgundy, 24 pumpkin): Leave a 6-in (15 cm) starting tail. Ch 3, work a 5-dc bobble in the 3rd ch from the hook, ch 1 to close. Fasten off, leaving a 6-in (15 cm) tail. Both tails come out of the base of the berry.
Berry cluster (make 12): Take 2 burgundy and 2 pumpkin berries. Knot all eight tails together close to the berries, so the 4 berries bunch into a little cluster. Keep the tails. They're for sewing the cluster to the vine.
Acorn nut (make 5, in tan): The magic ring is the pointed bottom of the nut. The last round is the open top, and the cap closes it.
- Rnd 1: MR, 6 sc in the ring. (6) Work in continuous rounds from here, with a marker in the first st.
- Rnd 2: *Sc in the next st, inc; rep from * 3 times. (9)
- Rnd 3: *Sc in the next 2 sts, inc; rep from * 3 times. (12)
- Rnds 4–5: Sc in each st around. (12)
- Sl st in the next st and fasten off. Stuff firmly.
Acorn cap (make 5, in brown): The magic ring is the top of the cap. The last round is the rim, and the tail there sews the cap on.
- Rnd 1: MR, 6 sc in the ring. (6)
- Rnd 2: Inc in each st around. (12)
- Rnd 3: *Sc in the next 3 sts, inc; rep from * 3 times. (15)
- Rnd 4: Sc in BLO of each st around. (15) The BLO ridge gives the cap its little rim.
- Sl st in the next st and fasten off, leaving a 10-in (25 cm) tail.
Put the acorn together: Set the cap over the open top of the stuffed nut, so the rim covers Rnd 5. Whipstitch the rim to the nut all the way around, going through Rnd 4 of the nut. Add a little stuffing just before you close it. For the stem, bring the needle out at the center top of the cap, make 3 short straight stitches on the same spot, and tie off inside. Keep the rest of the tail for sewing the acorn to the vine.
Part 5 — Lay it out and sew it together
Clear a table, or lay a big towel on the floor. Everything gets pinned first and sewn second.
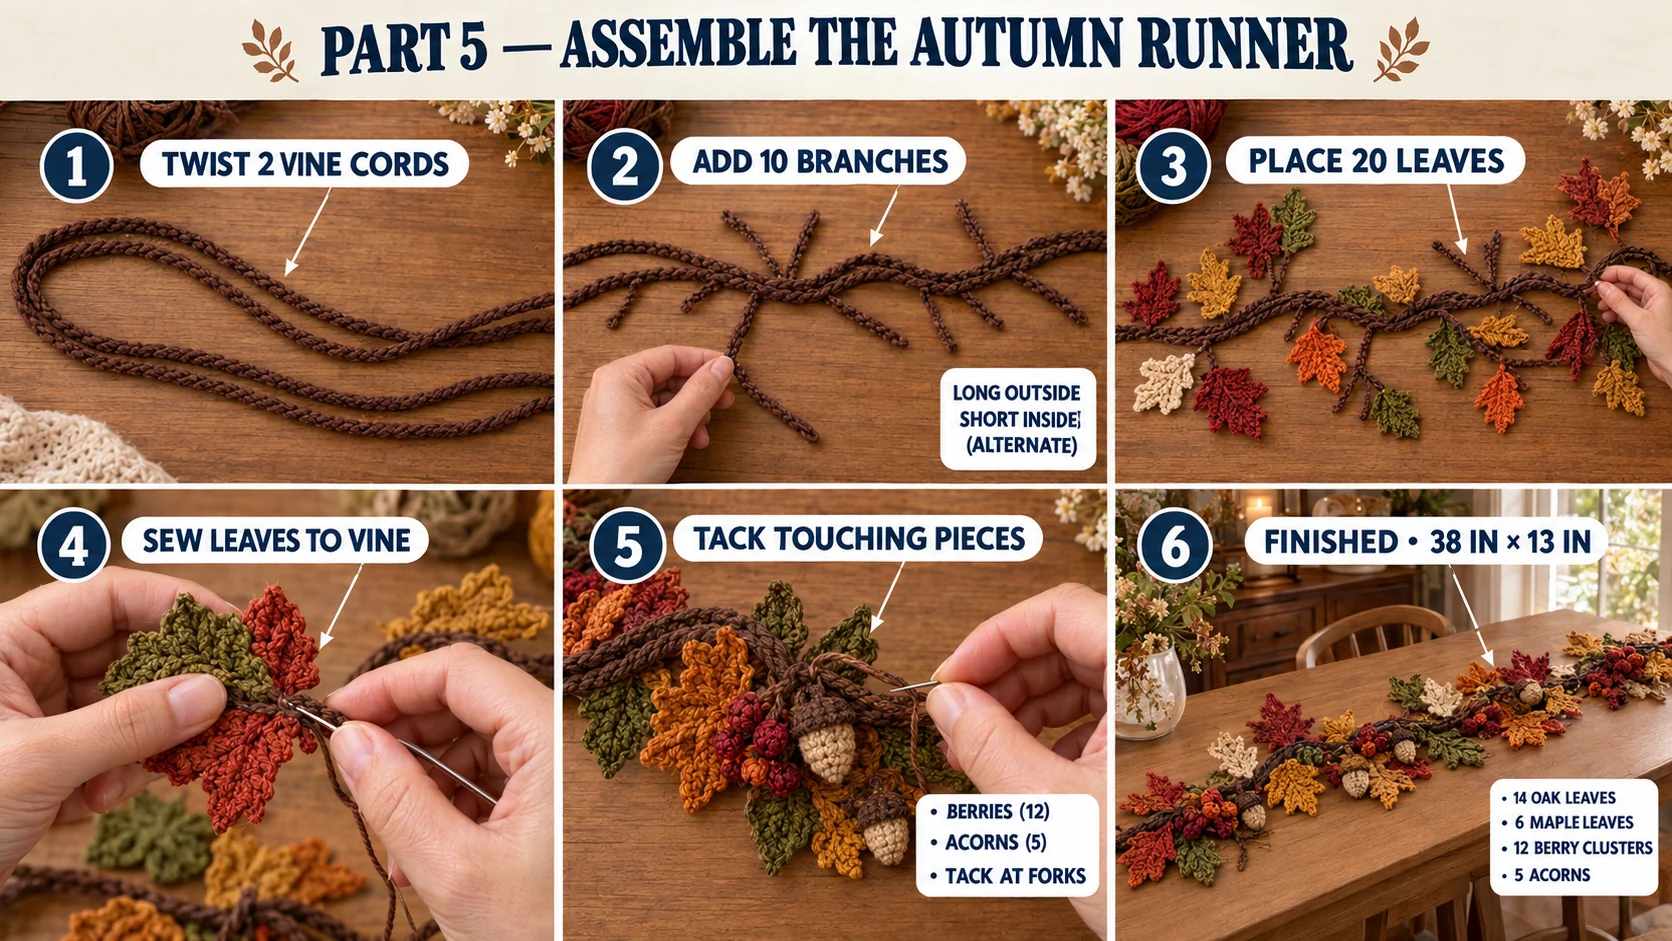
- Make the vine. Lay the two vine cords side by side and twist them loosely around each other, about one twist every 4 in (10 cm). Pin them down in a gentle S-curve about 36 in (90 cm) long, with 3 bends. Whipstitch the two cords together every 1 in (2.5 cm) with brown, and tie the end tails together at each end.
- Add the branches. Pin the 10 branches so they fan out from the vine, alternating left and right. Put the long branches on the outside of each bend, where there's the most room, and the short ones on the inside. Sew each branch's 8-in tail under the vine with 4 or 5 stitches.
- Place the leaves. Put a leaf at the end of each branch, then fill the gaps along the vine with the rest. Start with a cream oak leaf at the top end and finish with a small olive oak leaf at the bottom tip. Keep two leaves of the same color from touching, and spread the 6 maples out, with about one every 6 in (15 cm).
- Sew the leaves on. Tuck each stem under a branch end or under the vine and sew it with its 8-in tail, 5 or 6 stitches deep.
- Tack the leaves to each other. Wherever two leaves touch, sew them together from the back with 2 or 3 small stitches in a matching color. This is what makes the runner lift as one piece. Aim for at least 2 tack points per leaf.
- Add the berries and acorns. Tuck the 12 berry clusters into the forks where branches meet the vine, and sew them on with their tails. Sew the 5 acorns along the vine, cap end toward the vine, at roughly even spacing.
- Lift test. Unpin everything and gently lift one end of the runner. Any leaf that droops or flips needs one more tack. Weave in all the tails on the back.
Care. Hand wash in cool water, press out the water in a towel and dry it flat in its shape. Don't machine wash it, because the tack stitches can catch. The berries and acorns are small parts, so this is table decor, not something for a toddler to play with.
Make it yours — quick variations
| Variation | Change from base pattern |
|---|---|
| Longer table (about 60 in) | Make each vine cord with ch 241 (240 sl st, about 60 in / 150 cm). Add 5 branches, 8 oak leaves, 4 maples, 3 acorns and 7 berry clusters. Add about 180 yd. |
| Narrow shelf or mantel | Use only the short branches and put the leaves close along the vine. The runner ends up about 8 in (20 cm) wide. |
| Harvest wreath | Coil the vine into a circle on a 12-in (30 cm) embroidery hoop or wreath ring and sew the leaves around it. |
| Pumpkin centerpiece | Leave a gap in the middle of the vine and set my crochet pumpkins in it. |
| Single leaves as coasters | A maple leaf in cotton makes a sweet mug rug. My crochet maple leaf pattern is a flatter one-piece version. |
Troubleshooting the three things that go wrong
The oak leaf curls
Your stitches are too tight around the foundation chain. Work the chain a little looser, or make it with a hook one size up and switch back for the lobes. A light mist of water and drying flat under a book fixes a finished leaf.
The maple points look floppy
The picot tips need a firm pull. After you sl st the picot closed, give the yarn a little tug before the next stitch. Cotton holds points much better than acrylic, so check your yarn too.
The runner comes apart when you lift it
There aren't enough tack points. Each leaf needs to touch the vine or a branch, and at least one other leaf, and be sewn at each contact. Turn it over and add tacks wherever you can slide a finger between two pieces.
Frequently asked questions
How long does this table runner take to crochet? About 10 to 12 hours in total. Each oak leaf takes 10 to 15 minutes and each maple about 15. The berries take a couple of minutes each, and the acorns about 20 minutes each. The layout and sewing take another 2 hours. It splits nicely into short evening sessions.
How much yarn do I need? About 330 yd (300 m) of worsted #4 cotton across 8 colors, including sewing tails. The brown vine and branches use the most, at about 80 yd. The smallest amount is brick red, at about 15 yd. One ball of each color covers the whole runner, with plenty left for extra leaves.
Can I use acrylic yarn instead of cotton? Yes, any worsted #4 yarn works. Acrylic is softer and a little fuzzier, so the leaf points and lobes look rounder and less crisp. It's also lighter, so the runner may shift more on the table. If you use acrylic, add a few extra tack points during assembly.
Is there a chart for the layout? No, and you don't need one. The layout rules in Part 5 are enough: alternate colors, long branches outside the bends, and spread the maples out. Every runner ends up a little different, and you can lay the pieces out and rearrange them as many times as you like before you sew.
Can I sell runners made from this pattern? Yes, you're welcome to sell finished runners and single leaves made from this free pattern at markets, on Etsy or as gifts. Please credit "Pattern by Wavode" in your listing and link back to this page. What you can't do is republish this write-up or my photos as your own pattern.
Related patterns on Wavode
- Crochet maple leaf pattern: a 20-minute fall appliqué in rust and mustard.
- Crochet amigurumi acorns: bigger, kawaii-style acorns to scatter around the runner.
- How to crochet a pumpkin: a no-increase pumpkin for the middle of the table.
- Autumn patchwork Tunisian blanket: sage, mustard, terracotta and cream squares for the couch.
- Crochet Christmas tree decorations: the next centerpiece when the leaves come off the table.
Made this runner? Tag #wavodecrochet on Pinterest. I re-pin every finished make and credit the maker.
Pattern by Clara Hartwell for Wavode. Questions? Email me at support@wavode.com.