Crochet Ribbed Beanie

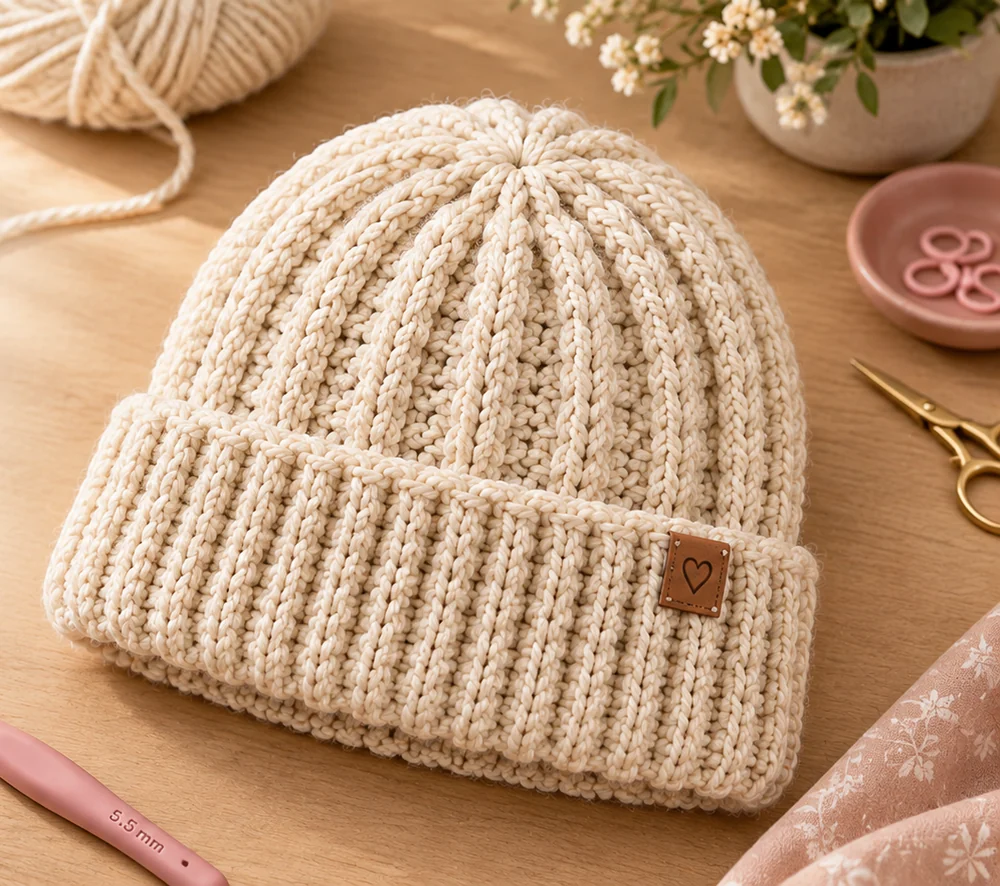
This free crochet ribbed beanie pattern makes a cozy, knit-look hat with a deep fold-up brim, in three adult sizes. It's worked flat and sideways in half double crochet. Then you seam it into a tube and gather the top, and the ribs meet in a neat swirl at the crown. You'll need about 200 yards of worsted #4 yarn and a 5.5 mm hook, and it takes 3 to 4 hours.
Key Takeaways
- Just one stitch: half double crochet, worked in two different loops.
- No increases, no rounds. It's a flat rectangle, seamed and gathered.
- Budget ~180–250 yd (165–230 m) of worsted #4, depending on size.
- Height and width are easy to change. Add stitches for more slouch and rows for more width.
Why I love this ribbed beanie
This is the hat people ask about, because it doesn't look crocheted. The body has neat columns that read like knit stockinette, and the brim has deep, springy ribs. Most people guess it's hand-knit.
The trick is working sideways. Every row runs from the brim to the crown. So when you gather the top, the rows turn into ribs that all point to the center. That's the starburst you see from above, and you get it without any crown decreases.
It's also the most forgiving hat I make. There's no round counting and no joining seam to line up round after round. If it's too big, you take out a few rows. If it's too small, you add a few. You can check the fit before you sew anything.
Skill level. Beginner. If you can make a half double crochet, you can make this hat. The only new idea is where you put the hook, and I show you both spots below.
Want something to match? My Tunisian crochet ribbed scarf has the same cream, knit-look ribs. And if you'd like a bigger texture project next, try my oversized bobble crochet scarf.
What you'll need
Yarn
- About 200 yd (185 m) of worsted #4 yarn in cream or oatmeal. A smooth wool blend shows the ribs best. Lion Brand Wool-Ease in Fisherman (197 yd / 180 m per 85 g skein) is a good match. Buy 2 skeins for any size, from the same dye lot.
- By size, plan on 160–190 yd (S), 180–220 yd (M) and 210–250 yd (L).
- A fuzzy or splitty yarn blurs the texture. Save it for a different hat.
Hook and notions
- 5.5 mm (US I-9) hook.
- 2 locking stitch markers.
- A tapestry needle and scissors.
- Optional: a small faux-leather label and a sewing needle with matching thread.
Gauge
In the body pattern: 13 sts × 11 rows = 4 in (10 cm), relaxed.
To check it, chain 15. Work Row 1 as written below, then work 10 more rows of hdc in the third loop on those 13 sts. Measure without stretching.
The stitches set the hat's height, and the rows set how big around it is. If your swatch is bigger, go down to a 5 mm hook. If it's smaller, go up to 6 mm. You can also just add or remove rows. The fit check in Part 3 catches either way.
Abbreviations (US crochet terms)
- ch = chain
- hdc = half double crochet
- BLO = back loop only
- st(s) = stitch(es)
- rep = repeat
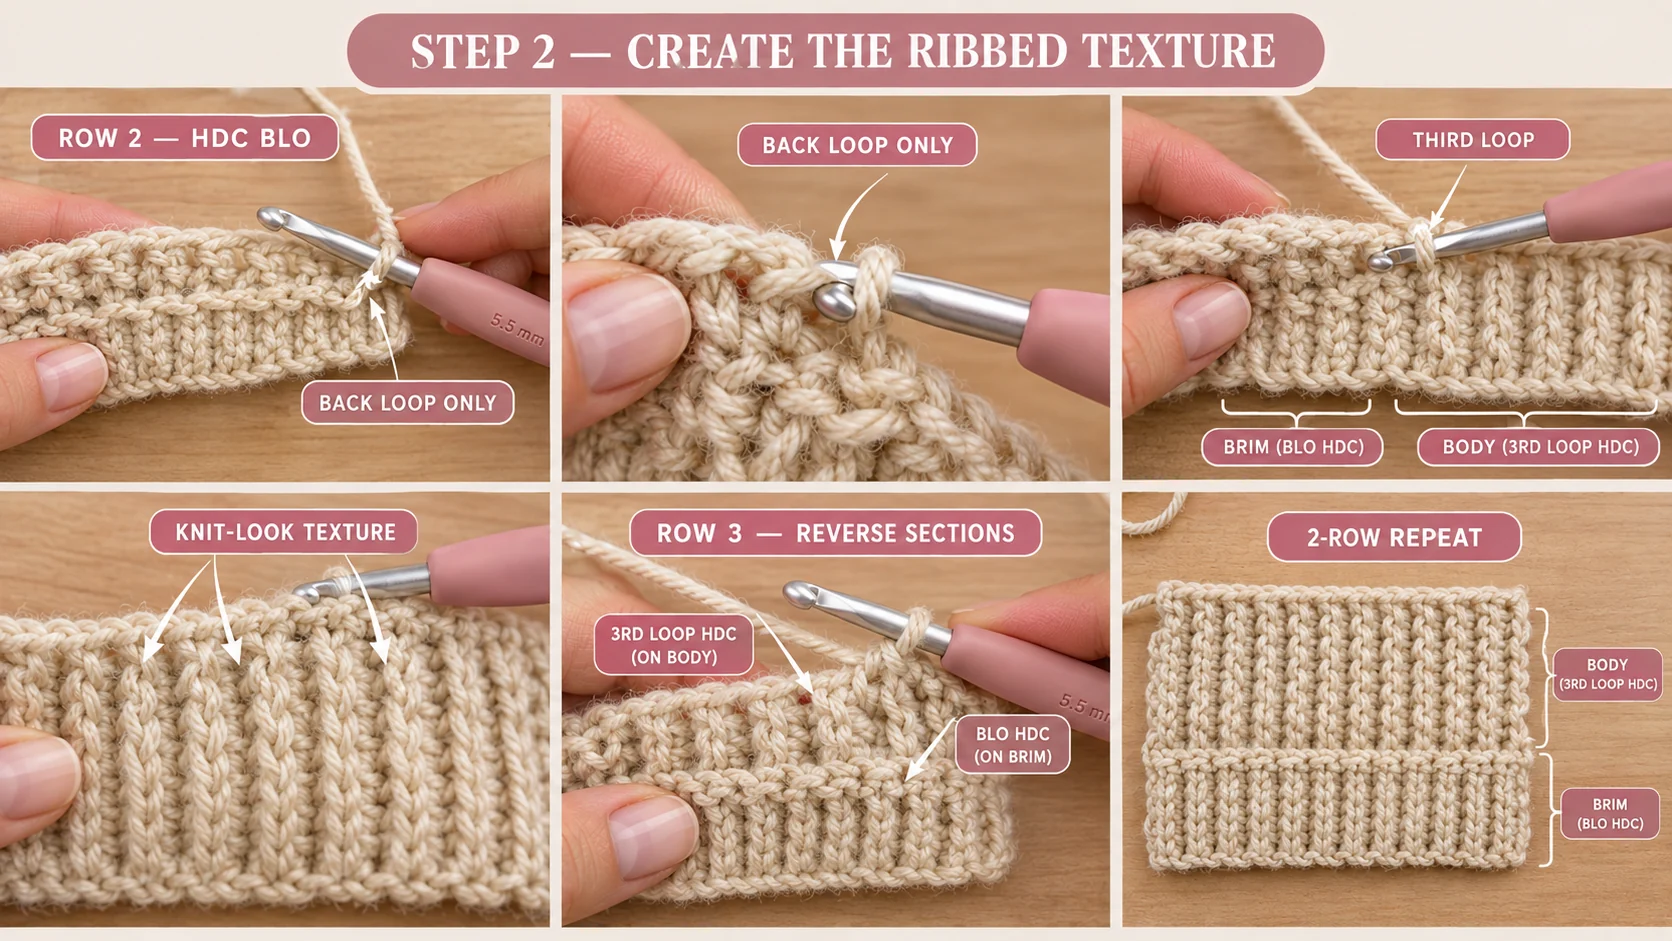
Hdc in the third loop: Look at the back of a hdc, just below its two top loops. There's a horizontal bar there. That's the third loop. Yarn over, insert the hook under that bar only, and finish the hdc as usual. Both top loops get pushed toward you, and that's what makes the knit-look columns.
Hdc BLO: Yarn over, insert the hook under the back top loop only (the one farther from you), and finish the hdc as usual. This makes the deep ribs on the brim.
UK crocheters: this pattern uses US terms. US half double crochet = UK half treble.
Sizes and finished measurements
Numbers are for S (M, L). If only one number is given, it's the same for all sizes.
| S | M | L | |
|---|---|---|---|
| Fits head | 20–21 in (51–53 cm) | 21.5–22.5 in (55–57 cm) | 23–24 in (58–61 cm) |
| Hat around, unstretched | 18 in (46 cm) | 19.5 in (50 cm) | 21 in (53 cm) |
| Height, brim folded | about 8.25 in (21 cm) | about 9 in (23 cm) | about 9.5 in (24 cm) |
| Folded brim | 2.5 in (6 cm) | 2.75 in (7 cm) | 3 in (7.5 cm) |
The hat is about 2 in smaller around than the head. That's on purpose. The ribs stretch, and that stretch is what keeps a beanie from sliding down.
How the hat is built
Here's the whole idea in plain words. You make a rectangle, sideways.
- The stitches in each row run from the brim edge to the crown edge. The brim part is worked in BLO, and the body part is worked in the third loop.
- The rows stack up to make the hat's width, all the way around the head.
- Then you sew the first row to the last row to make a tube, gather the crown edge closed, and fold the brim up.
Each pair of rows makes one rib. That's why the row counts are all even, so the seam falls neatly between two ribs.
The pattern — step by step
Turn at the end of every row. The ch 1 at the start of a row doesn't count as a stitch. Work the first hdc of each row into the first stitch.
Part 1 — Foundation
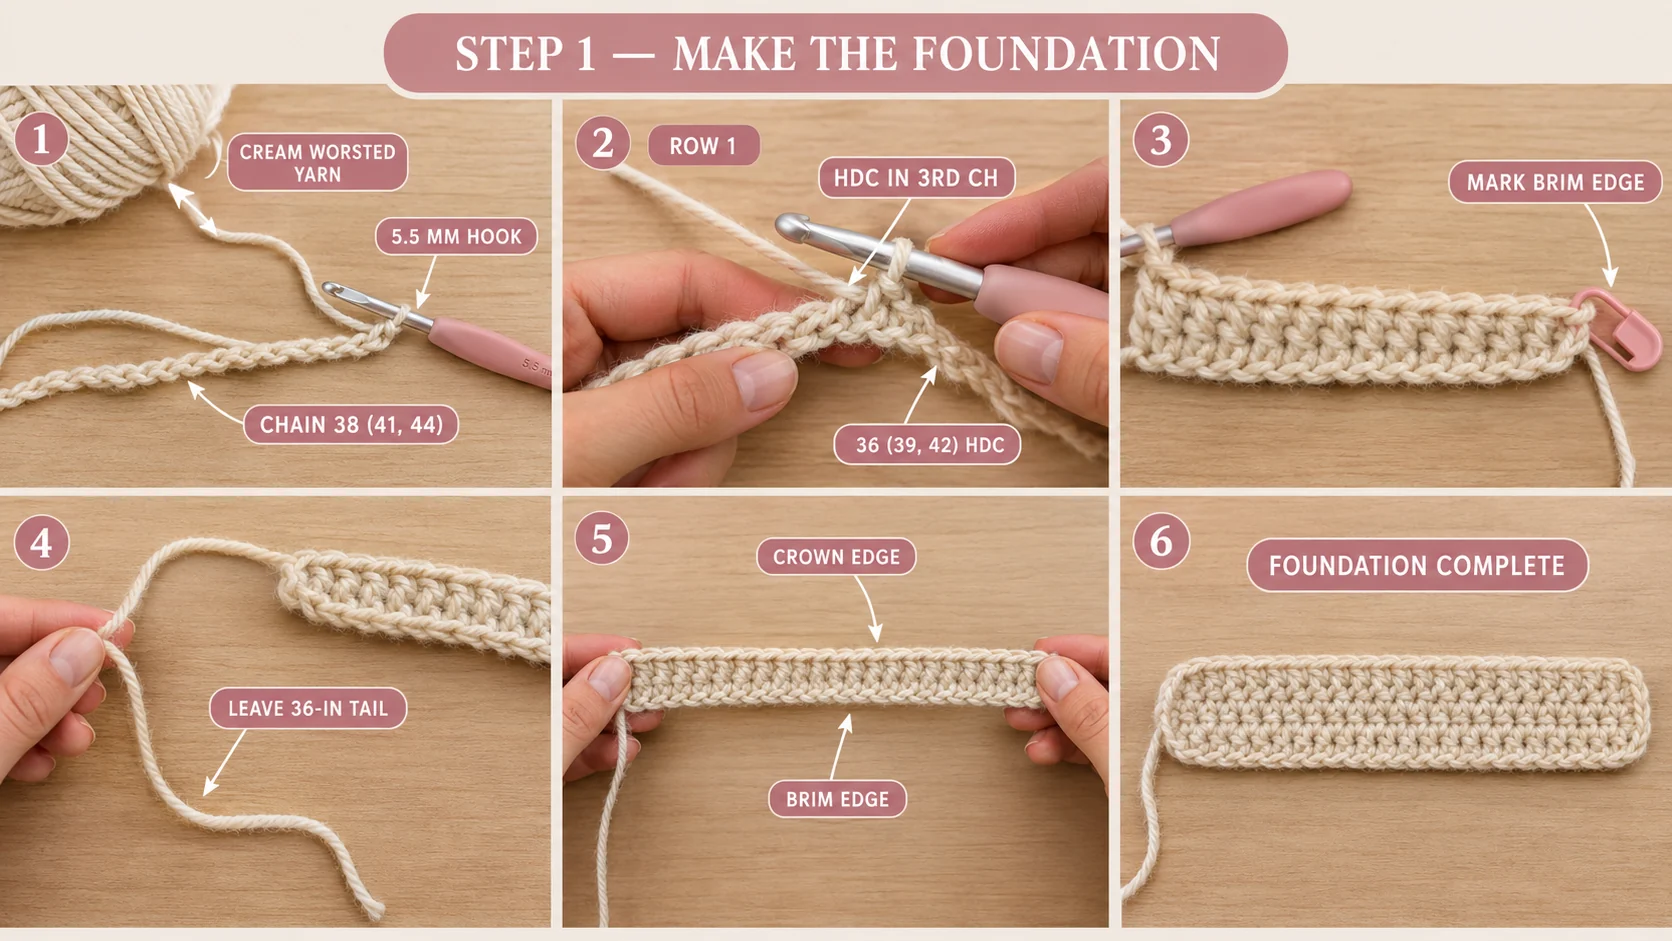
Leave a 36-in (90 cm) starting tail. You'll use it for the side seam.
Foundation: Ch 38 (41, 44).
Row 1: Hdc in the 3rd ch from the hook and in each ch across. Turn. (36 (39, 42) hdc)
The slipknot end of your chain is the brim end. Put a marker in the last hdc you made, right next to the starting tail, to show where the brim is. As the rows stack up, that end grows into the long brim edge of the rectangle, and the other end grows into the long crown edge.
Part 2 — The 2-row pattern
Every row has a brim section of 16 (18, 20) sts and a body section of 20 (21, 22) sts.
Row 2 (starts at the brim edge): Ch 1, hdc BLO in the first 16 (18, 20) sts, hdc in the third loop in the last 20 (21, 22) sts. Turn. (36 (39, 42) hdc)
Row 3 (starts at the crown edge): Ch 1, hdc in the third loop in the first 20 (21, 22) sts, hdc BLO in the last 16 (18, 20) sts. Turn. (36 (39, 42) hdc)
An easy way to remember the pair: Row 2 opens with the BLO brim stitches, and Row 3 opens with the third-loop body stitches. Both rows cover both sections.
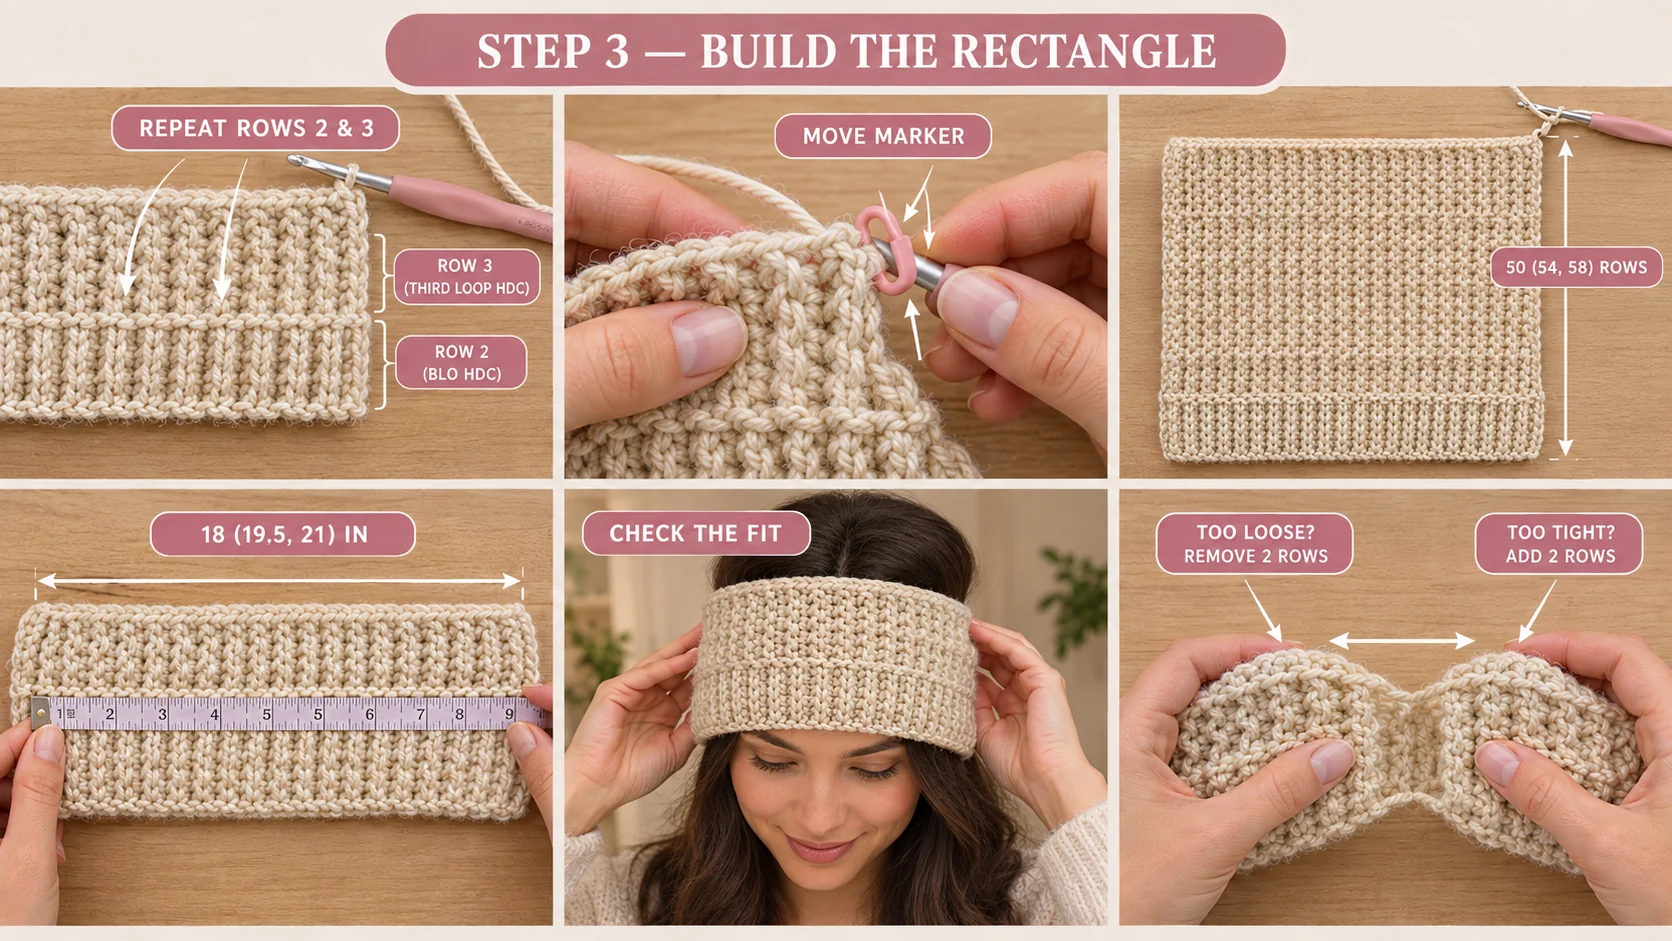
Move the marker up into the switch point between the two sections every few rows. It keeps you from drifting a stitch.
The edge stitch is easy to miss. The last stitch of every row hides a little against the turning chain. If you have 35 (38, 41) sts at the end of a row, this is almost always why. Count every row until the rhythm feels automatic.
Part 3 — Work the width and check the fit
Rows 4–50 (54, 58): Rep Rows 2 and 3. End after an even-numbered row (a Row 2).
You now have 50 (54, 58) rows, and the rectangle measures about 18 (19.5, 21) in along the brim edge. Lay it flat with the ribbing at the bottom: the rows run up and down, so you count them across the width.
Check the fit before you fasten off. Wrap the rectangle around your head, with the brim edge at your forehead. The two short edges should meet with a gentle stretch. Too loose? Take out 2 rows. Too tight? Add 2 rows. Always add or remove 2 rows at a time to keep the ribs even.
Fasten off at the crown edge, leaving a 36-in (90 cm) ending tail for the crown.
Part 4 — Sew the side seam
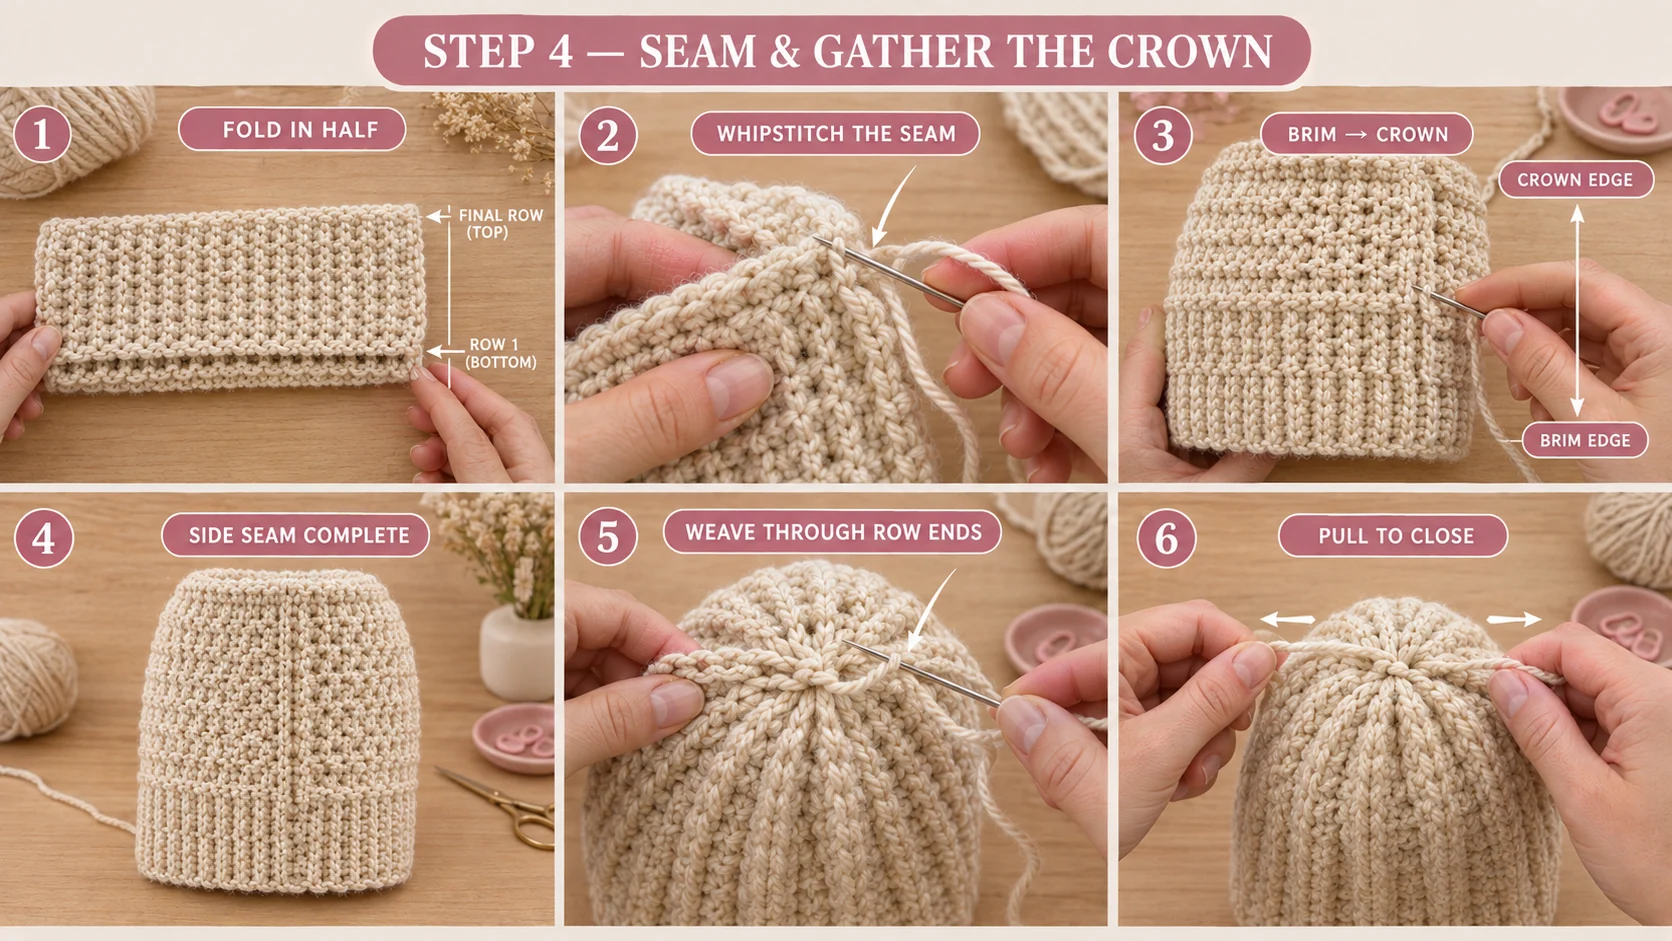
- Fold the rectangle in half so Row 1 and the last row meet, with the side you like best facing in. The starting tail now sits at the brim end of the seam, and the ending tail at the crown end.
- Thread the starting tail (at the brim edge) onto your tapestry needle.
- Whipstitch the seam from the brim edge to the crown edge. Go through one loop of the foundation chain and the matching loop of the last row, stitch by stitch. Keep it snug but not tight, or the seam won't stretch with the ribs.
- Stop at the crown edge and weave the tail down into the seam for 2 in. Trim it.
About the cuff. The brim folds up and out, so the bottom 2.5 (2.75, 3) in of the seam will show on the outside of the cuff. A whipstitch through single loops sits flat on both sides, so it barely shows. Put the seam at the center back when you wear it.
Part 5 — Gather the crown
- Turn the hat right side out. Thread the ending tail onto your tapestry needle.
- Weave the tail in and out through the end of each row along the crown edge, all the way around. Go through the post of the edge stitch, not just the surface.
- Pull the tail firmly to close the top. The rows bunch into a tight circle, and the ribs spread out like spokes.
- Go around a second time through the same row ends and pull again. That closes the last little hole.
- Take the needle to the inside and knot it. Weave the tail in for 2 in, then turn and go back the other way.
Part 6 — Finishing
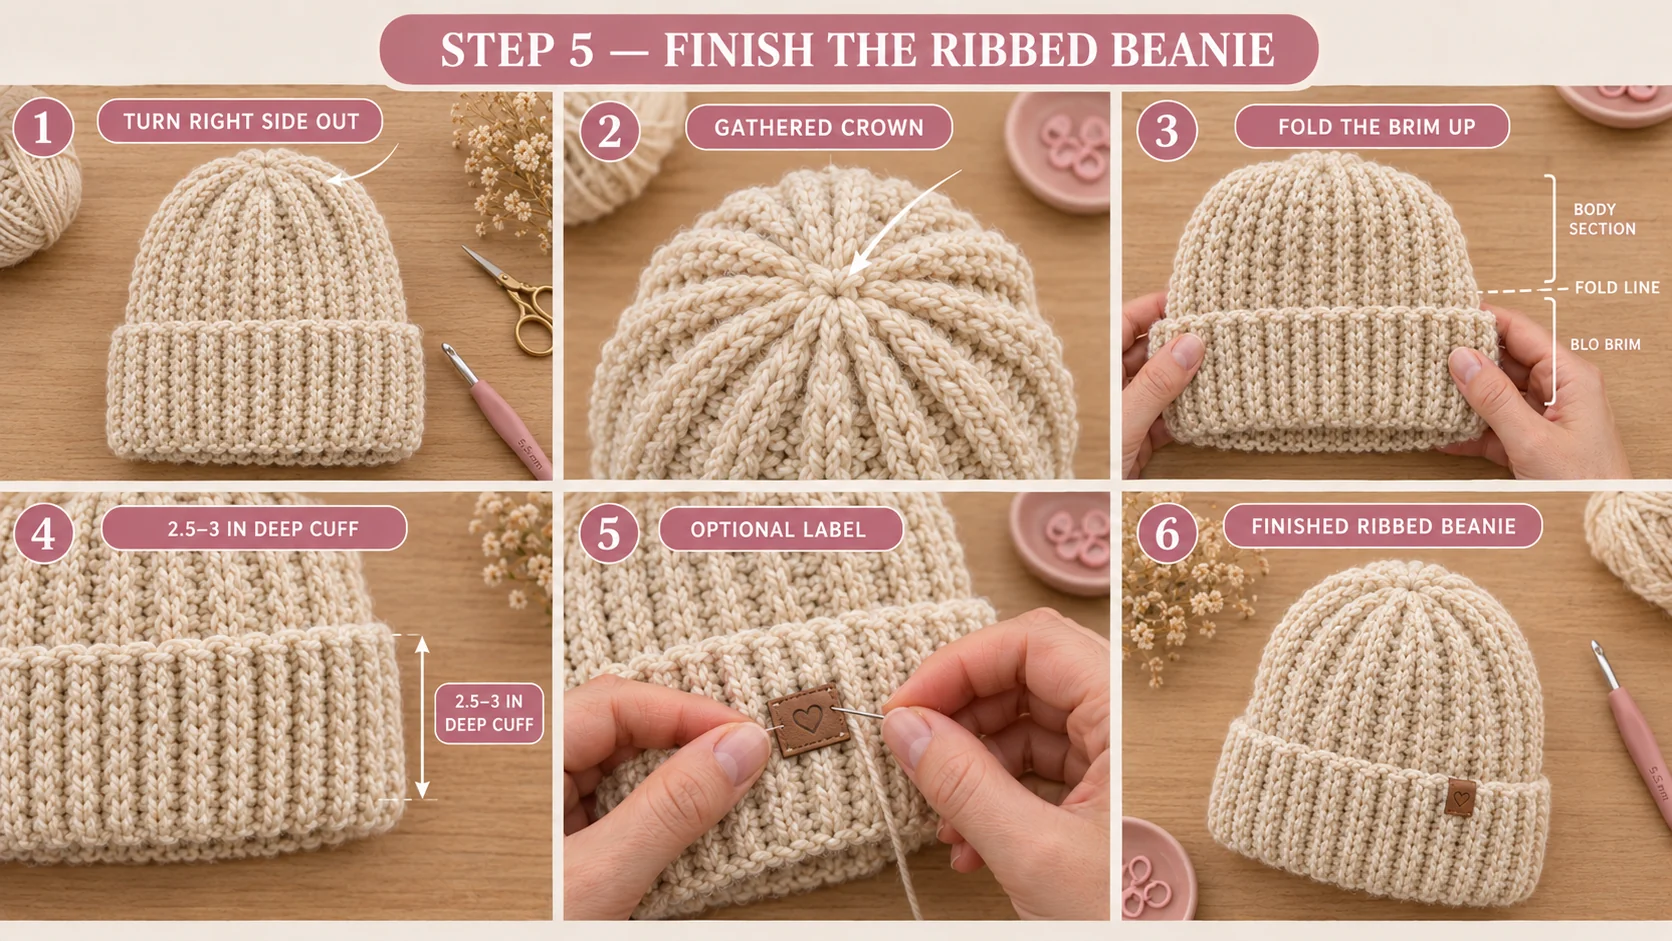
- Fold the brim up. Fold the ribbed section in half, up and out. The top edge of the cuff lands right where the ribs meet the body section. The cuff ends up 2.5 (2.75, 3) in deep.
- Optional: add a label. Sew a small faux-leather tag onto the side of the cuff, away from the seam, with a sewing needle and thread. Sew through the outer layer of the cuff only, so it still folds.
- Optional: block it lightly. Mist the hat with water and let it dry flat or over a bowl. Don't press or iron it, because that flattens the ribs.
Make it yours — quick variations
| Variation | Change from base pattern |
|---|---|
| Snug fit, no slouch | Work 3 fewer body sts in every row, and ch 3 fewer to start. The hat is about 1 in shorter. |
| Extra slouch | Work 4–6 more body sts in every row, and ch the same number more to start. Add about 15 yd of yarn. |
| No-fold brim | Work the brim section on half the sts (8 (9, 10)) and ch 8 (9, 10) fewer to start. Don't fold it. The hat stays the same height, but the brim is a single layer, so it's a little less warm. |
| Pom-pom | Make a 3-in pom-pom and sew it to the gathered crown with its tie ends. Add about 25 yd. |
| Two-tone | Work the brim section in a second color. Use one ball per color and twist the two yarns at the switch point in every row. Or change color every 10 rows for wide vertical stripes. |
| Matching set | Pair it with my Tunisian crochet ribbed scarf in the same cream. |
Troubleshooting the three things that go wrong
The hat is getting shorter on one edge
You're losing a stitch, almost always the last one in a row. It hides beside the turning chain. Count to 36 (39, 42) at the end of each row, and keep the marker at the switch point so you'll spot it early.
The crown won't close all the way
The tail is only catching the surface of the row ends. Go around again and put the needle through the post of each edge stitch. Pull slowly and firmly. If a small hole is still left, a few stitches across it on the inside will close it.
The brim is too loose
The hat is too big around, or the ribs have relaxed. Take out 2–4 rows before seaming. If it's already sewn, run a strand of matching yarn through the inside of the fold and pull it in gently, then knot it.
Frequently asked questions
How long does this ribbed beanie take to make? About 3 to 4 hours for size M. The rows are short, so it goes quickly. The seam and crown take another 20 minutes or so. Size S is closer to 3 hours, and size L closer to 4. It's a good one-evening project once you know the stitch.
How much yarn do I need? About 200 yd (185 m) of worsted #4 for size M. Plan on 160–190 yd for S, 180–220 yd for M and 210–250 yd for L. Your tension and yarn brand shift that. Two skeins of a 197 yd yarn cover every size, with some left over for a pom-pom.
Is this crochet beanie beginner friendly? Yes. It uses only half double crochet and a 2-row repeat. It's worked flat, so there are no rounds to count and no increases. The only new idea is the third loop, and it takes about two rows to get used to. It makes a good first hat.
Can I use a different yarn weight? Yes, but you'll need to redo the numbers. Measure your gauge in the third-loop stitch. Multiply the stitches per inch by the total height, including the double brim (12 in for size M), for the stitch count. Multiply the rows per inch by 2 in less than the head size for the row count. Keep the row count even.
How do I wash it? Follow the yarn label. Wool-Ease can go in the machine on a gentle cycle in a mesh bag, then dry flat. For pure wool, hand wash in cool water, squeeze it out in a towel and dry it flat. Don't hang it, because the weight will stretch the ribs.
Can I sell hats made from this pattern? Yes, you're welcome to sell finished hats made from this free pattern at markets, on Etsy or as gifts. Please credit "Pattern by Wavode" in your listing and link back to this page. What you can't do is republish this write-up or my photos as your own pattern.
Related patterns on Wavode
- Tunisian crochet ribbed scarf: a 60-inch cream wrap with knit-look ribs.
- Oversized bobble crochet scarf: a chunky rust wrap with staggered bobbles and a long fringe.
- Chunky striped crochet scarf: two colors, one stitch, about two hours.
- Navy and cream striped crochet sweater: a half double crochet pullover in 5 sizes.
Made this beanie? Tag #wavodecrochet on Pinterest. I re-pin every finished make and credit the maker.
Pattern by Clara Hartwell for Wavode. Questions? Email me at support@wavode.com.