Crochet Sewing Machine Keychain

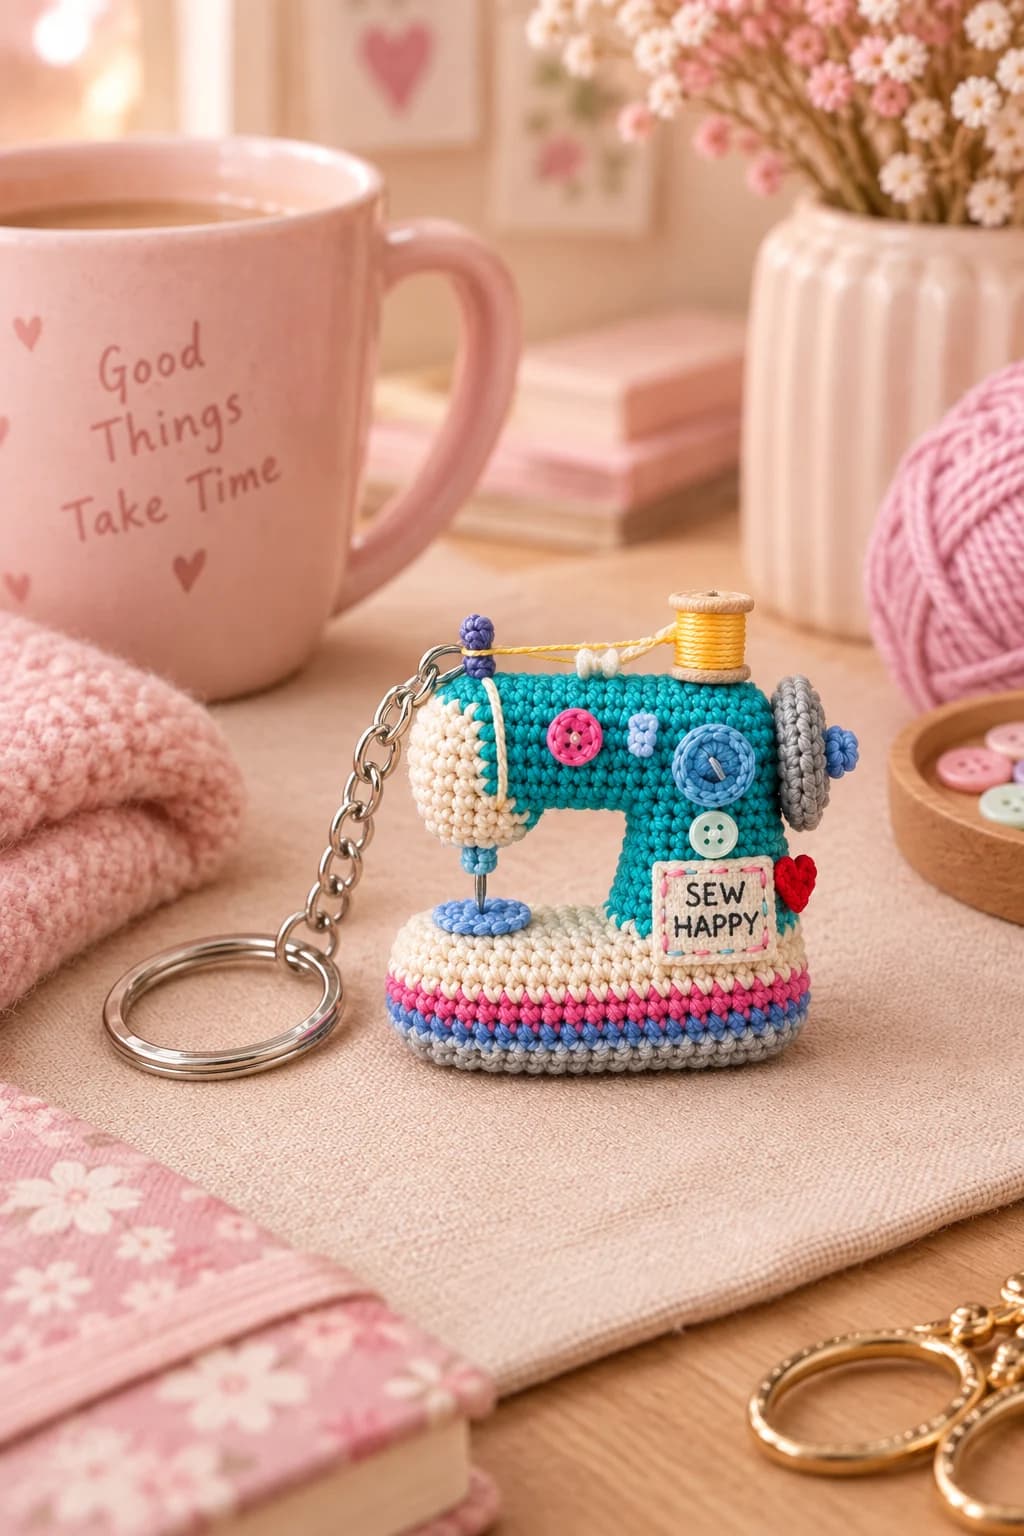
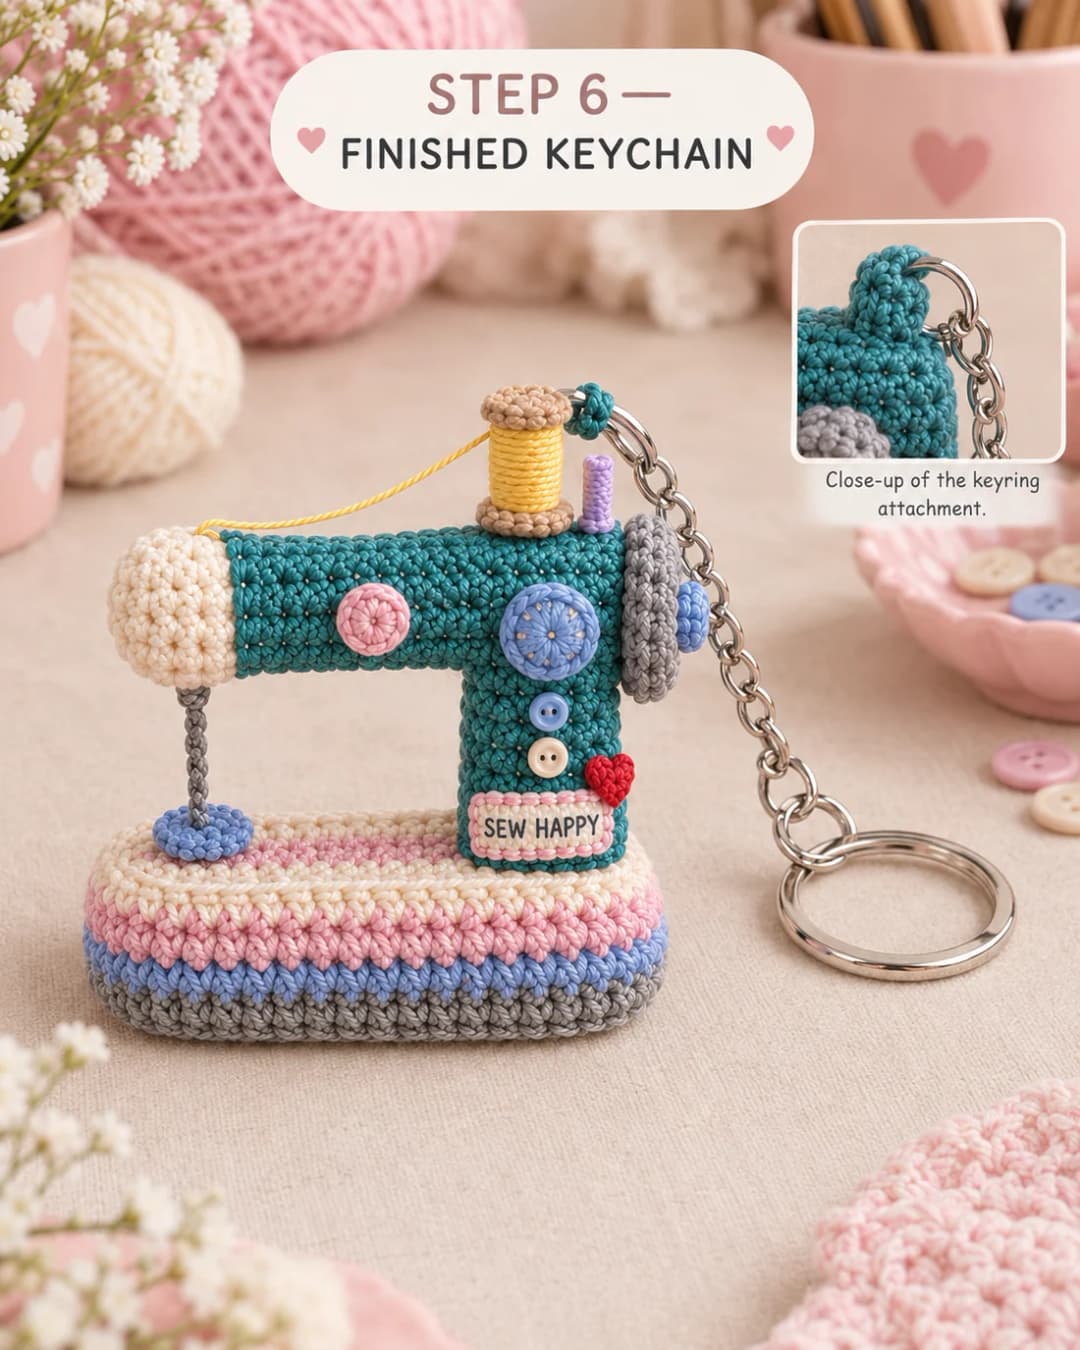
This free crochet sewing machine keychain pattern makes a 2.3-inch mini machine in teal and cream, on a striped base, with a yellow thread spool, a handwheel, tiny buttons and a "Sew Happy" label. Every piece is a small tube or circle in single crochet, so it's all amigurumi basics. You'll need about 35 yards of DK cotton scraps in 9 colors, a 2.5 mm hook and 3 to 4 hours.
Key Takeaways
- Three main pieces: a striped oval box for the base, a teal pillar and a teal arm with a cream head.
- Details: a handwheel, presser foot, dial, 3 buttons, a thread spool, a spool pin, a label and a heart.
- Scrap-friendly: about 35 yd (32 m) of DK #3 cotton in total. Teal uses the most, at about 10 yd.
- Safe needle: the needle is a crocheted cord, not a real one.
Why I love this keychain
Every maker I know has a bag full of tools and nowhere to hang a charm that says so. This little machine is the gift I make for sewing friends, quilting groups and the crochet swap every December. It's recognizable from across the room, and it's small enough to finish in one evening.
It's also the best scrap project I have. None of the colors needs more than a few yards, so the odd leftovers of teal, pink and yellow finally get a job.
And it's forgiving. The machine is three stuffed shapes sewn together. If the arm comes out a round too long, it just becomes a longer machine.
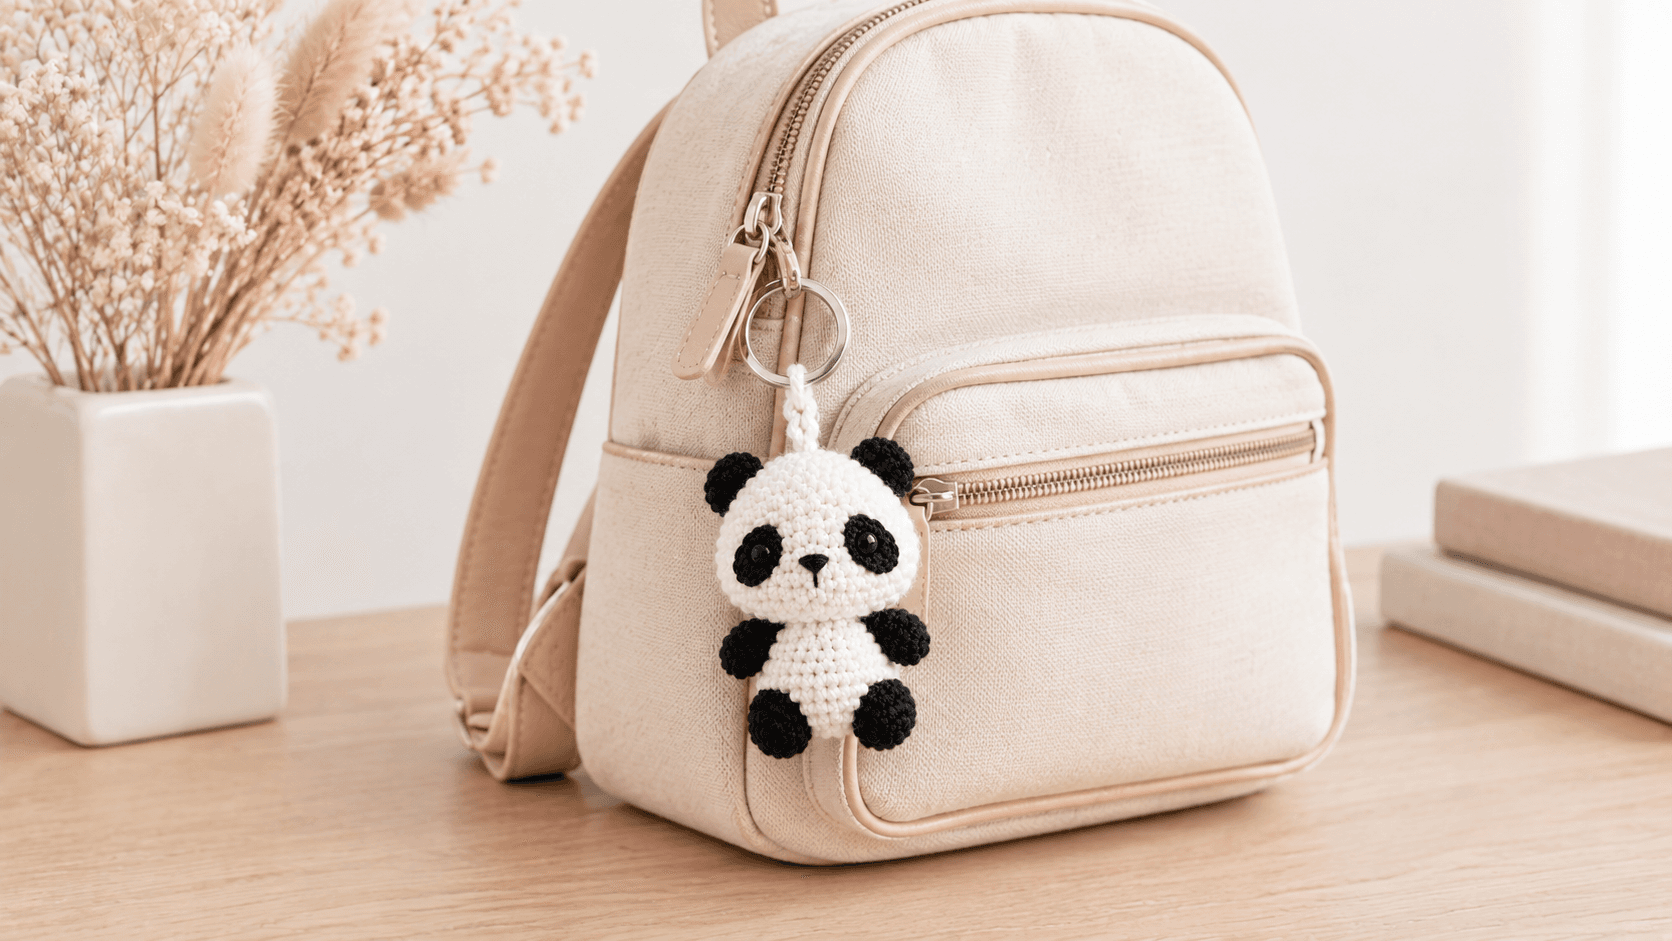
Skill level. Easy. You need a magic ring, sc, sl st, inc, dc, a French knot and a little backstitch. If you've made one of my small keychains, like the panda keychain, you already know every stitch here.
What you'll need
Yarn: DK #3 cotton, such as Paintbox Yarns Cotton DK. Cotton gives crisp stitches and keeps its shape on a keyring. Everything here comes from scraps.
| Color | Used for | Amount |
|---|---|---|
| Teal | Pillar, arm, keyring loop | about 10 yd |
| Cream | Head, base rim and top, label | about 8 yd |
| Grey | Base bottom and 2 stripes, handwheel, needle | about 6 yd |
| Pink | 2 base stripes, button, label border | about 4 yd |
| Periwinkle blue | 1 base stripe, dial, presser foot, wheel knob, tiny button | about 3 yd |
| Yellow | Thread spool, thread | about 2 yd |
| Tan | 2 spool ends | about 1 yd |
| Lavender | Spool pin | about 1 yd |
| Red | Heart | about 1 yd |
I counted the stitches to get those amounts. The whole machine uses about 35 yd (32 m), including sewing tails.
Hook and notions
- 2.5 mm (US B/C) hook.
- A tapestry needle and a sharp embroidery needle.
- Dark grey embroidery floss for the lettering.
- A stitch marker and a little polyester fiberfill.
- A 25 mm split keyring, a 6 mm jump ring and 2 flat-nose pliers. A short keychain chain is optional.
Gauge and finished size
Gauge isn't critical. Your stitches should be tight enough that the stuffing doesn't show through. If it does, go down to a 2.25 mm hook.
Finished machine: about 2.3 in (6 cm) wide and 2 in (5 cm) tall, not counting the keyring. The base is about 2.1 in (5.5 cm) long.
Abbreviations (US crochet terms)
- ch = chain
- sl st = slip stitch
- sc = single crochet
- dc = double crochet
- inc = 2 sc in the same stitch
- BLO = back loop only
- MR = magic ring
- st(s) = stitch(es)
- rnd(s) = round(s)
Work in continuous rounds unless I say to join. Move your marker up at the start of every round.
Color change: Work the last sc of the old color until 2 loops are left on the hook. Finish it with the new color.
UK crocheters: this pattern uses US terms. US single crochet = UK double crochet, and US double crochet = UK treble.
The pieces at a glance
| Piece | Make | Color |
|---|---|---|
| Base (bottom, striped wall, top) | 1 | grey, blue, pink, cream |
| Pillar | 1 | teal |
| Arm with head | 1 | cream, then teal |
| Presser foot | 1 | blue |
| Needle | 1 | grey |
| Handwheel with knob | 1 | grey, blue |
| Button and dial | 1 each | pink, blue |
| Tiny buttons | 2 | blue, cream |
| Thread spool with 2 ends | 1 | yellow, tan |
| Spool pin | 1 | lavender |
| Label | 1 | cream, pink border |
| Heart | 1 | red |
| Keyring loop | 1 | teal |
The pattern — step by step
Part 1 — The striped base
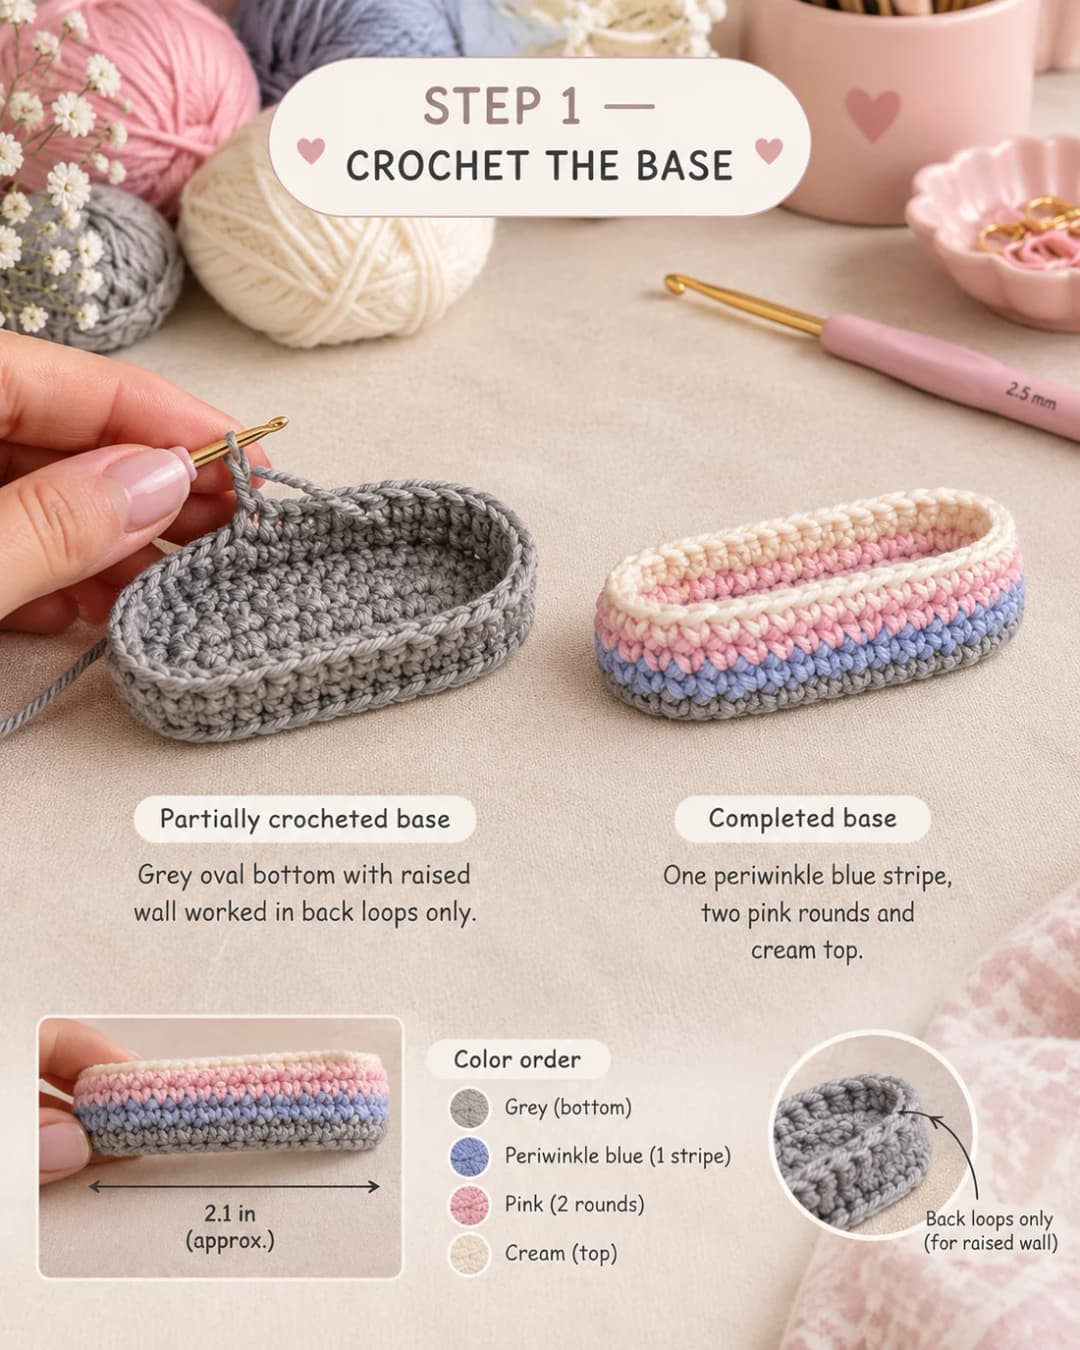
The base is a flat oval box. The bottom and the top are the same oval, and the wall between them carries the stripes.
Bottom (grey):
- Rnd 1: Ch 11. Sc in the 2nd ch from the hook and in each of the next 8 ch, 3 sc in the last ch. Working along the other side of the chain, sc in each of the next 8 ch, 2 sc in the last ch. (22)
- Rnd 2: Inc in the first st, sc in each of the next 8 sts, inc in each of the next 3 sts, sc in each of the next 8 sts, inc in each of the last 2 sts. (28)
Wall:
- Rnd 3 (grey): Sc in BLO of each st around. (28) The BLO ridge turns the edge up, so the bottom stays flat.
- Rnd 4 (grey): Sc in each st around. (28) Change to blue on the last st.
- Rnd 5 (blue): Sc in each st around. (28) Change to pink on the last st.
- Rnds 6–7 (pink): Sc in each st around. (28) Don't fasten off. Leave the pink loop on a marker.
At this point you have an open oval tray, grey underneath, with one blue and two pink stripes.
Top (cream): Work Rnds 1–2 as the bottom. (28) Fasten off and weave in the ends.
Close the box: Stuff the tray lightly and set the cream oval on top, RS out, with its ends lined up with the ends of the wall. Pick up the pink loop and change to cream. Rnd 8 (cream): sc through both the wall and the top oval, one st at a time, all the way around. Add a little more stuffing before you close the last few sts. (28) Sl st in the next st and fasten off. Weave the end inside.
The base should be about 2.1 in long and 0.9 in deep: grey, one blue stripe, two pink rounds and a cream rim.
Part 2 — The pillar and the arm
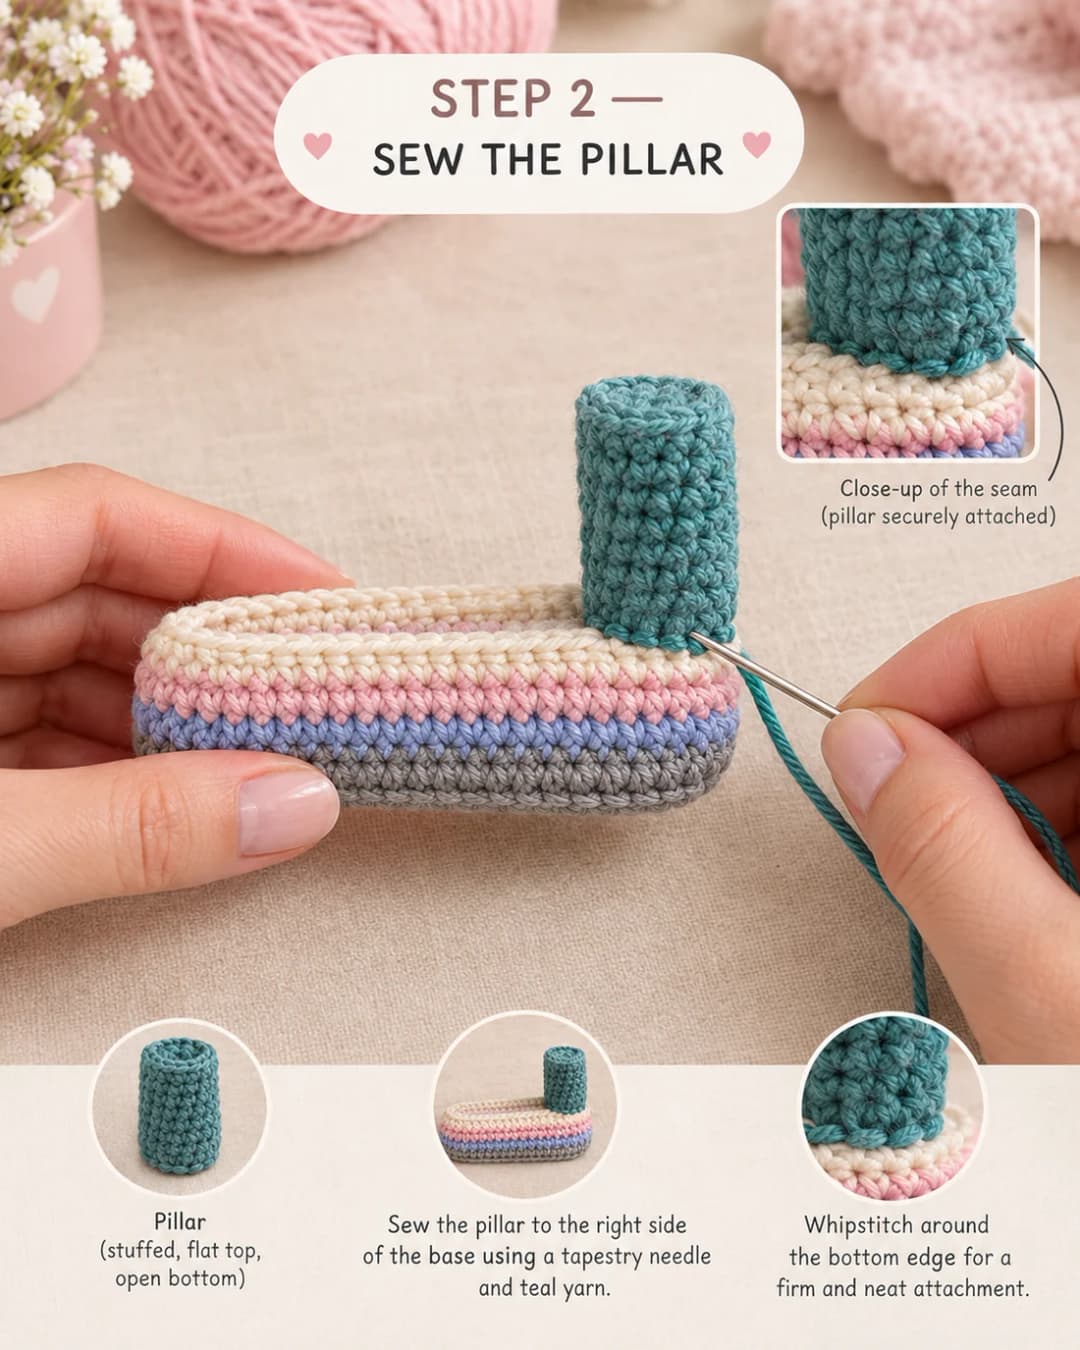
Pillar (teal): The oval start is the top of the pillar. The open end is sewn to the base.
- Rnd 1: Ch 7. Sc in the 2nd ch from the hook and in each of the next 4 ch, 3 sc in the last ch. Working along the other side, sc in each of the next 4 ch, 2 sc in the last ch. (14)
- Rnd 2: Sc in BLO of each st around. (14) This makes the flat top.
- Rnds 3–7: Sc in each st around. (14)
- Sl st in the next st and fasten off, leaving a 12-in (30 cm) tail. Stuff it firmly enough to stand up on its own.
Sew the pillar on. Stand the pillar on the right end of the cream base top, open end down. Whipstitch all the way around the open edge with the teal tail. Go around twice. This seam carries the weight of the whole machine on a keyring.
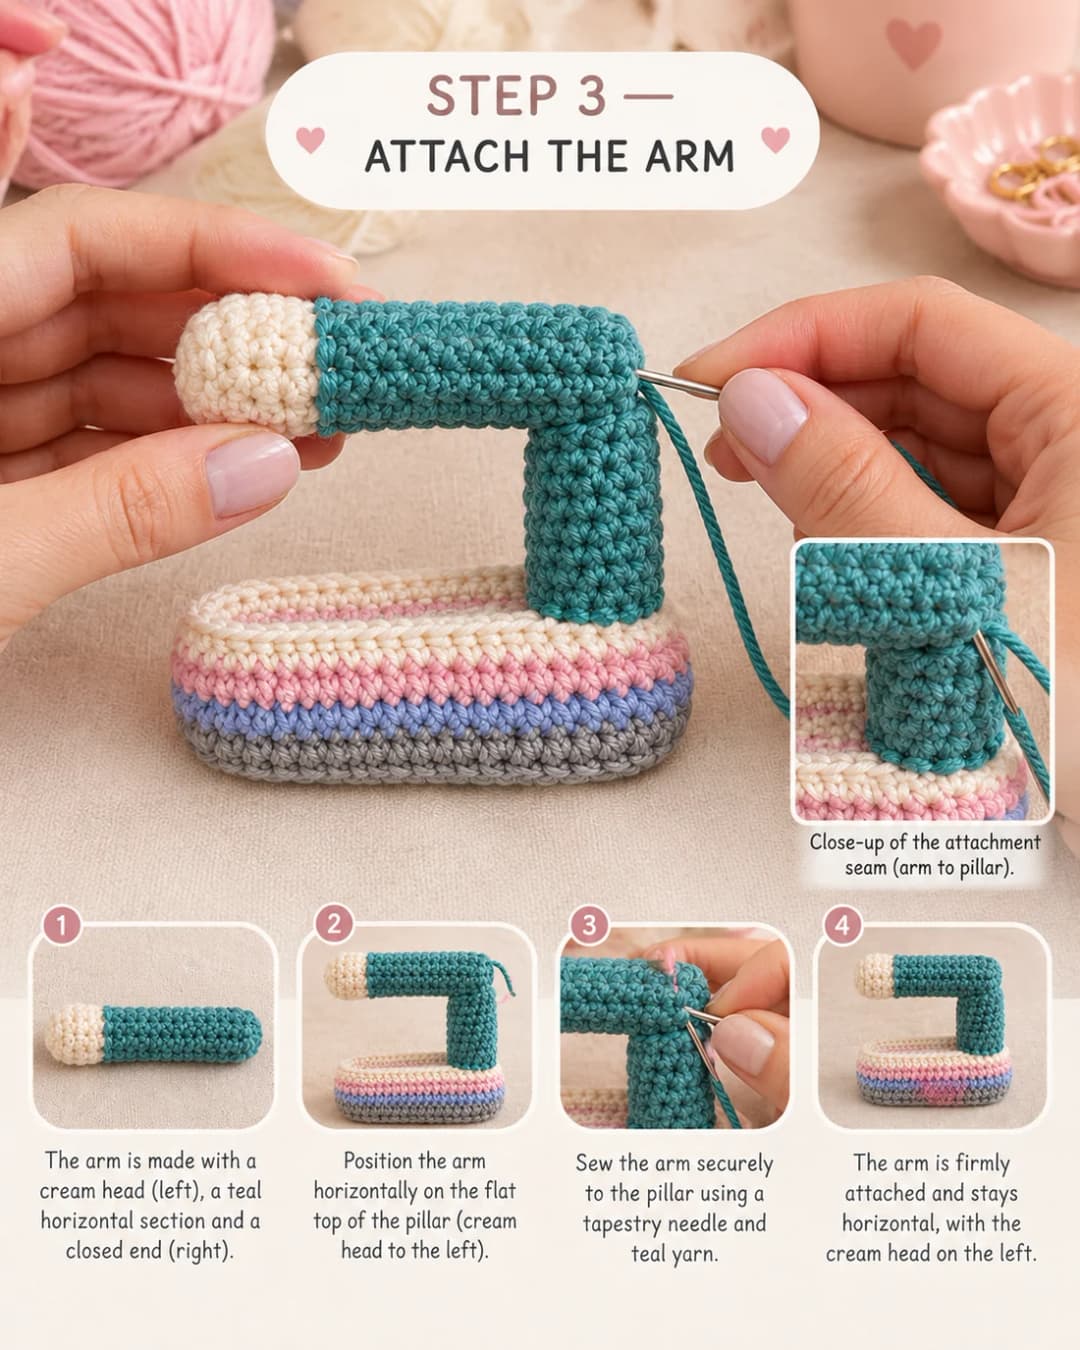
Arm with head: The oval start is the rounded left end of the head. The closing is the right end of the arm, which sits on top of the pillar.
- Rnd 1 (cream): Ch 6. Sc in the 2nd ch from the hook and in each of the next 3 ch, 3 sc in the last ch. Working along the other side, sc in each of the next 3 ch, 2 sc in the last ch. (12)
- Rnds 2–4 (cream): Sc in each st around. (12) Change to teal on the last st of Rnd 4.
- Rnds 5–13 (teal): Sc in each st around. (12)
- Stuff lightly. Flatten the opening and sc through both layers to close it. (6) Fasten off, leaving a 12-in (30 cm) tail.
The arm should be about 2 in long, with a cream head about half an inch long at one end.
Sew the arm on. Lay the arm across the top of the pillar, with the closed teal end flush with the pillar's right side and the cream head reaching out over the left end of the base. Sew the arm's underside to the pillar's flat top, all the way around the contact area, twice.
Part 3 — Presser foot, needle, handwheel and buttons
Make each piece, then sew it on right away with its own tail.
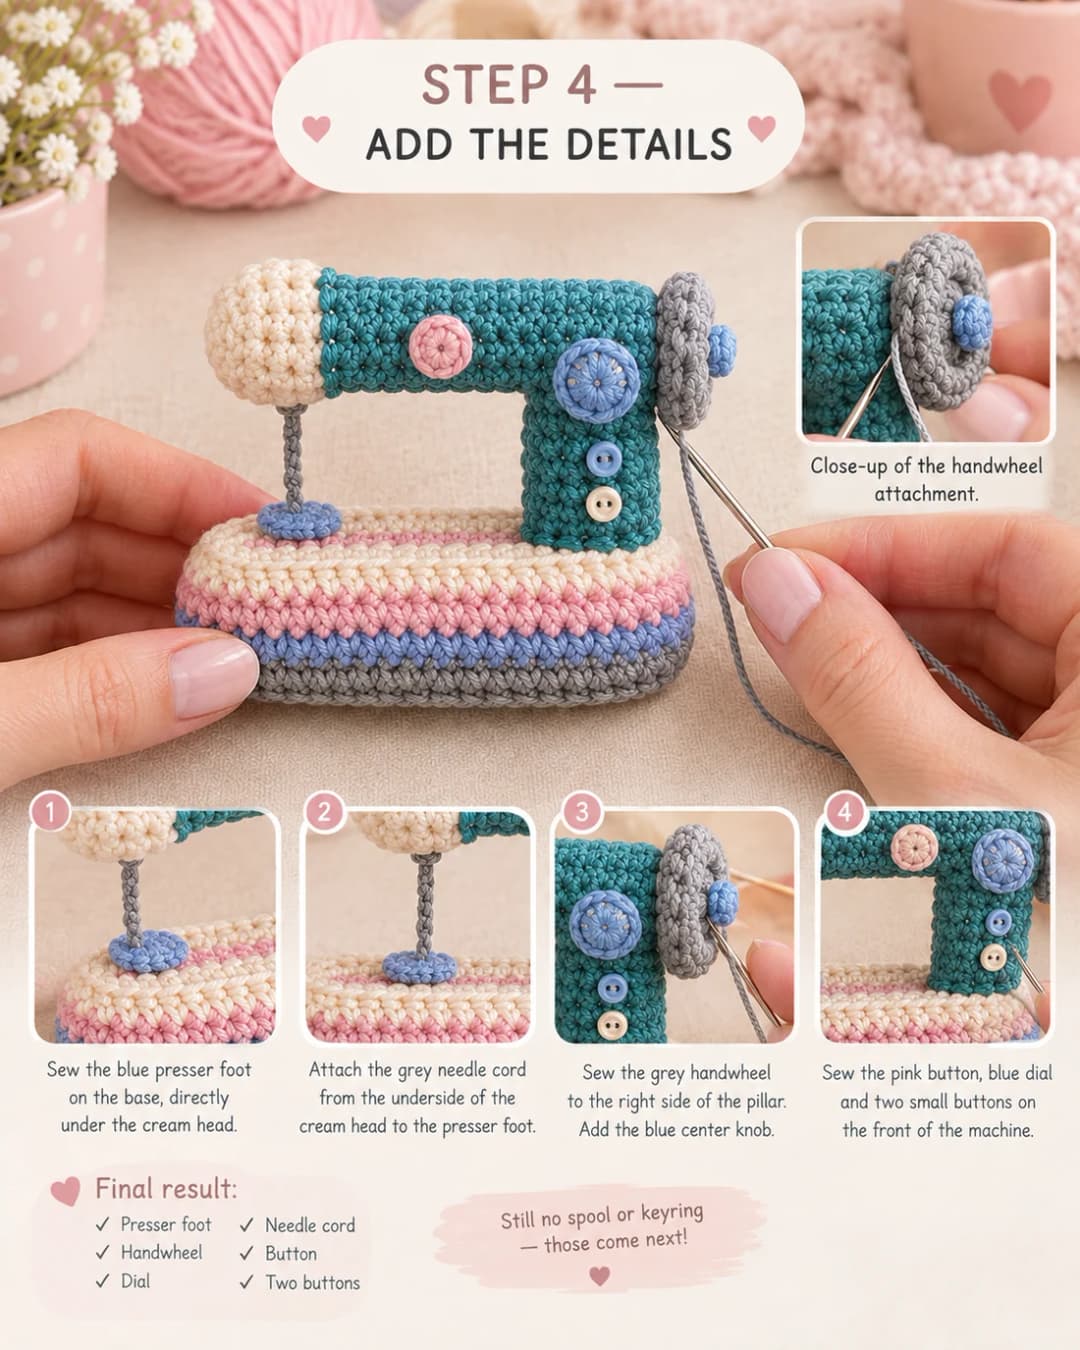
Presser foot (blue): MR, 6 sc in the ring. Pull tight and sl st to the first sc. Fasten off, leaving a 6-in (15 cm) tail. Sew it flat onto the base, directly under the cream head.
Needle (grey): Leave a 6-in (15 cm) starting tail. Ch 5. Sl st in the back bump of the 2nd ch from the hook and of each ch across. (4 sl st) Fasten off, leaving a 6-in (15 cm) tail. Sew one tail into the underside of the head and the other down through the center of the presser foot into the base. The needle now props up the head, so the arm can't droop.
Handwheel (grey): MR, 6 sc in the ring. (6) Inc in each st around. (12) Sl st in the next st and fasten off, leaving an 8-in (20 cm) tail.
Wheel knob (blue): MR, 5 sc in the ring. Pull the ring tight and sl st to the first sc. Fasten off, leaving a 6-in (15 cm) tail. It curls into a tiny bead. Sew it to the center of the handwheel, then sew the handwheel to the right side of the machine, where the arm meets the pillar, with the knob pointing out.
Button (pink): MR, 6 sc in the ring. Pull tight and sl st to the first sc. Fasten off, leaving a 6-in (15 cm) tail. Make a cream French knot in the center. Sew it to the front of the arm, near the head.
Dial (blue): MR, 6 sc in the ring. (6) Inc in each st around. (12) Sl st and fasten off, leaving a 6-in (15 cm) tail. Embroider one short grey straight stitch across it, like a pointer. Sew it to the front of the arm, above the pillar.
Tiny buttons (make 2: 1 blue, 1 cream): MR, 5 sc in the ring. Pull tight and sl st to the first sc. Fasten off, leaving a 6-in (15 cm) tail. Sew them in a column on the front of the pillar, blue on top, just below the dial. A cross stitch in the center of each makes it look like a sewing button.
Part 4 — Spool, thread, label and heart
Thread spool: The spool is a small yellow tube with a tan disc on each end.
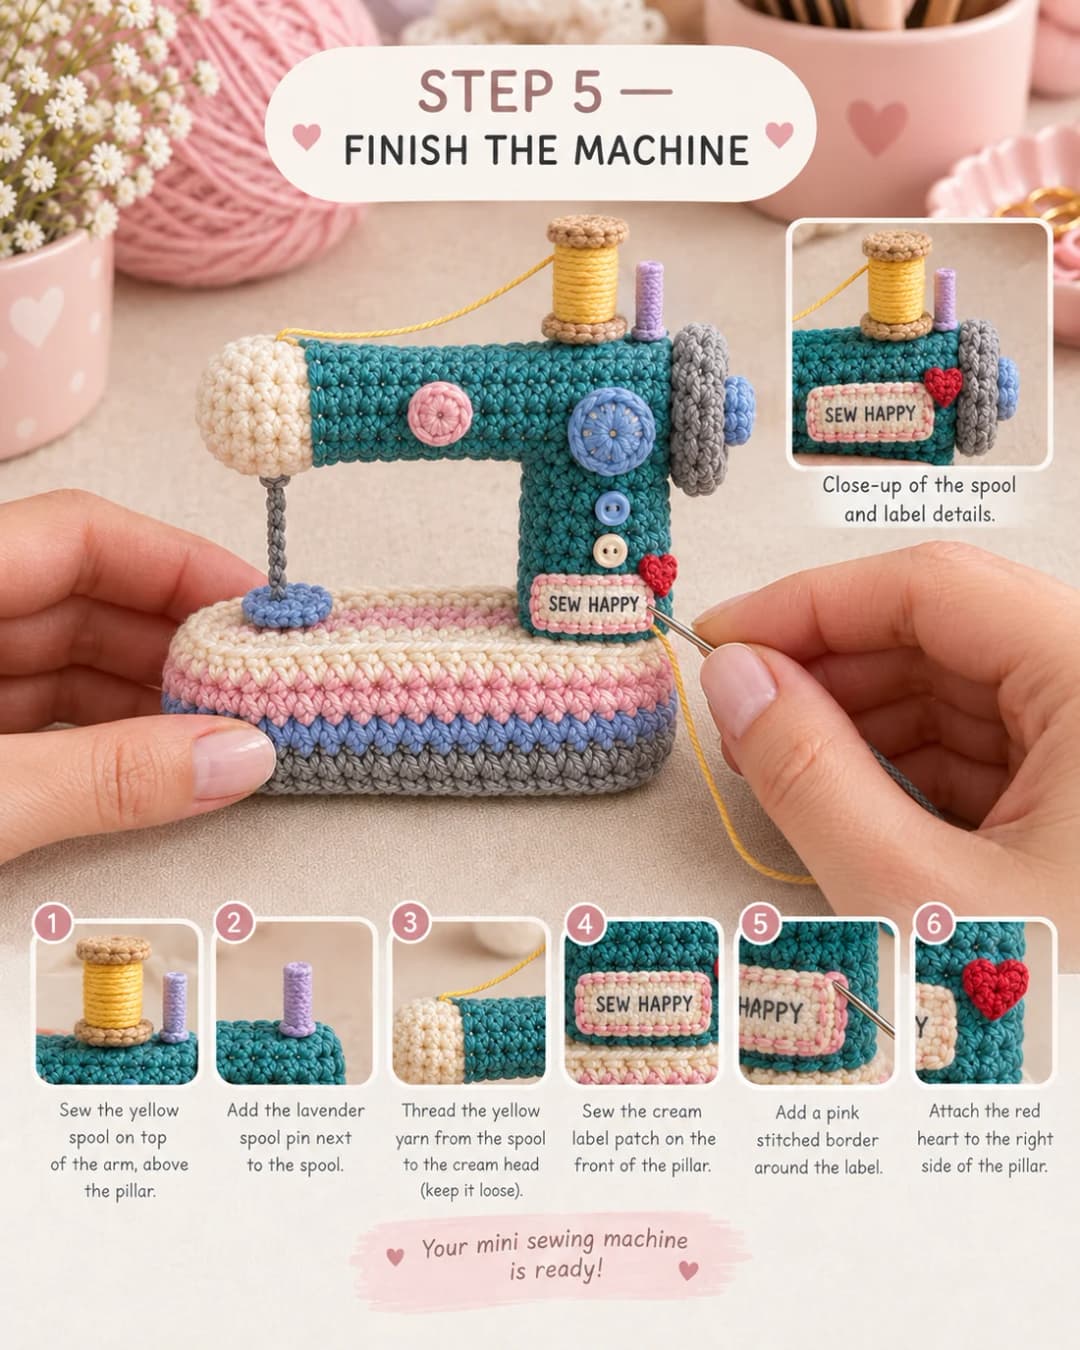
- Thread (yellow): MR, 6 sc in the ring. (6) Sc in each st around for 2 more rnds. (6) Sl st and fasten off, leaving an 8-in (20 cm) tail. Push a pinch of stuffing inside.
- Ends (make 2, tan): MR, 6 sc in the ring. Pull tight and sl st to the first sc. Fasten off, leaving a 6-in (15 cm) tail.
- Sew one tan end over each end of the yellow tube. Keep the yellow tail. It becomes the thread.
- Stand the spool on top of the arm, above the pillar, with a tan end down, and sew it on.
Spool pin (lavender): MR, 4 sc in the ring. (4) Sc in each st around for 2 more rnds. (4) Fasten off, leaving a 6-in (15 cm) tail. Sew it upright on top of the arm, right beside the spool, toward the handwheel.
Thread: Take the spool's yellow tail across the top of the arm to the top of the cream head. Leave it a little loose, like real thread, and anchor it with one tiny stitch at the head. Weave the end in.
Label (cream):
- Row 1: Ch 9. Sc in the 2nd ch from the hook and in each ch across. (8)
- Rows 2–3: Ch 1, turn. Sc in each st across. (8)
- Fasten off, leaving a 10-in (25 cm) tail.
- With a single strand of pink, work a tiny running stitch around the edge, like the stitched border on a sewing label.
- With one strand of dark grey floss, backstitch SEW HAPPY across the middle in small capitals. Draw the letters lightly with a pencil first, or split them into two lines, SEW over HAPPY, if one line feels too tight.
- Sew the label on the lower front of the pillar, just above the base.
Heart (red): MR. Into the ring, work: ch 2, 2 dc, ch 1, 2 dc, ch 2, sl st. Pull the ring tight, so the two humps meet and a point forms at the bottom. Fasten off, leaving a 6-in (15 cm) tail. Sew it on the right edge of the pillar, beside the label.
Part 5 — The keyring loop
Loop (teal): Leave a 6-in (15 cm) starting tail. Ch 6 and fasten off, leaving a second 6-in (15 cm) tail. You now have a short chain with a tail at each end.
- Open the 6 mm jump ring with two pliers, twisting sideways, not pulling apart. Slide the chain through the jump ring and fold it in half, so both tails hang down together.
- Sew both tails into the top right corner of the arm, right above the pillar, behind the spool pin. Take them down through the arm and into the pillar, and make at least 10 stitches, going deep. Putting the loop over the pillar sends the pull straight down into the strongest seam.
- Close the jump ring onto a short keychain chain, and the chain onto the split ring.
A cotton chain stretches a little with daily use. If the loop grows, run one more tail through it and tighten it.
Safety. This is a keychain with a metal split ring, a jump ring and small parts, so it's not a toy and not safe for children under 3. The needle is a yarn cord on purpose: please don't swap it for a real needle or pin.
Make it yours — quick variations
| Variation | Change from base pattern |
|---|---|
| Vintage machine | Work the pillar and arm in black and the head in cream, and use gold for the spool ends and the wheel knob. |
| Pastel machine | Work the pillar and arm in mint or blush, and the base stripes in lavender, peach and cream. |
| Personal label | Swap SEW HAPPY for a name, initials or a year. Keep it to 8 or 9 small letters per line. |
| Bag charm | Swap the split ring for a lobster clasp, and clip it to a project bag or a crochet hook case. |
| Ornament | Skip the keyring. Sew a 6-in loop of gold thread above the pillar and hang it on the tree. |
Troubleshooting the three things that go wrong
The arm droops toward the head
The head isn't supported enough. Check that the needle is sewn firmly at both ends, so it props up the head. A few extra stitches between the arm and the top of the pillar, on the head side, help too.
The base looks round, not flat
The wall didn't turn up sharply, or there's too much stuffing. Make sure Rnd 3 is worked in BLO only. Take out a little stuffing before the cream join round, and press the base flat with your fingers while you close it.
The lettering looks crowded
Crochet fabric is bumpy, so small letters get lost. Use a single strand of floss, not yarn, and keep each letter to 2 stitches tall. If SEW HAPPY still won't fit on one line, put it on two lines.
Frequently asked questions
How long does this sewing machine keychain take? About 3 to 4 hours. The base takes about an hour, the pillar and arm about 45 minutes together, and the small details another hour. Plan 45 minutes to 1 hour for the assembly and the lettering. It's a nice one-evening project.
How much yarn do I need? About 35 yd (32 m) of DK #3 cotton in total, spread over 9 colors. Teal uses the most, at about 10 yd, then cream at about 8 yd. The spool pin needs only about a yard of lavender. Scraps from other projects cover everything.
Can I use worsted yarn instead of DK? Yes. Use a 3.5 mm hook and keep the stitch counts the same. The machine comes out about 3 in (7.5 cm) wide, which is closer to a bag charm than a keychain. Use a bigger split ring, about 30 mm.
How do I embroider SEW HAPPY so it's readable? Use one strand of dark grey embroidery floss and a sharp needle, not a tapestry needle. Pencil the letters on first, then backstitch them with tiny stitches, one letter at a time. The 8-stitch label fits the 9 letters on one line if you keep them small, or on two lines if you prefer.
Can I sell keychains made from this pattern? Yes, you're welcome to sell finished keychains made from this free pattern at markets, on Etsy or as gifts. Please credit "Pattern by Wavode" in your listing and link back to this page. What you can't do is republish this write-up or my photos as your own pattern.
Related patterns on Wavode
- Hot air balloon bear keychain: a striped balloon with bunting and a tiny bear.
- Panda keychain: a one-hour black and white mini.
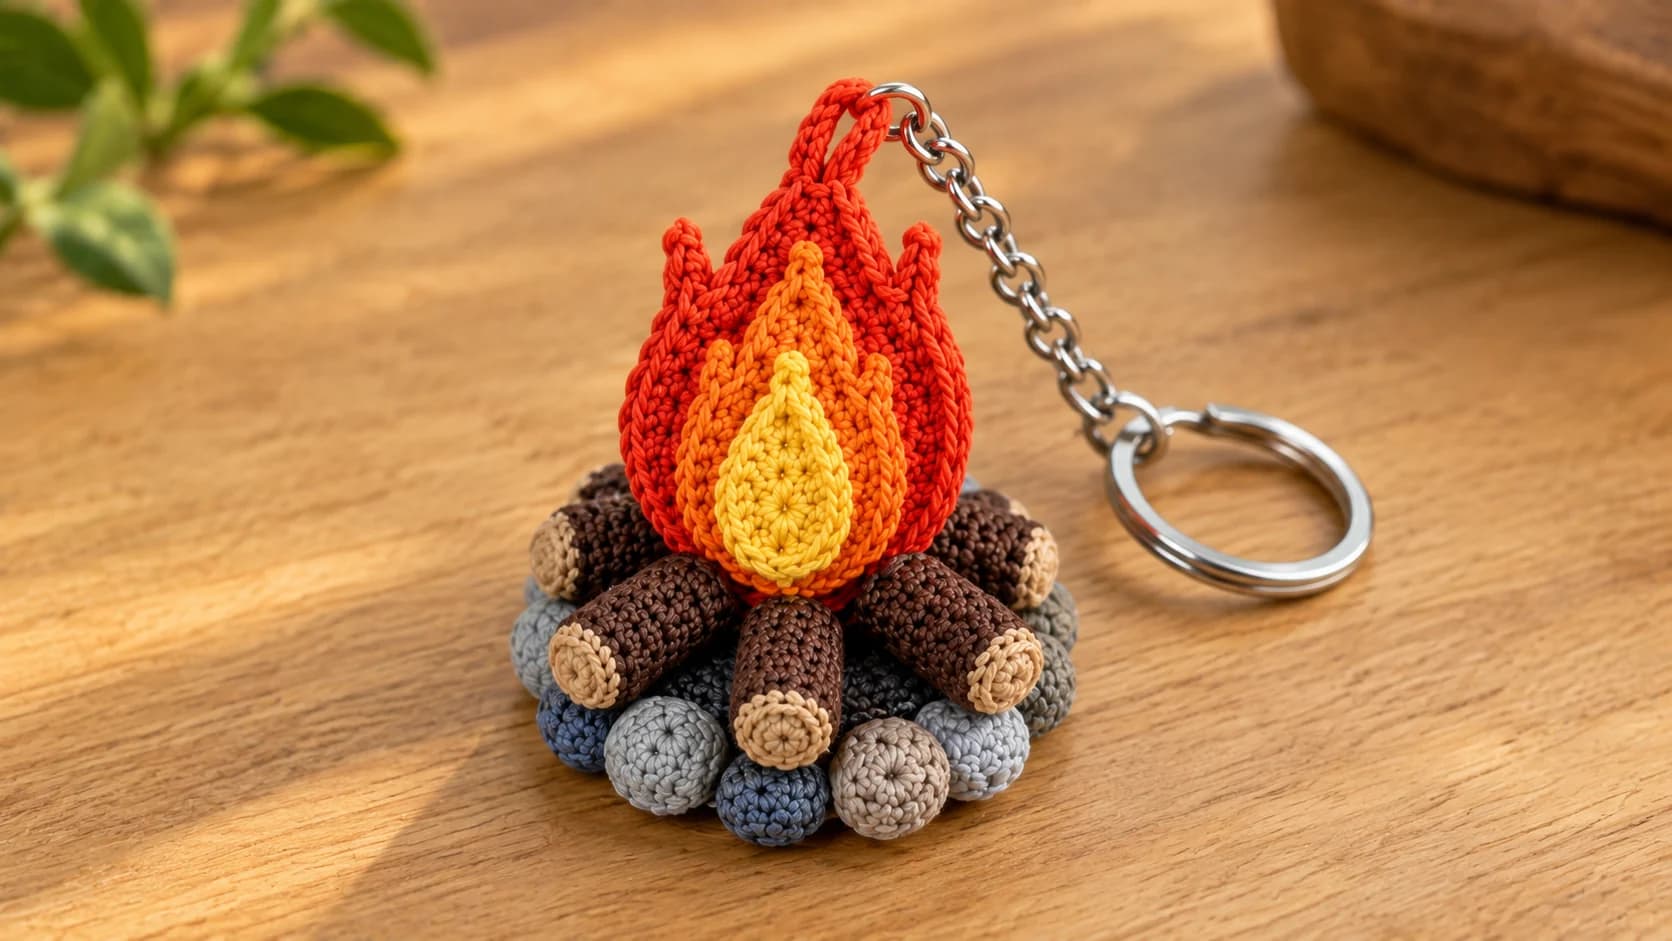
- Campfire keychain: layered flames, little logs and a ring of stones.
- Crochet hook case: a checkerboard roll-up to clip this machine onto.
- Crochet pencil case: a boxy zippered case for notions.
Made this keychain? Tag #wavodecrochet on Pinterest. I re-pin every finished make and credit the maker.
Pattern by Clara Hartwell for Wavode. Questions? Email me at support@wavode.com.