Crochet Palm Tree Keychain

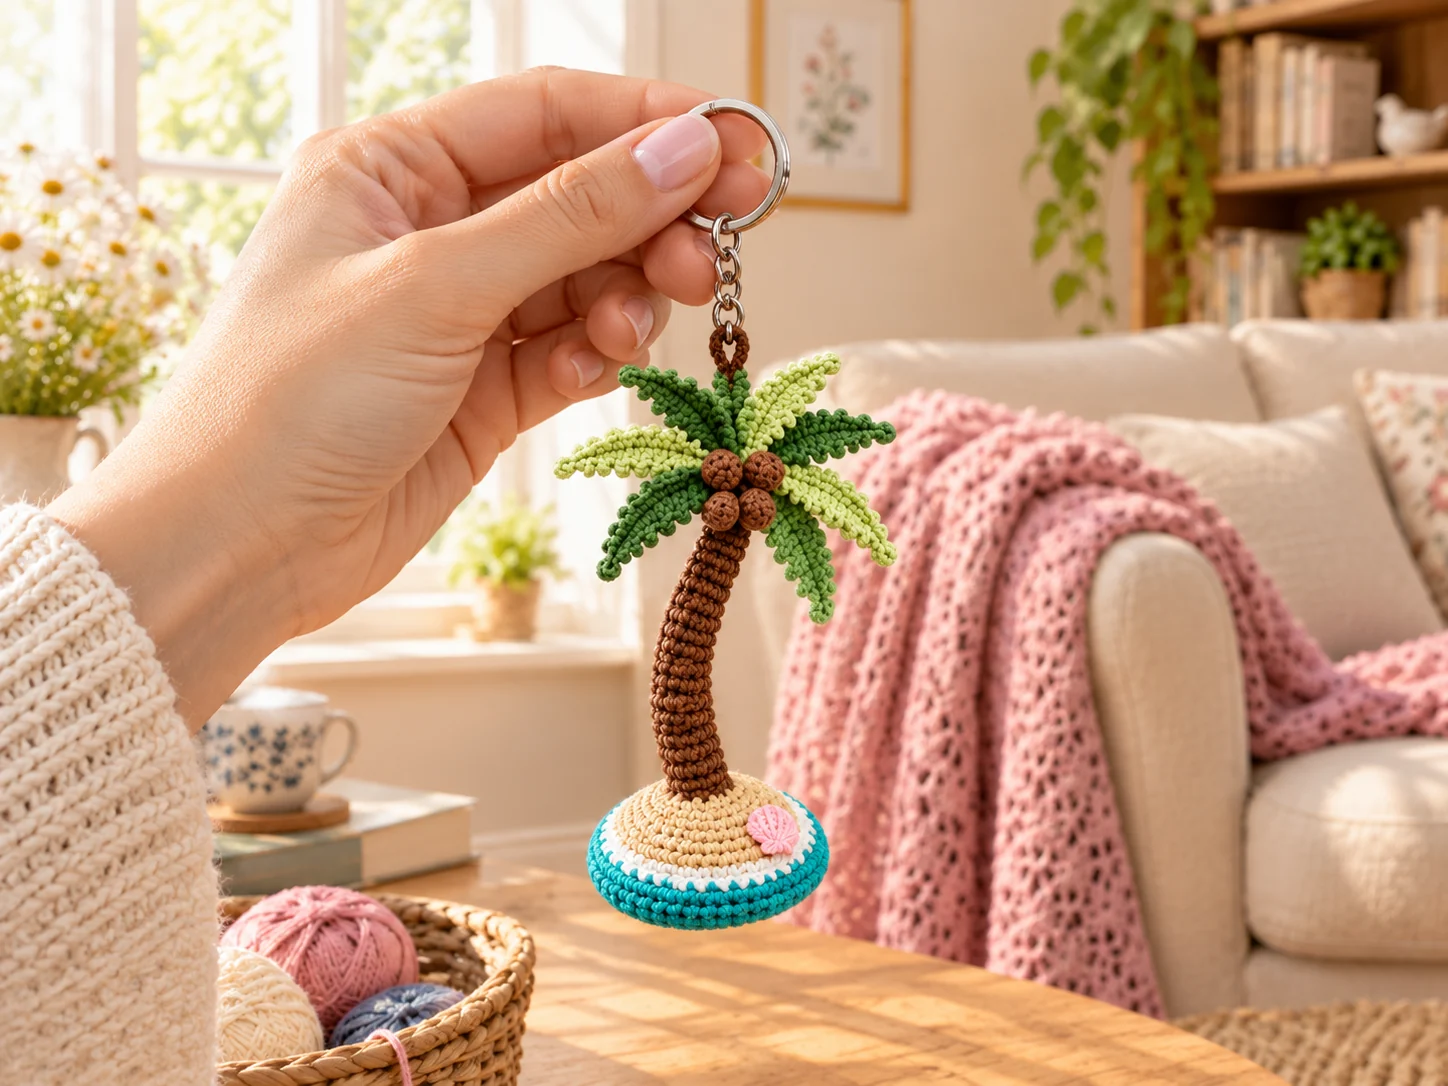
This crochet palm tree keychain is a 4-inch mini palm with a ridged brown trunk, six frilly leaves and a sandy island base trimmed with a white wave line, a turquoise sea edge and a tiny pink shell. It's all DK cotton on a 2.5 mm hook, mostly single crochet. You'll need about 50 to 60 yards in seven colors, which is really just a pile of scraps. Most makers finish it in one evening.
Key Takeaways
- Five simple parts: an island base, a trunk tube, six leaves, three coconuts and a shell. Plus a chain loop for the keyring.
- The trunk rings come from one trick: every third round is worked in the back loop only, which leaves a little ridge of bark.
- About 50–60 yd of DK #3 cotton in total. No color needs more than about 16 yd, so this is a perfect scrap project.
- It hangs from one load-bearing path, so the loop, trunk and base seams are all over-sewn. Metal hardware means it's not for children under 3.
Why I love this little palm tree
A palm tree keychain is a vacation you can clip to a bag. It's the piece people point at and ask about. I wanted one that looked neat and "shop-bought" but only used beginner stitches.
Two small choices do most of the work. The back-loop rounds on the trunk turn a plain brown tube into bark rings with no color changes at all. And a short pipe cleaner inside the trunk lets you bend it into that relaxed, leaning-palm curve. Without it, the trunk just stands up like a pole. Isn't the lean what makes a palm look like a palm?
The island base is the other favorite part. One white round sits between the sand and the sea, and it reads as the foam of a wave. It's one row of work for a lot of charm.
Pattern at a glance
- Stitches: single crochet in continuous rounds, plus a few hdc and dc for the leaves.
- Yarn: DK #3 cotton, about 50–60 yd (46–55 m) total across seven colors.
- Hook: 2.5 mm (US B/1–C/2). That's smaller than a DK ball band suggests, on purpose, so the stuffing stays hidden.
- Construction: island base (top to bottom) → trunk (crown to base) → 6 leaves → 3 coconuts → shell → keyring loop → assembly.
- Finished size: about 4 in (10 cm) tall and 2 in (5 cm) across the base, without the keyring. Your tension will shift this a little.
- Time: 2.5–3.5 hours. The six leaves take the longest, about an hour together.
- Skill level: advanced beginner. You should be comfortable with a magic ring and with sewing small pieces onto a round shape.
What you'll need
Yarn (DK #3 cotton, ~50–60 yd / 46–55 m total)
- Brown (trunk, coconuts, keyring loop): 14–16 yd. A milk-chocolate or walnut shade.
- Sand beige (island top): 7–9 yd. A speckled or tweed beige looks even more like sand.
- Turquoise or aqua (sea edge): 10–12 yd.
- White (wave line): 2–3 yd. Paintbox Yarns Cotton DK in Paper White works well.
- Leaf green, two shades: 9–11 yd of each. One light and one medium green give the crown depth. One shade is fine too.
- Pink (shell): 1 yd.
These figures come from the stitch counts in the pattern, plus sewing tails, with a little margin. Please keep every color a true DK #3 cotton. A worsted #4 cotton like Lily Sugar 'n Cream in one color will make that piece noticeably bigger than the rest.
Hook and notions
- 2.5 mm crochet hook
- A small handful of polyfil stuffing
- 1 brown chenille stem (pipe cleaner), for the trunk
- 1 keychain with a lobster clasp or split ring and a short chain
- 1 × 6 mm jump ring and 2 pairs of flat-nose pliers (only if your keychain chain has no open end link)
- Tapestry needle
- Optional: a 3-inch (7.5 cm) doll needle, for the strength upgrade in the assembly
- 1 stitch marker
- A few pins
Tension
You don't need a strict gauge for amigurumi this small. Aim for a firm fabric where the white stuffing doesn't peek through between stitches. If you can see stuffing, drop to a 2.25 mm hook.
Abbreviations (US terms)
- MR: magic ring
- ch: chain
- sl st: slip stitch
- sc: single crochet
- hdc: half double crochet
- dc: double crochet
- inc: 2 sc in the same stitch
- dec: invisible decrease (sc2tog through the front loops)
- BLO: back loop only
- R: round
- st(s): stitch(es)
All round pieces are worked in a continuous spiral. Don't join at the end of rounds. Move your stitch marker up to the first stitch of each new round.
Island base (make 1)
The magic ring is the center of the sand, on top. The closing round is the center of the bottom, where the island sits flat. You'll stop partway down, sew the trunk on, then finish.
With sand beige:
R1: 6 sc in MR. (6 sts) R2: Inc in each st around. (12) R3: Sc 1, inc; repeat 6 times. (18) R4: Sc 2, inc; repeat 6 times. (24) R5: Sc 3, inc; repeat 6 times. (30) R6: Sc 4, inc; repeat 6 times. (36)
Switch to white:
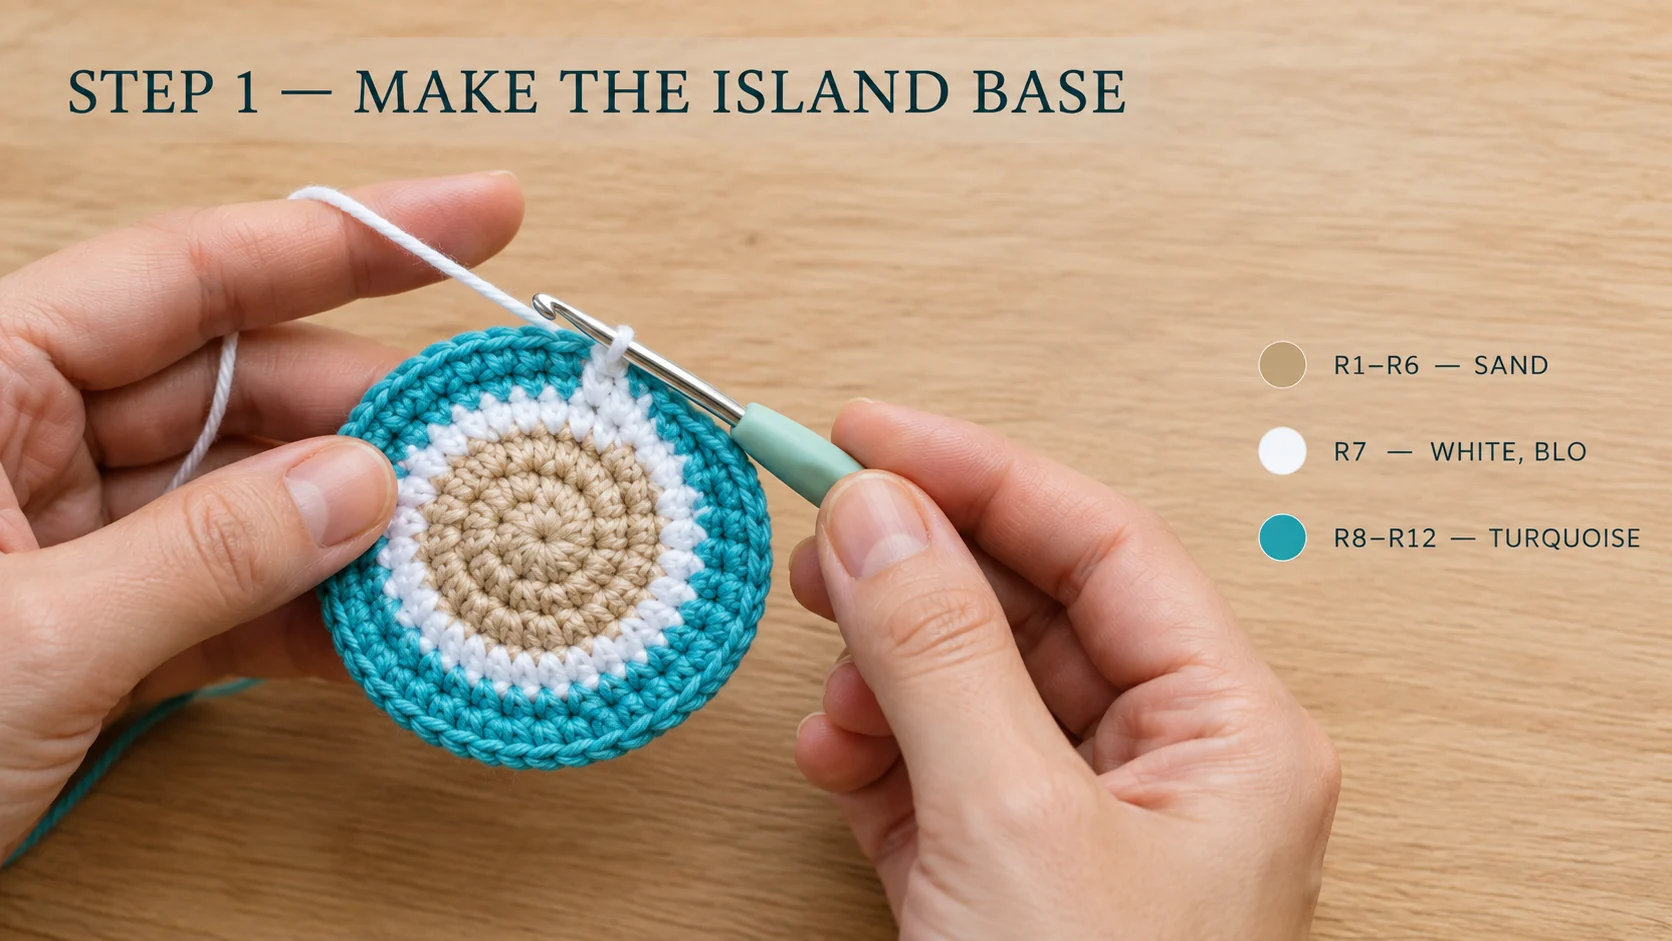
R7: Sc in BLO in each st around. (36) This turns the edge downward. The white round is your wave foam.
Switch to turquoise:
R8–R9: Sc in each st around. (36) R10: Sc in BLO in each st around. (36) This makes the crisp bottom corner. R11: Sc 4, dec; repeat 6 times. (30) R12: Sc 3, dec; repeat 6 times. (24)
Stop here. Pull up a long loop on your hook and slip it onto a stitch marker so it can't unravel. Don't cut the yarn. You'll sew the trunk on through this opening, then come back to finish R13–R15 in the assembly.
Trunk (make 1, in brown)
The trunk is worked from the top down. The magic ring is the crown, where the leaves and keyring go. The last round is the open bottom edge, which you'll sew onto the sand.
Every third round is worked in the back loop only. The unworked front loops stay on the outside as a little ridge, and that's your bark ring.
Keep the marker in the first stitch of each round. The increases all fall at the start of a round, so they stack on one side and give the trunk a slight lean.
R1: 8 sc in MR. (8 sts) R2: Sc in each st around. (8) R3: Sc in BLO in each st around. (8) R4: Sc in each st around. (8) R5: Inc, sc 7. (9) R6: Sc in BLO in each st around. (9) R7: Sc in each st around. (9) R8: Inc, sc 8. (10) R9: Sc in BLO in each st around. (10) R10: Sc in each st around. (10)
Add the pipe cleaner now. Cut a 2¾-inch (7 cm) length of chenille stem. Fold each end back by ¼ in (6 mm) and pinch it flat, so no cut wire can poke through. That leaves a 2¼-inch (5.5 cm) stem. Push it up the center of the trunk until it touches the underside of the crown. Add small bits of stuffing around it with the back of your hook.
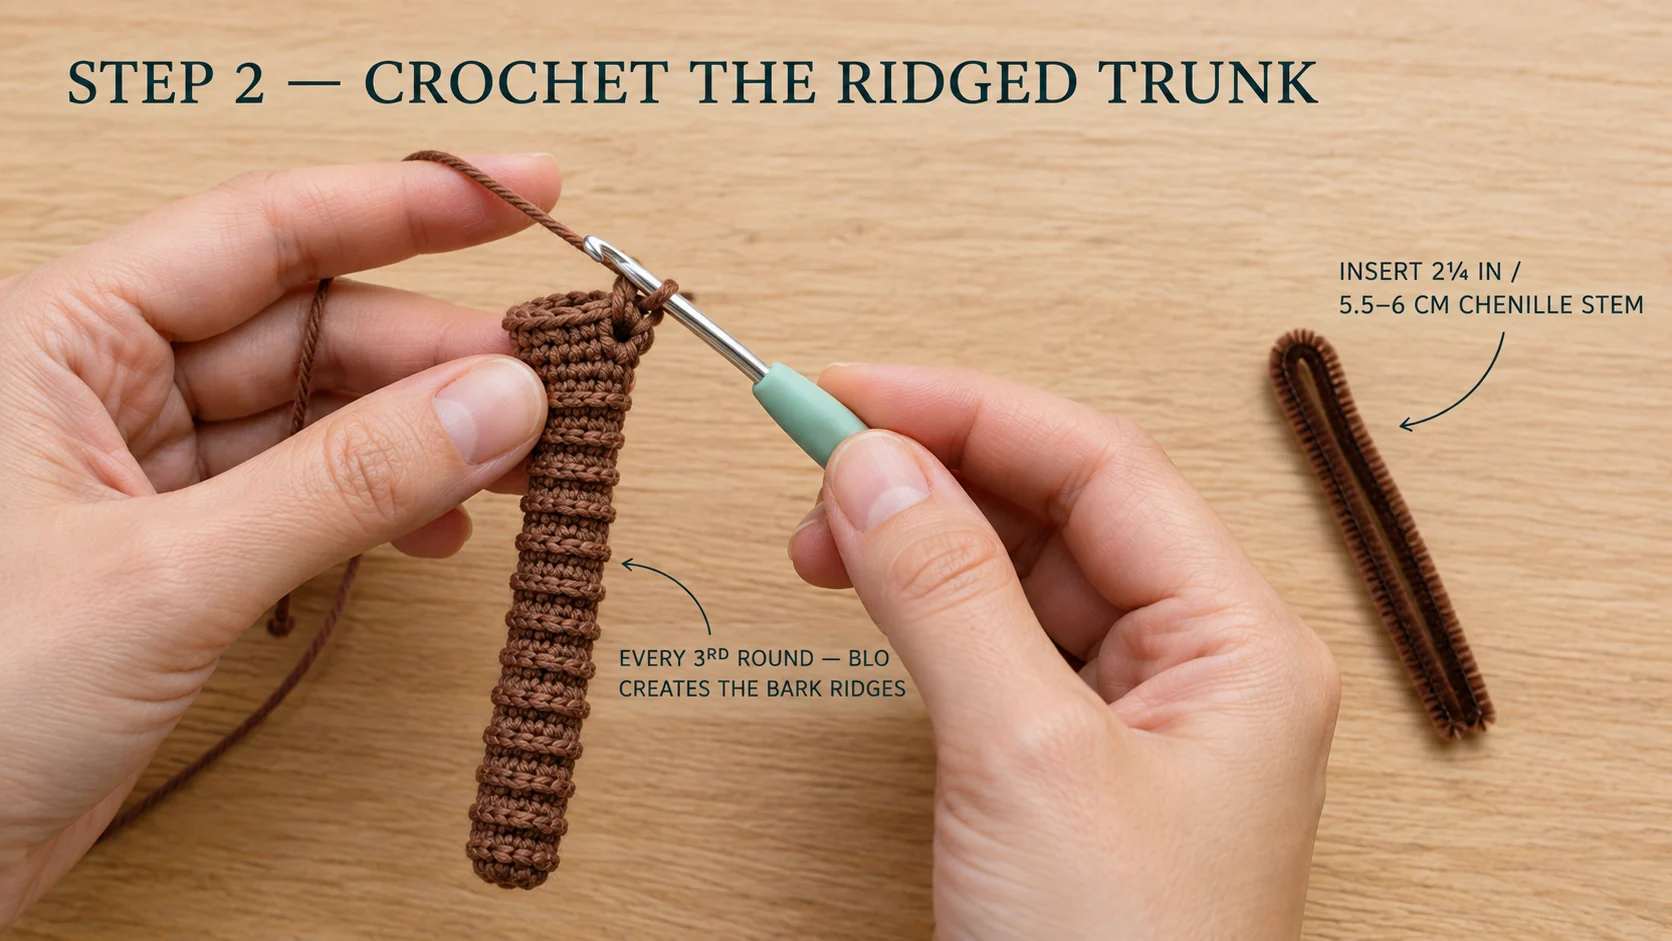
R11: Inc, sc 9. (11) R12: Sc in BLO in each st around. (11) R13: Sc in each st around. (11) R14: Inc, sc 10. (12) R15: Sc in BLO in each st around. (12) R16–R18: Sc in each st around. (12)
Stuff the trunk firmly as you go, all the way to the bottom edge. The pipe cleaner should now end about ¼ in (6 mm) above the open edge, fully inside the stuffing.
Sl st in the next st and fasten off, leaving a 14-inch tail at the open bottom edge. That tail sews the trunk onto the island. Weave the short magic-ring tail at the crown into the trunk. Then bend the trunk gently into its curve. You can fine-tune the curve after assembly.
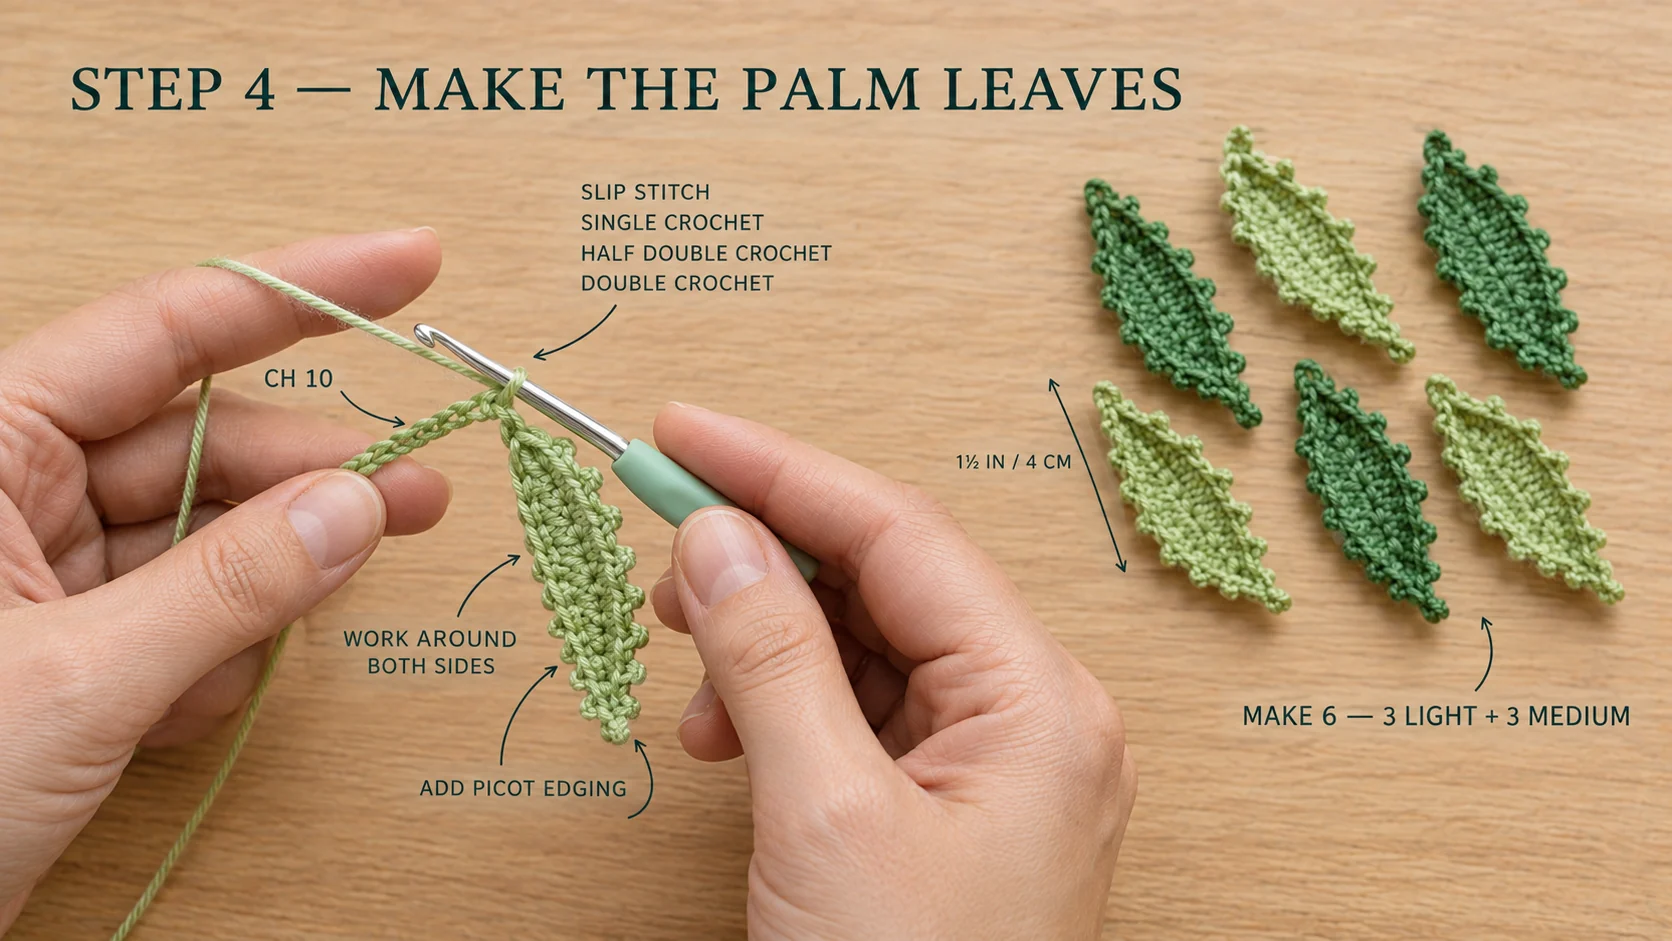
Palm leaves (make 6: 3 light green, 3 medium green)
Each leaf is worked around both sides of a short chain, then edged with tiny picots for the frilly frond look.
Leave an 8-inch starting tail before your slip knot. That tail ends up at the base of the leaf, and you'll sew with it.
Ch 10.
Side 1 (tip to base): Starting in the 2nd ch from the hook, sl st in the first ch (this is the tip), sc in each of the next 2 ch, hdc in each of the next 2 ch, dc in each of the next 2 ch, hdc in the next ch, then 3 sc in the last ch (this is the base, next to your starting tail).
Side 2 (base to tip): Rotate the leaf and work along the other side of the foundation chain. Hdc in the next ch, dc in each of the next 2 ch, hdc in each of the next 2 ch, sc in each of the next 2 ch, sl st in the tip ch. (19 sts around the leaf)
Picot edging: (Sl st, ch 2, sl st) in the next st, sl st in the next st; repeat around the whole leaf. You'll make 9 picots and finish with a sl st at the tip. (19 sts, 9 picots)
Fasten off with a short tail at the tip and weave it into the back of the leaf. Keep the 8-inch base tail for sewing.
Each leaf comes out about 1½ in (4 cm) long. Give the leaves a gentle pinch lengthwise so they fold slightly along the center, like a real frond.
Coconuts (make 3, in brown)
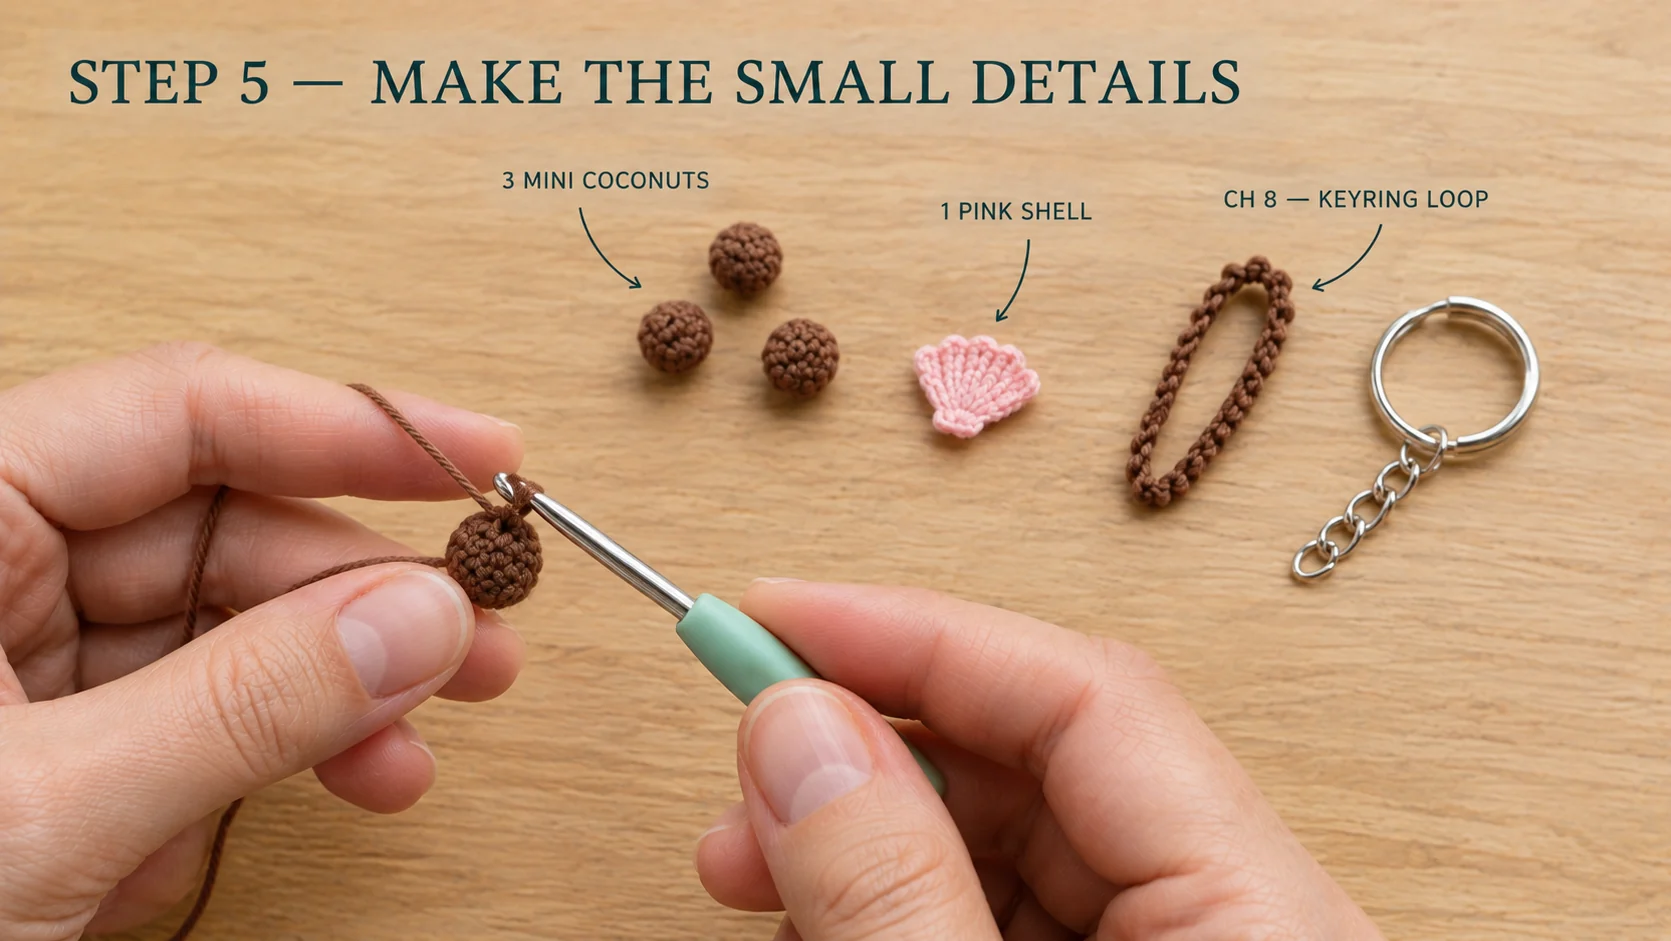
The magic ring is one side of the ball. The closing round is the other side, and that's where your sewing tail comes out.
R1: 6 sc in MR. (6 sts) R2: Sc 1, inc; repeat 3 times. (9) R3: Sc in each st around. (9) R4: Sc 1, dec; repeat 3 times. (6)
Push in a tiny pinch of stuffing, or just tuck the magic-ring tail inside. Fasten off leaving an 8-inch tail at the closing round. Thread it through the front loops of the last 6 sts and pull tight to close.
Shell (make 1, in pink)
Leave an 8-inch starting tail. The magic ring becomes the hinge of the shell, so the starting tail comes out right where you'll sew.
MR, ch 3 (counts as the first dc), 6 dc into the ring. Pull the ring closed so the stitches fan out into a half circle. (7 dc)
Fasten off and weave the ending tail into the back of the fan. For ribs, you can add 3 straight stitches of white or darker pink from the hinge to the edge. That's optional, and it looks sweet plain too.
Keyring loop (make 1, in brown)
A slip-stitched ring would only have one tail. This loop needs a tail at each end, so work it as a plain chain.
Leave a 10-inch starting tail. Ch 8. Fasten off leaving a second 10-inch tail. The long tails leave enough yarn for the optional strength upgrade in the assembly.
Thread the chain through the end link of your keychain chain (or through a 6 mm jump ring). Fold it in half so the link sits at the fold, with both tails side by side.
Assembly
Work in this order. You'll build the whole crown on the trunk first, then sew the trunk onto the island while the base is still open, so you can knot the tails inside it.
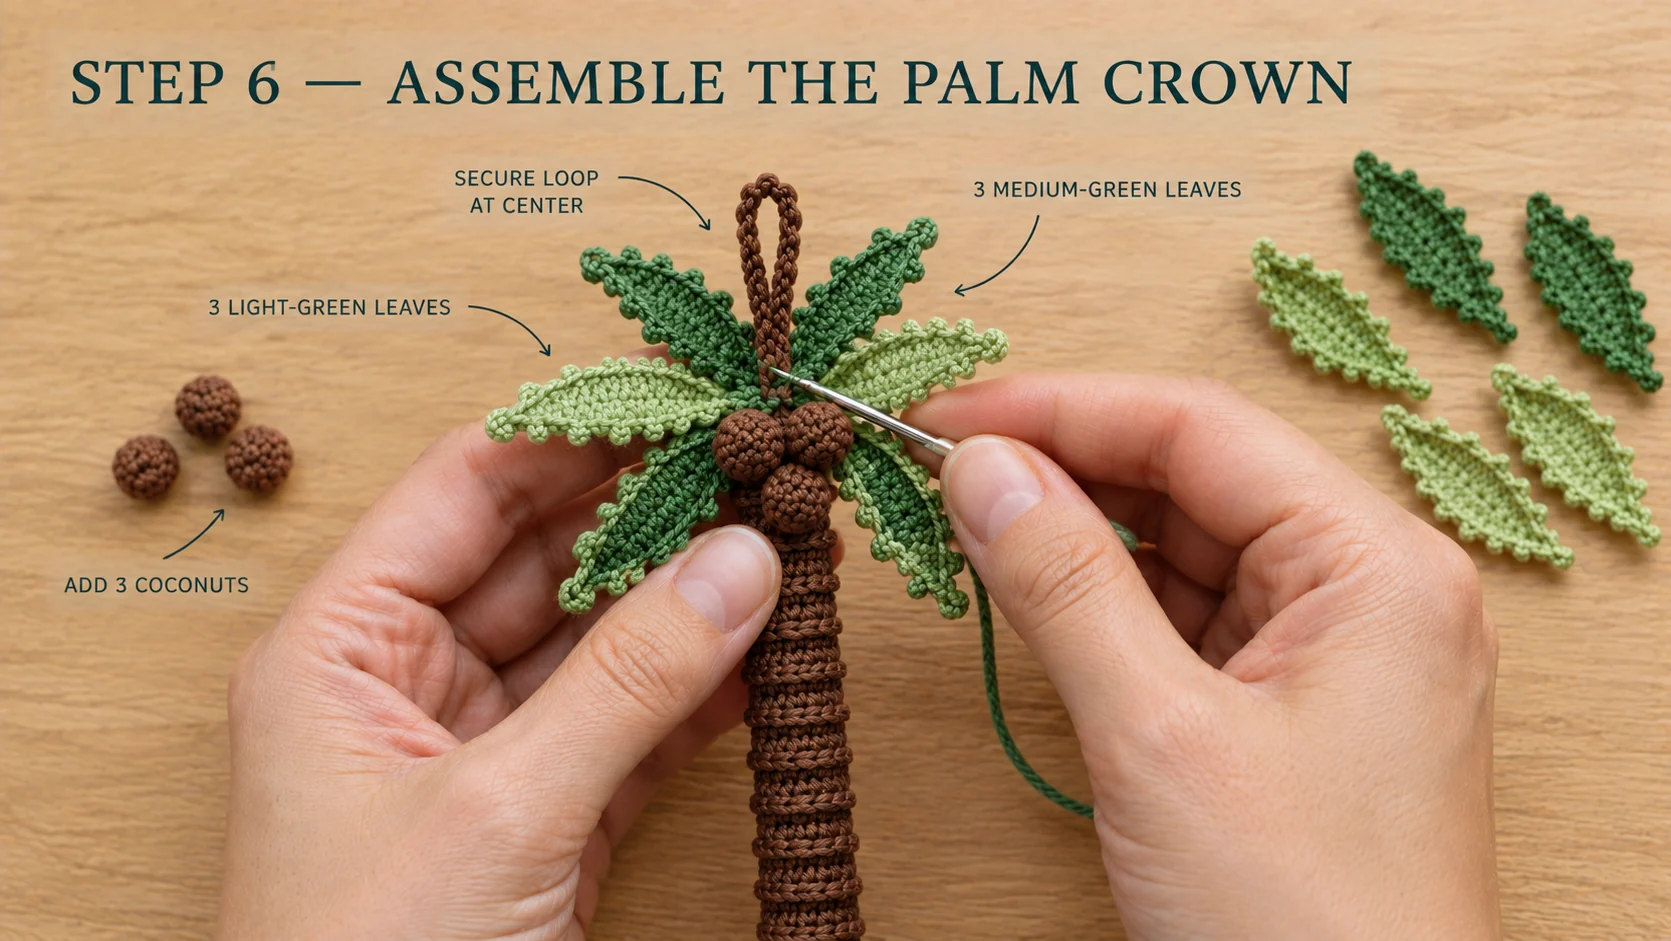
1. Sew on the keyring loop. Set the fold of the loop at the center of the crown, with the keychain sitting above it. Thread one tail onto your needle. Go down through the crown, come back up 1 st away, and repeat 5 or 6 times, catching the magic-ring stitches each time. Do the same with the second tail. That's 10 or more stitches holding the loop. If you plan to do the strength upgrade in step 5, leave the leftover tails hanging for now. Otherwise, weave them deep into the trunk.
2. Sew on the leaves. Think of the crown as a clock face around the keyring loop. Sew the 3 medium-green leaves first at 12, 4 and 8 o'clock, with their bases touching the loop. Then sew the 3 light-green leaves in the gaps at 2, 6 and 10 o'clock, one stitch lower down. Use each leaf's base tail and make 4 to 5 stitches through the crown for each one. Let the tips spread outward and droop slightly.
3. Add the coconuts. Nestle the 3 coconuts in a tight cluster in the center of the crown, around the base of the keyring loop and between the leaf bases. Sew each one with its tail, going through the coconut and deep into the trunk top. Weave the ends inside the trunk.
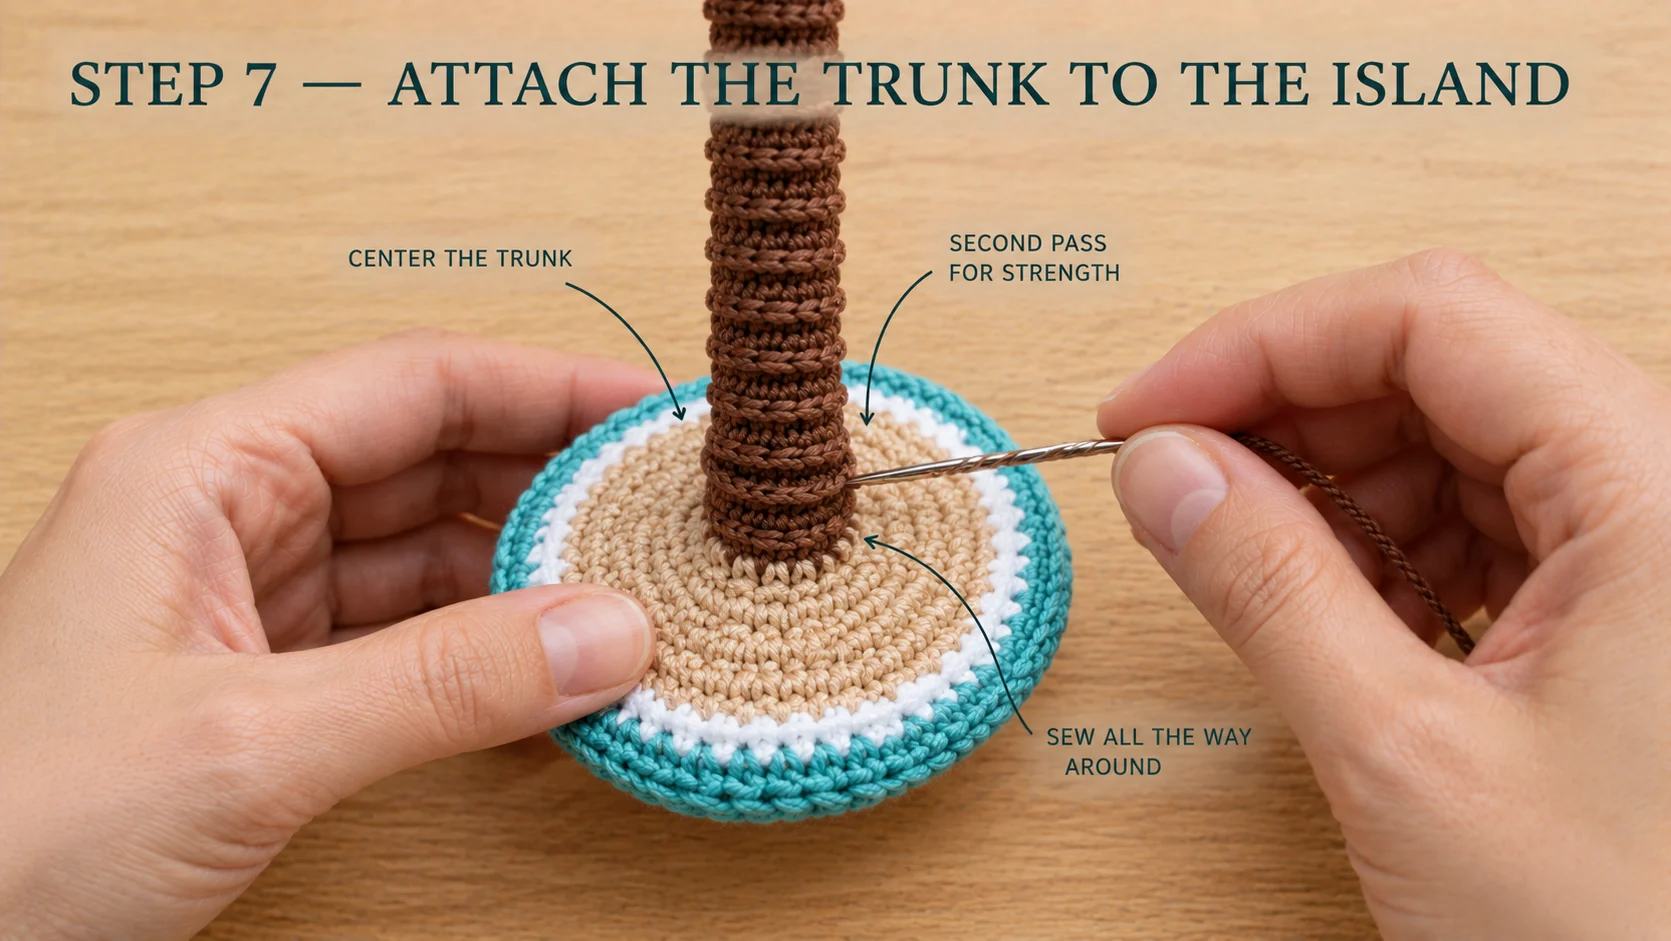
4. Sew the trunk onto the island. Center the trunk's open edge on the sand, right over R2 of the base (the 12-stitch ring around the magic ring). Pin it straight up first. Using the 14-inch trunk tail, whipstitch each trunk stitch to the sand, going all the way around. Then go around a second time. That's 24 stitches or more. This seam carries the weight of the whole island every time the keychain swings, so don't skip the second pass. Bring the tail inside the base through the opening and knot it to a stitch there.
5. Optional strength upgrade (my favorite). Thread both leftover loop tails onto a 3-inch doll needle. Push it straight down from the crown through the center of the trunk, beside the pipe cleaner, and out through the sand into the base. Pull the tails through the base opening and knot them firmly to a stitch inside. Now the yarn carries the load straight from the keyring to the island, instead of the seams doing all the work. Skip it if you don't own a doll needle.
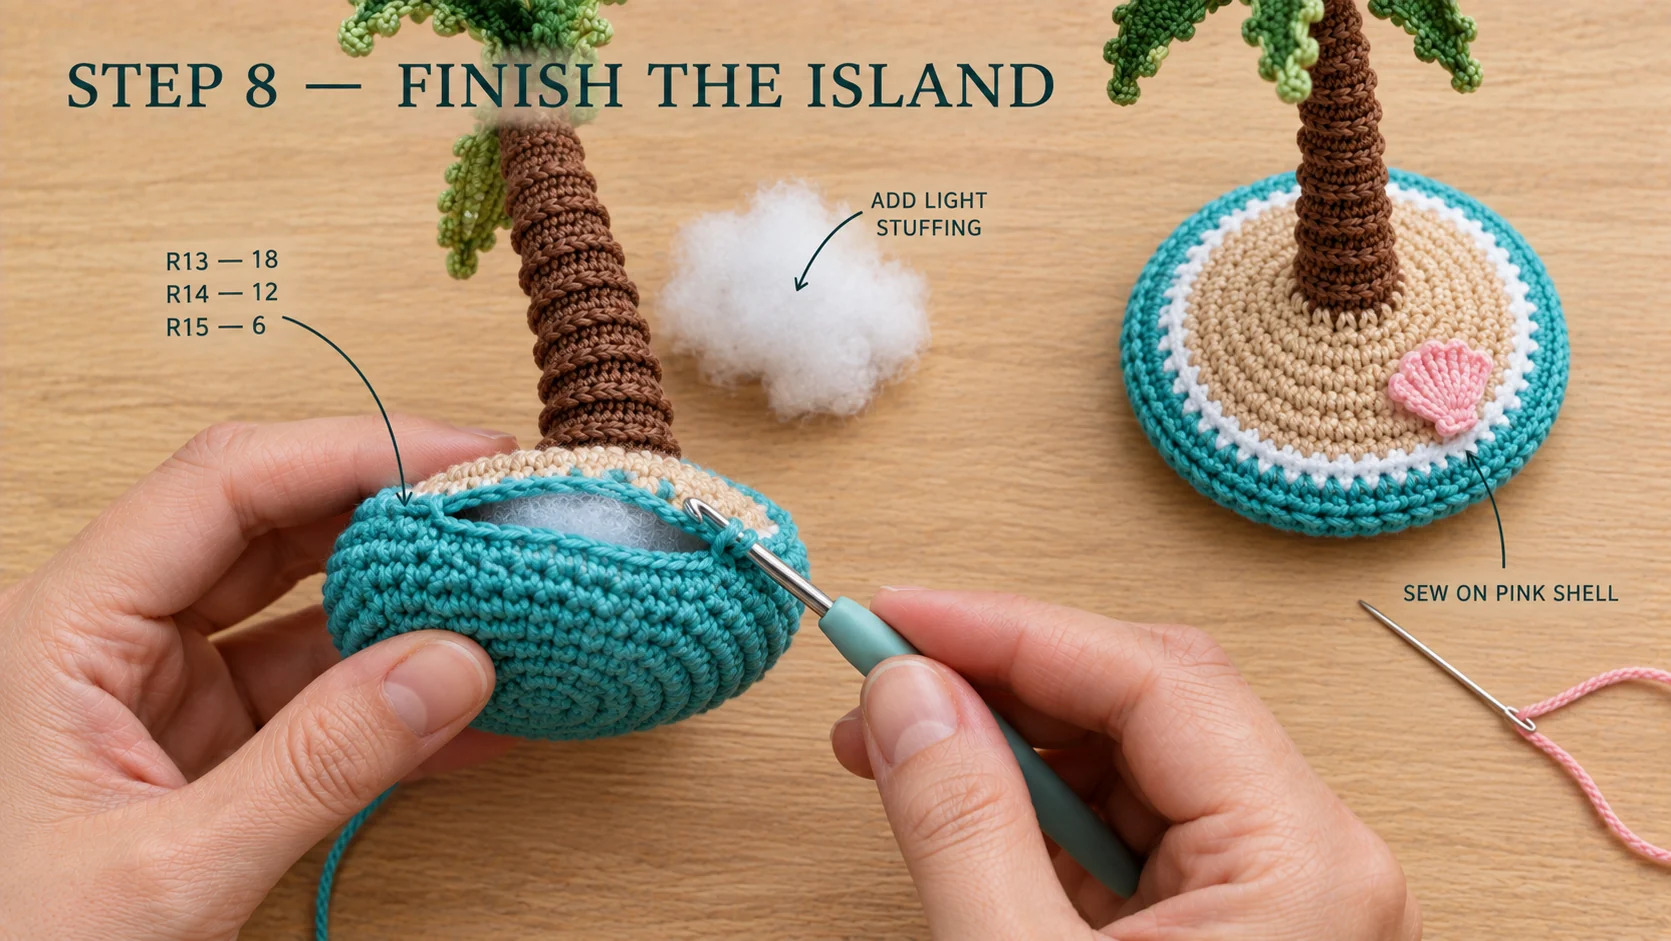
6. Finish the base. Put your loop back on the hook and pick up where you left off in turquoise.
R13: Sc 2, dec; repeat 6 times. (18)
Stuff the base lightly. It should feel plump but still sit flat, so press it on the table as you go.
R14: Sc 1, dec; repeat 6 times. (12) R15: Dec 6 times. (6)
Fasten off, thread the tail through the front loops of the last 6 sts, pull tight and weave the tail deep into the base.
7. Add the shell. Place the shell on the sand near the edge, with the hinge pointing toward the trunk. Sew around the hinge with the starting tail, then take 2 or 3 small stitches under the curved edge so it lies flat.
8. Shape and check. Bend the trunk gently into a soft curve. Hold the keychain up and let it hang. If the island tips, bend the trunk a little more upright until the base hangs level.
9. Close the hardware. If you used a jump ring, twist it closed with two pairs of pliers. Open it sideways, never by pulling the ends apart, or it won't close neatly.
Safety and care
Safety. This is a keychain with a metal ring, a chain and a wire pipe cleaner inside. It isn't a toy and isn't safe for children under 3, because the small parts and hardware are choking hazards. For a child's gift, leave out the pipe cleaner and the keychain hardware and stuff the trunk firmly instead. Even then, give it to older kids as decor, not as a baby toy.
Care. Spot clean with a damp cloth. If it needs a proper wash, hand-wash in cool water with a drop of mild soap, squeeze it in a towel and let it dry fully, trunk up. Don't put it in the dryer or soak it for long, because the pipe cleaner can rust inside.
Wear. Cotton chain can stretch with daily use. If your keyring loop starts to lengthen, sew a second loop right beside the first and knot both tails inside the trunk.
Easy variations
- Sunset island: coral sand, a lilac sea edge and a yellow shell for a dreamy color set.
- Holiday palm: add a few French knots in red, yellow and blue along the leaves, like string lights. It's a fun gift for anyone spending Christmas somewhere warm.
- Shelf decor: skip the keyring loop and pipe cleaner, and stuff the base more firmly so it stands on a desk.
- Bigger palm: use worsted #4 cotton and a 3.5 mm hook with the same counts. It grows to about 5½ in (14 cm), which works better as a shelf ornament than a keychain.
Troubleshooting
The bark rings don't show
Check that you're working the ridge rounds into the back loop only. If the rings are there but faint, tighten your tension on those rounds. You can also go down to a 2.25 mm hook for the whole trunk.
The island hangs at an angle
The trunk is leaning too far off center. Bend the pipe cleaner more upright until the base hangs level. If the trunk isn't centered on the sand, unpick the seam and re-pin it right over R2.
The base won't sit flat
It's overstuffed. Press it flat on the table. If it still rocks, pull out a little stuffing before you finish R15 next time.
The leaves curl up at the tips
Picot edging can tighten the edge a little. Pinch each leaf lengthwise and let it relax. Or work the picot round a little looser.
Frequently asked questions
How much yarn does this palm tree keychain use?
About 50–60 yd (46–55 m) of DK #3 cotton in total. That's 14–16 yd of brown, 7–9 yd of sand, 10–12 yd of turquoise, 2–3 yd of white, 9–11 yd of each green and about 1 yd of pink. Scraps of each are enough, so you won't need to buy full balls.
Can I make the trunk without a pipe cleaner?
Yes. Stuff the trunk very firmly instead. It will stand straight rather than leaning, and it'll be a little softer. Leaving out the wire is also the better choice if you're making it as decor for an older child.
How long does it take to crochet?
About 2.5 to 3.5 hours. Plan roughly 30 minutes for the base, 30 for the trunk, an hour for the six leaves, and 30 to 45 minutes for the small pieces and assembly. It fits into one relaxed evening.
Is this keychain safe for kids?
Not for children under 3. The metal keyring, chain and the wire inside are choking hazards. For older kids, it's a fine bag charm. For a child's decor piece, leave out the hardware and the pipe cleaner and stuff the trunk firmly.
Can I sell the finished keychains?
Yes. You're welcome to sell finished palm trees made from this free pattern at markets, on Etsy or as gifts. Please credit "Pattern by Wavode" and link back to this page. Please don't republish the written pattern or my photos as your own.
UK terms note
This pattern uses US terms. In UK terms, sc becomes double crochet (dc), hdc becomes half treble (htr) and dc becomes treble (tr). The other abbreviations don't change. DK is the same yarn weight on both sides of the Atlantic.
Related patterns on Wavode
- Panda keychain: another one-evening bag charm on the same 2.5 mm hook.
- Crochet keychain flower vase: a mini daisy in a blush pot, a sweet match for this palm.
- Crochet mushroom keychain: a kawaii red-cap mushroom in 45 minutes.
- Mini crochet tree: a cherry blossom bonsai with a wired trunk, if you like bendable trees.
Made a palm tree? Tag #wavodecrochet on Pinterest. I re-pin every finished make and credit the maker.
Pattern by Clara Hartwell for Wavode. Questions? Email me at support@wavode.com.