Mini Crochet Tree

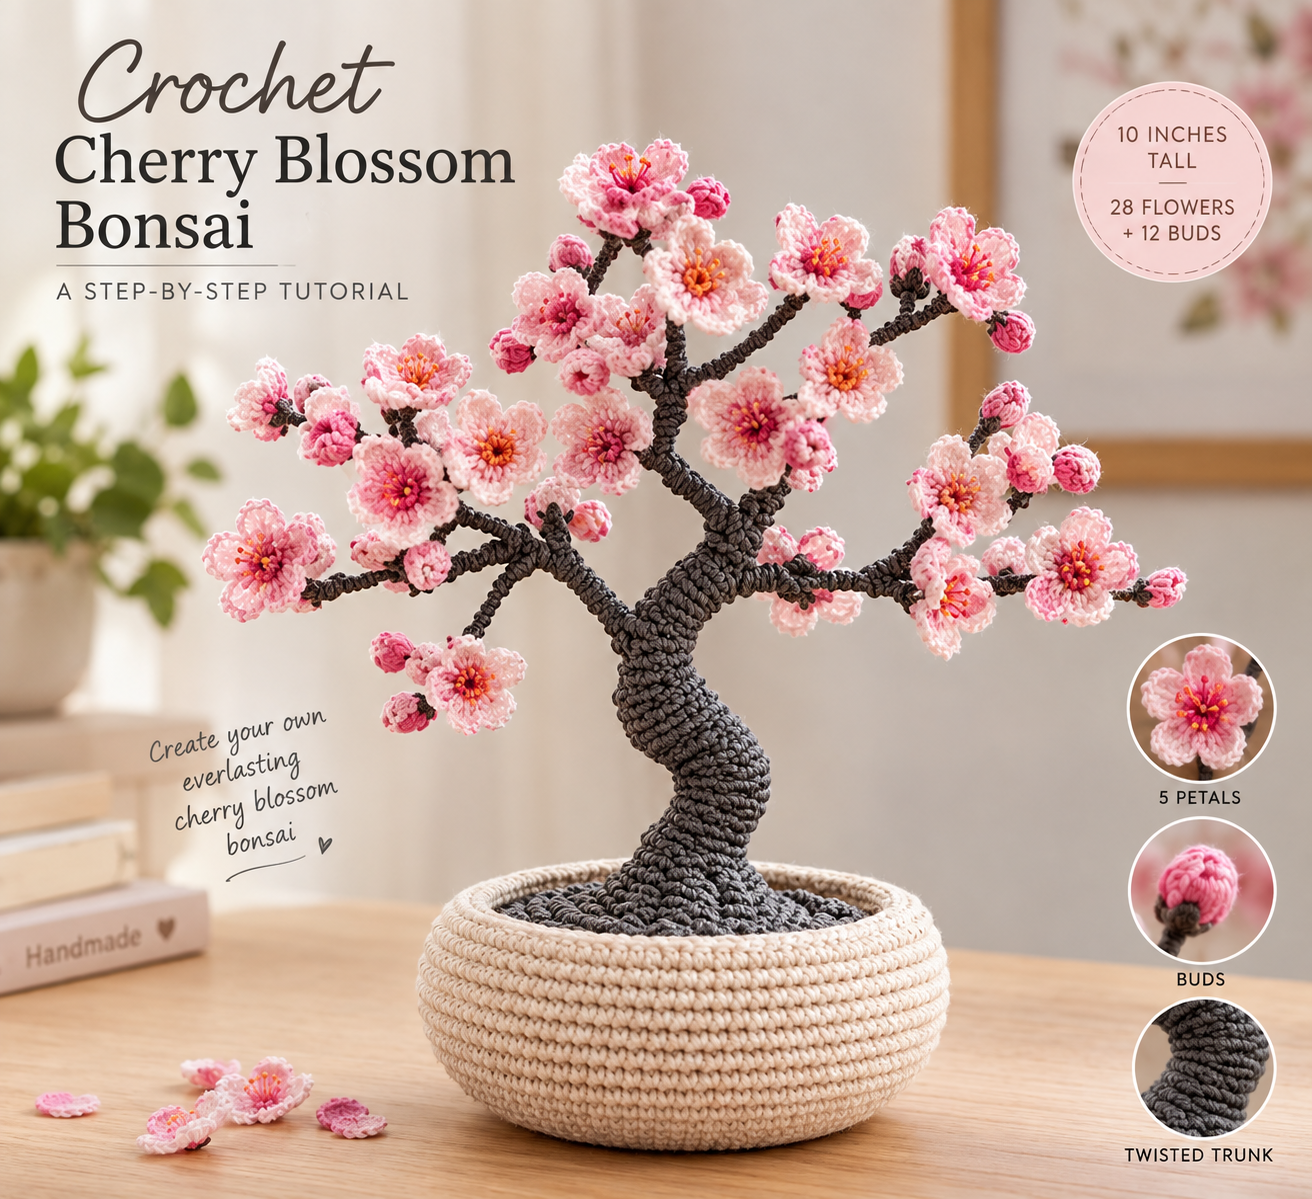
This free mini crochet tree is a cherry blossom bonsai about 10 inches tall, built on a bendable aluminum wire trunk and planted in a round cream cotton pot. You crochet the pot, a grey soil disc and a tapered trunk sleeve in worsted cotton, then make 28 two-tone blossoms and 12 buds in DK cotton. The last step is bending the branches and stitching the flowers on. You'll need about 200 yards of yarn in total, and it takes 12 to 14 hours, so plan on a relaxed weekend.
Pattern at a glance
A 10-inch cherry blossom bonsai (approximately, depending on tension): a low, belly-shaped pot in ecru cotton, weighted and filled with floral foam; a grey crocheted soil disc; a twisted wire trunk inside a crocheted sleeve; yarn-wrapped branches; and 40 little flowers and buds that you arrange by eye.
Stitches: magic ring, single crochet, half double crochet, double crochet, slip stitch and single crochet in the back loop only. Rated advanced beginner. None of the stitches are hard. It just has more assembly than a flat project.
Why a mini crochet tree is my favorite shelf project
A crocheted tree never drops its petals, never needs watering and still looks like spring in September. I made my first one for a windowsill that kills every real plant I put on it. It's been in bloom there ever since.
What I love about this design is that the wire does all the structural work. The crochet only has to look pretty. That means you never have to fight to make a stuffed trunk stand up straight. The armature holds the shape, and you can bend the branches whenever you like, even months later. If you've made my crochet mini rose, the blossoms will feel very familiar: they're small rounds with one petal round, and they're quick enough to make in front of the TV.
Skill level. Advanced beginner. You need a magic ring, single crochet, half double crochet, double crochet, slip stitch, working in continuous rounds, and a whipstitch seam. The new part is the wire armature, and I walk you through it one bend at a time.
What you'll need
Yarn for the pot, soil and trunk (worsted weight #4, ~110 yd / 100 m total)
- Color A (pot): ~60 yd of ecru or cream cotton, such as Lily Sugar 'n Cream in Ecru or Bernat Handicrafter Cotton in a cream shade.
- Color B (trunk, branches, soil): ~50 yd of charcoal grey worsted cotton from the same brands. Cotton keeps the pot firm and gives the trunk crisp stitch definition, which is why I don't use acrylic here.
Yarn for the blossoms (DK weight #3, ~90 yd / 82 m total)
- Color C (flower centers and buds): ~30 yd of a deeper rose pink.
- Color D (petals): ~55 yd of a pale blossom pink.
- Color E (stamens): ~5 yd of coral or tangerine orange.
- I used Paintbox Cotton DK for all three. It's a true DK cotton that holds a crisp petal edge. Don't mix in a worsted cotton for the flowers, because the blossoms would come out almost twice the size and swamp the branches.
Hooks
- 4 mm (US G/6) for the pot, soil and trunk sleeve.
- 3 mm (US C/2–D/3) for the blossoms and buds.
- Keep your tension snug on the pot. It should stand on its own without sagging once it's filled.
Armature and notions
- Aluminum armature wire, 2 mm (12 gauge): eight 15-in (38 cm) lengths, about 10 ft (3 m) total. Aluminum bends by hand and doesn't rust.
- Wire cutters and a small pair of round-nose or flat-nose pliers.
- A 2 × 2 × 4 in block of dry floral foam (the kind sold for silk flowers, not the green wet-foam for fresh arrangements).
- About 4 oz (110 g) of poly pellets or clean aquarium gravel in a small zip bag, used as ballast.
- A scrap of stiff cardboard for the pot base.
- A small handful of polyester fiberfill or quilt batting, plus floral tape or masking tape for padding the trunk.
- Clear-drying tacky craft glue (a low-temp glue gun is optional).
- Tapestry needle, stitch markers and scissors.
Abbreviations (US crochet terms)
- ch = chain
- sl st = slip stitch
- sc = single crochet
- hdc = half double crochet
- dc = double crochet
- MR = magic ring
- inc = 2 sc in same stitch
- dec = single crochet two stitches together
- BLO = back loop only
- st(s) = stitch(es)
UK crocheters: this pattern uses US terms. US single crochet = UK double crochet, US half double = UK half treble, and US double = UK treble.
A safety note before you start
This mini crochet tree is home decor, not a toy. It has wire inside, poly pellets in the base and dozens of small glued-on flowers, and all three are choking or poking hazards for children under 3 and for pets that chew. Put it on a shelf, not in a nursery basket. I also fold every cut wire tip back on itself before wrapping it (Part 5), so no sharp end can work through the yarn.
Finished size
- Height: approximately 10 in (25 cm) from the table to the top blossom.
- Canopy: approximately 11 in (28 cm) across, depending on how you bend the branches.
- Pot: approximately 6 in (15 cm) wide at the belly and 2.5 in (6.5 cm) tall.
- Blossom: approximately 1.25 in (3 cm) across.
The pattern — step by step
I work in this order: pot, then soil, then blossoms (so they're ready and waiting), then the armature and trunk. Planting and flowering come last. Leaving the blossoms until the very end lets you place them on the tree standing up, where you can see the silhouette.
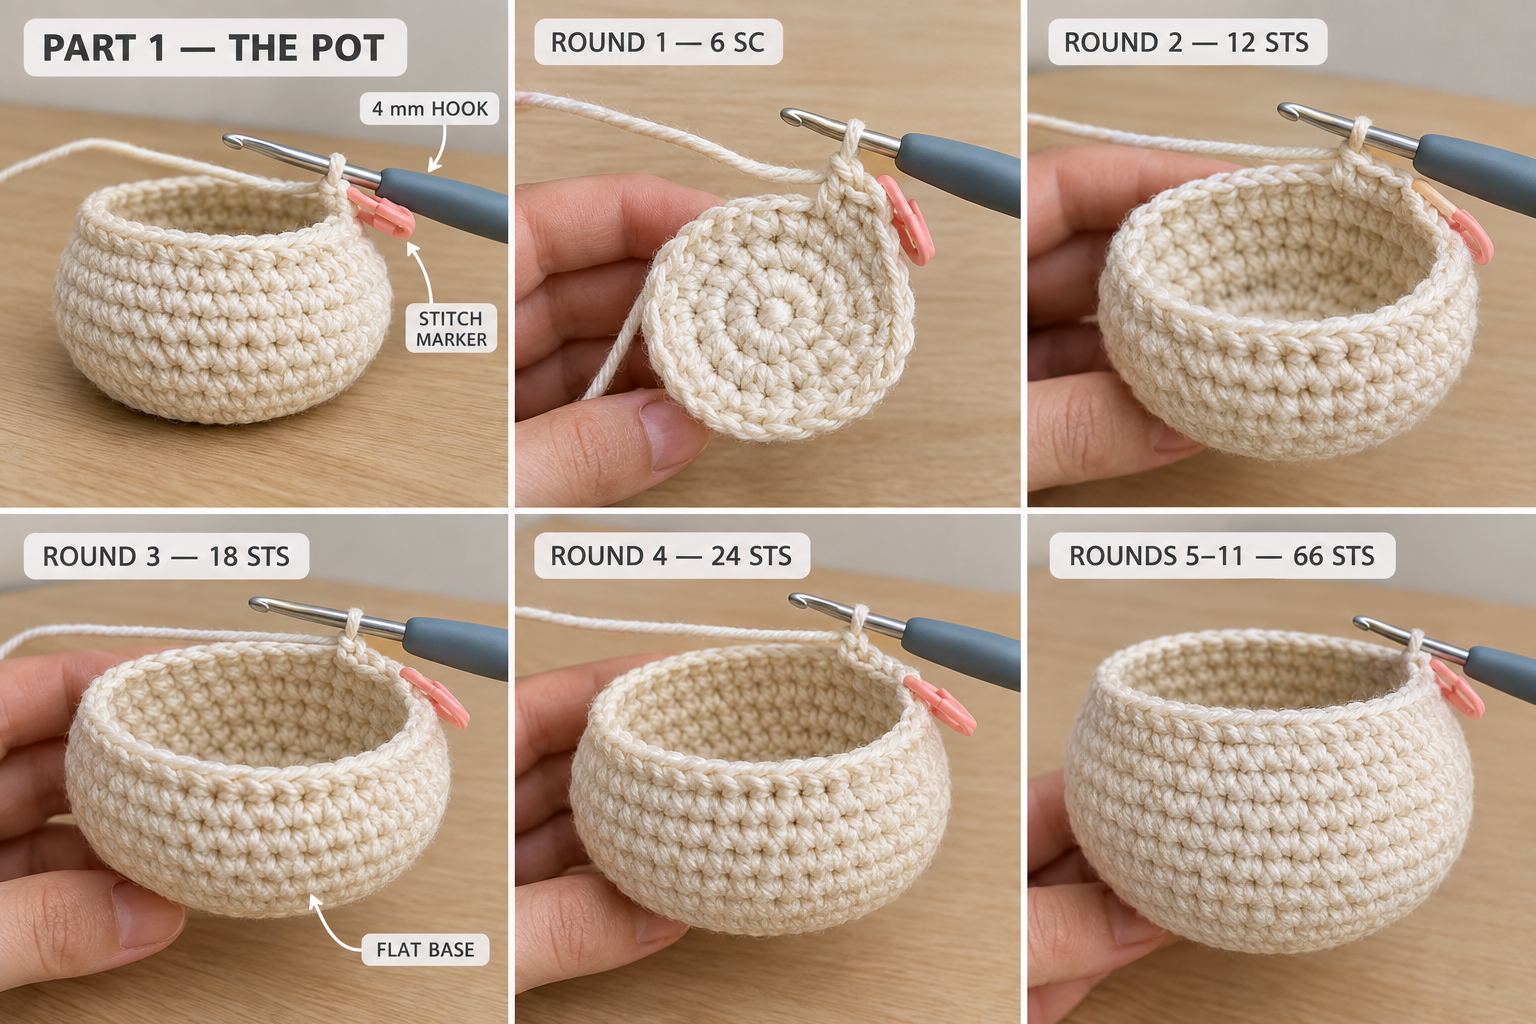
Part 1 — The pot (make 1)
With Color A and the 4 mm hook, worked in continuous rounds. Put a stitch marker in the first stitch of each round. The magic ring is the center of the pot's base. The last round is the rim.
Base
Rnd 1: MR, 6 sc into the ring. (6 sts) Rnd 2: Inc in each st around. (12 sts) Rnd 3: Sc 1, inc; repeat around. (18 sts) Rnd 4: Sc 2, inc; repeat around. (24 sts) Rnds 5–11: Keep adding 6 sts per round by working one more sc before each inc: sc 3, inc for Rnd 5 (30), then sc 4, inc for Rnd 6 (36), and so on up to sc 9, inc for Rnd 11. (66 sts)
The base should now be a flat circle about 5 in (13 cm) across.
Walls
Rnd 12: Sc in BLO in each st around. (66 sts) This turns the edge upward and gives the pot a crisp bottom corner. Rnd 13: Sc 10, inc; repeat around. (72 sts) Rnd 14: Sc 11, inc; repeat around. (78 sts) Rnds 15–19: Sc in each st around. (78 sts) This is the belly of the pot. Rnd 20: Sc 11, dec; repeat around. (72 sts) Rnd 21: Sc 10, dec; repeat around. (66 sts) Rnds 22–23: Sc in each st around. (66 sts) Rnd 24 (rim): Sl st loosely in each st around. Fasten off and weave in the tail.
Cut a cardboard circle the size of the flat base (trim it until it drops in and lies flat), and set the pot aside.
Part 2 — The soil disc (make 1)
With Color B and the 4 mm hook. The soil has a small opening in the center so the trunk's wire foot can pass through, so it starts with a chain ring instead of a magic ring.
Rnd 1: Ch 8, sl st into the first ch to form a ring. Ch 1, 12 sc into the ring. (12 sts) Rnd 2: Sc 1, inc; repeat around. (18 sts) Rnd 3: Sc 2, inc; repeat around. (24 sts) Rnds 4–9: Keep adding 6 sts per round, one more sc before each inc, finishing with sc 8, inc on Rnd 9. (60 sts)
Test it in the pot. It should sit just inside the wall at Rnd 22 with no gap. If your tension is tight and it falls short, add one more round of sc 9, inc (66 sts). Fasten off, leaving a 24-in (60 cm) tail for sewing the soil to the inside of the pot later.
Part 3 — The blossoms (make 28)
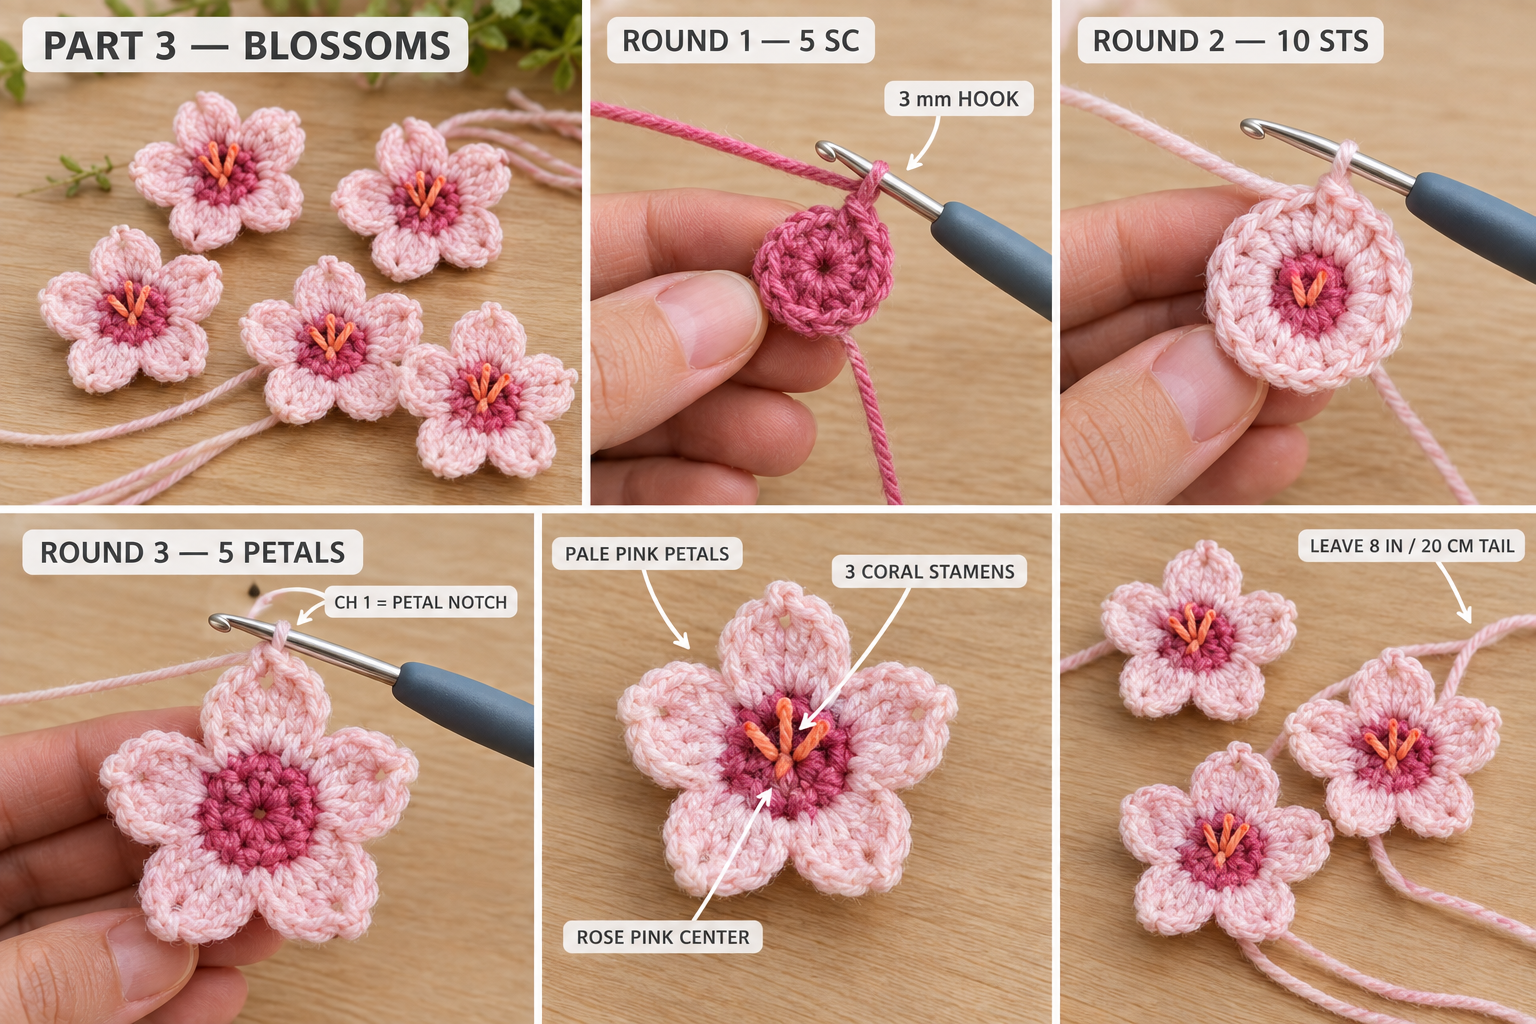
With the 3 mm hook.
Rnd 1 (Color C): MR, ch 1, 5 sc into the ring. Pull the ring closed and sl st to the first sc. (5 sts) Rnd 2 (Color C): Ch 1, 2 sc in each st around, sl st to the first sc. (10 sts) Fasten off Color C. Rnd 3 (Color D): Join Color D in any st. Sl st in the next st, then work (hdc, dc, ch 1, dc, hdc) all in the following st; repeat 4 more times for 5 petals. Sl st into the first sl st to join.
Fasten off Color D, leaving an 8-in (20 cm) tail. This is the tail you'll use to tie the blossom onto a branch, so don't weave it in. Weave in the Color C ends on the back.
Stamens: with Color E and a tapestry needle, make 3 short straight stitches radiating from the center over Rnd 1, then knot on the back.
That little ch 1 at the tip of each petal makes the notch that makes it read as a cherry blossom rather than a generic flower. Don't skip it.
My finding: On my first tree I made every flower in one pink, and from across the room it looked like a pink cloud rather than a blossoming tree. The two-tone version, with a deep rose center fading to pale petals, is what gives each flower depth. I now also make about a third of my blossoms with Color D for Rnd 2 as well. That softer, paler flower mixed in makes the canopy look far more natural.
Part 4 — The buds (make 12)
With Color C and the 3 mm hook.
MR, ch 2 (doesn't count as a stitch), 6 dc into the ring. Pull the ring tight so the stitches cup into a little ball. Sl st to the top of the first dc. Fasten off, leaving a 6-in (15 cm) tail. Tuck the starting tail inside the cup to fill it.
Part 5 — The wire armature
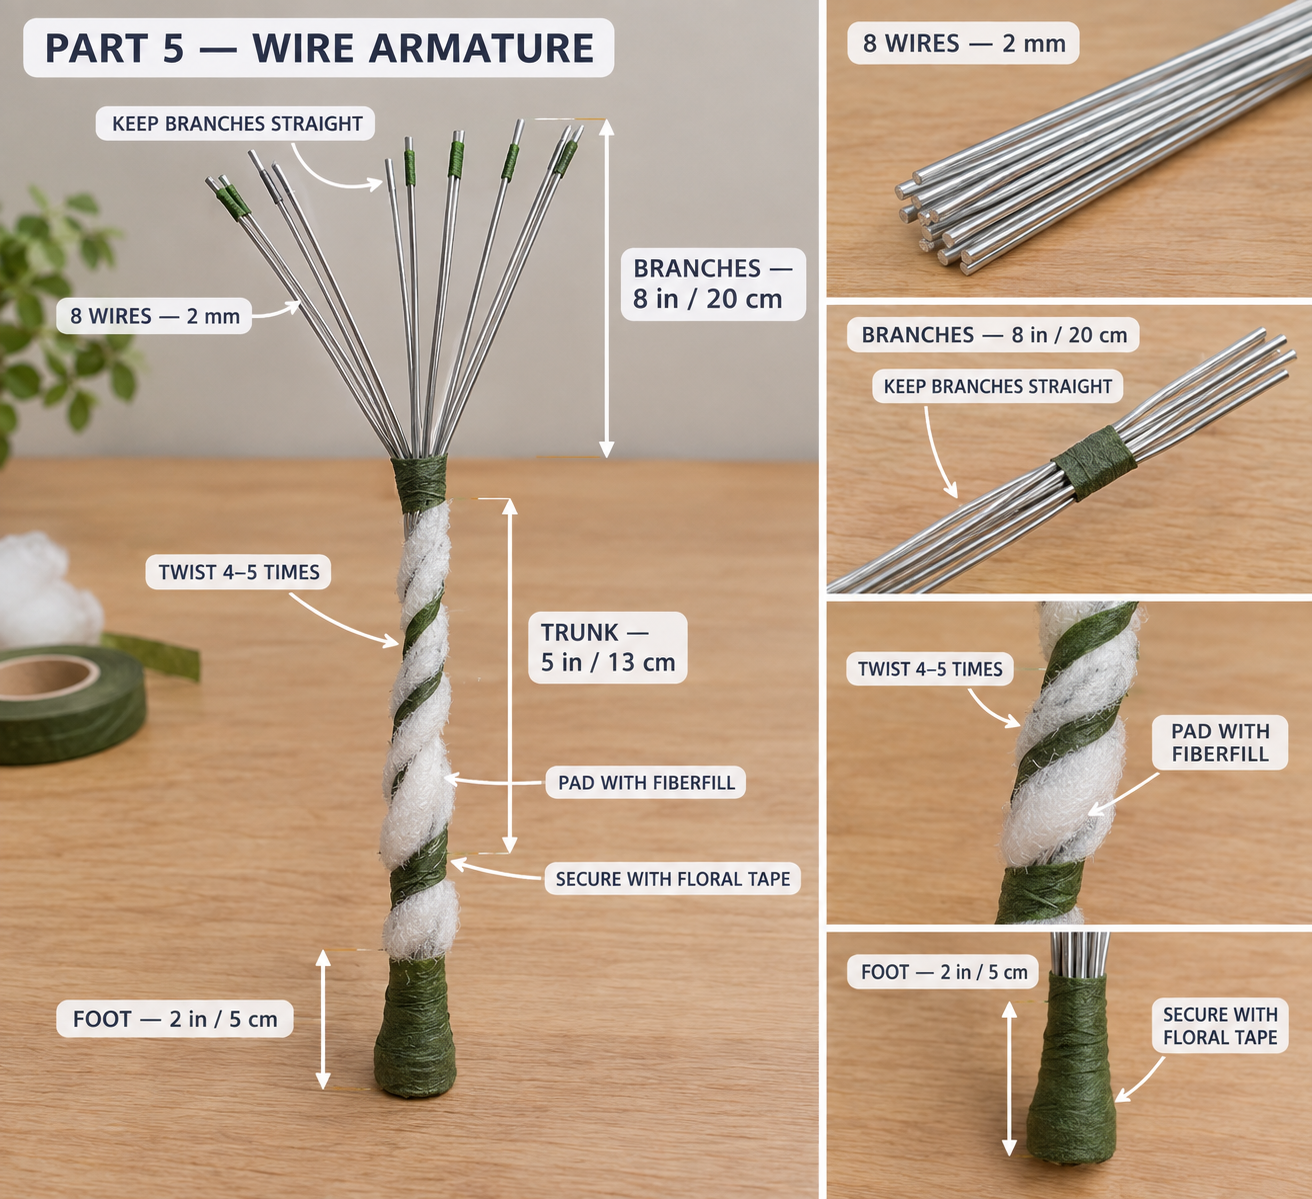
Cut eight 15-in (38 cm) lengths of 2 mm wire and hold them together as one bundle. Measure from one end and mark three zones with a marker:
- Foot (bottom 2 in / 5 cm): tape these ends tightly together with floral tape. This part goes into the foam.
- Trunk (next 5 in / 13 cm): twist the bundle firmly, like wringing a towel, 4 or 5 full turns.
- Branches (top 8 in / 20 cm): leave straight for now and tape them loosely together at the tip. You'll split them after the sleeve goes on.
Pad the trunk. Wrap thin strips of fiberfill or batting around the twisted trunk zone and bind them down with floral tape. Build the padding thicker toward the bottom so the trunk swells into a root flare. Aim for about 1 in (2.5 cm) across at the top of the trunk and 1.5 in (4 cm) at the base.
Part 6 — The trunk sleeve (make 1)
With Color B and the 4 mm hook, worked from the base up in continuous rounds. The starting chain is the root flare. The last round is the top of the trunk where the branches fork.
Leave an 18-in (45 cm) starting tail, then ch 24 and sl st into the first ch to form a ring, taking care not to twist the chain.
Rnd 1: Ch 1, sc in each ch around. (24 sts) Rnds 2–4: Sc in each st around. (24 sts) Rnd 5: Sc 2, dec; repeat around. (18 sts) Rnds 6–14: Sc in each st around. (18 sts) Rnd 15: Sc 1, dec; repeat around. (12 sts) Rnds 16–27: Sc in each st around. (12 sts)
Sl st into the next st and fasten off, leaving a 12-in (30 cm) tail.
Optional bark texture: work Rnds 2–27 in BLO. The unworked front loops form a spiral ridge that looks like twisted bark. That's the version in my photos. Skip it if plain sc is more comfortable for you.
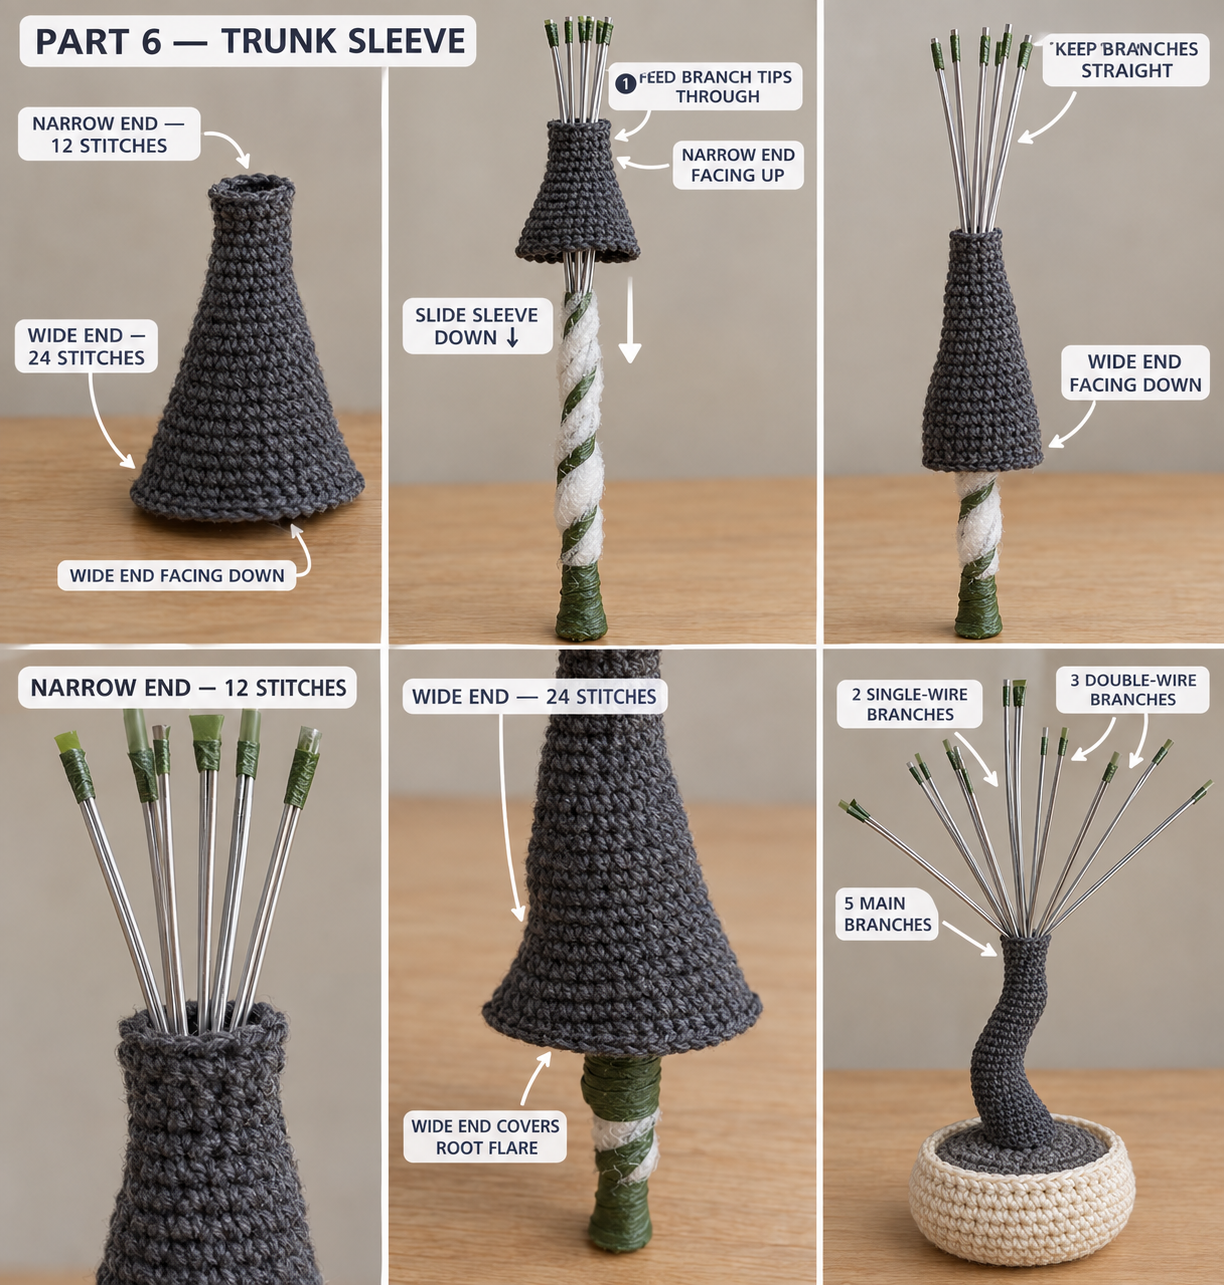
Fit the sleeve. In the finished tree, the wide 24-stitch end sits at the bottom over the root flare and the narrow 12-stitch end sits at the top under the branches. To get it there, stand the armature upright with the foot down. Hold the sleeve above the taped branch tips, already the right way up: wide end down, narrow end up. Feed the branch tips into the wide opening, push them out through the narrow end, and slide the sleeve down the trunk until the wide end covers the root flare. The narrow top should hug the trunk just below where the branches will fork. If it's loose, add another wrap of padding. If it's too tight to slide, peel one layer off.
My finding: The sleeve has to go on before you split or bend a single branch. I learned that the hard way on my second tree, when I'd already shaped a lovely canopy and then had nothing to slide the sleeve over. Keeping the branch wires taped straight until the sleeve is on turns this from a fight into a 30-second job.
With the top 12-in tail, sew a few stitches through the sleeve's last round and the padding underneath to snug the top edge closed around the wires.
Part 7 — Branches and wrapping
Untape the branch tips and split the 8 wires into 5 main branches: three branches of 2 wires each and two branches of 1 wire each. On each 2-wire branch, twist the pair together for the first 2 in (5 cm), then let them separate into two twigs.
Trim and fold the tips. Trim each twig to a length that looks balanced, usually 3 to 6 in (8–15 cm) from the fork, with shorter twigs on top and longer ones on the sides. Then use pliers to fold the last ¼ in (6 mm) of every tip back on itself. This blunts the cut end so it can't poke through the yarn.
Wrap the branches. Cut a 2-yd (1.8 m) length of Color B. Starting at the top of the sleeve, dab a little tacky glue on the wire, hold the yarn end against it and wrap tightly and evenly up the branch, each wrap touching the last. Where a branch forks, wrap one twig out to its tip, add a dot of glue, then wrap back down and carry on up the other twig. Cover each folded tip completely, then glue and trim the yarn end.
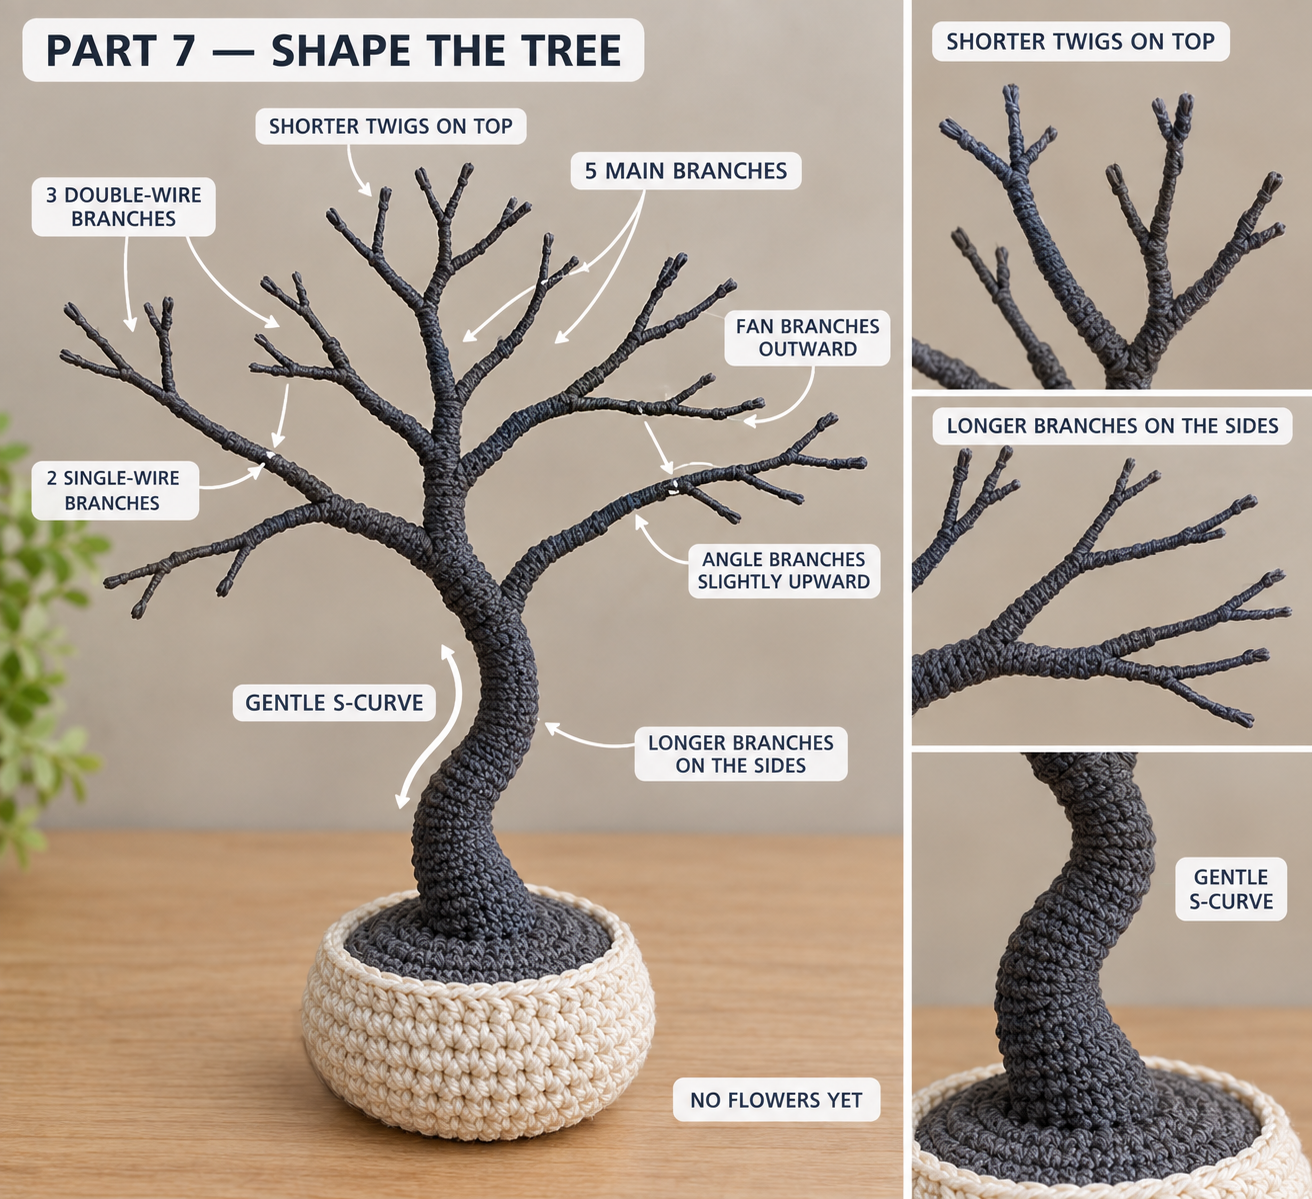
Shape the tree. Now bend the trunk into a gentle S-curve. Lean it one way just above the flare and back the other way halfway up. Then fan the branches out and slightly upward. Aluminum is forgiving, so bend slowly and step back often.
Part 8 — Planting
- Drop the cardboard circle into the bottom of the pot.
- Lay the bag of poly pellets flat on top. This ballast keeps the tree from tipping once the canopy is heavy with flowers.
- Cut the floral foam to fill the pot up to about ½ in (1.3 cm) below the rim, and press it in snugly.
- Thread the soil disc onto the wire foot through its center ring, and slide it up until it sits against the sleeve's root flare.
- Push the taped foot straight down into the center of the foam. For a rock-solid plant, pull it back out, squeeze glue into the hole and push it in again.
- With the soil disc's 24-in tail, whipstitch the disc's outer edge to the inside of the pot wall around Rnd 22.
- With the sleeve's 18-in starting tail, whipstitch the root flare down to the soil disc all the way around. Weave in both tails.
Part 9 — Adding the blossoms
Stand the tree at eye level. Work from the branch tips inward:
- Place a bud at the very tip of most twigs. Wrap its tail twice around the twig, knot it, add a dot of glue and trim.
- Add clusters of 3 to 5 blossoms just behind each tip. Pass the 8-in tail through the wrapped yarn on the twig, tie a firm double knot at the back of the flower, add a dot of glue and trim.
- Tuck the remaining blossoms singly along the main branches. Leave the lower trunk and the inner fork mostly bare so the shape of the tree still shows.
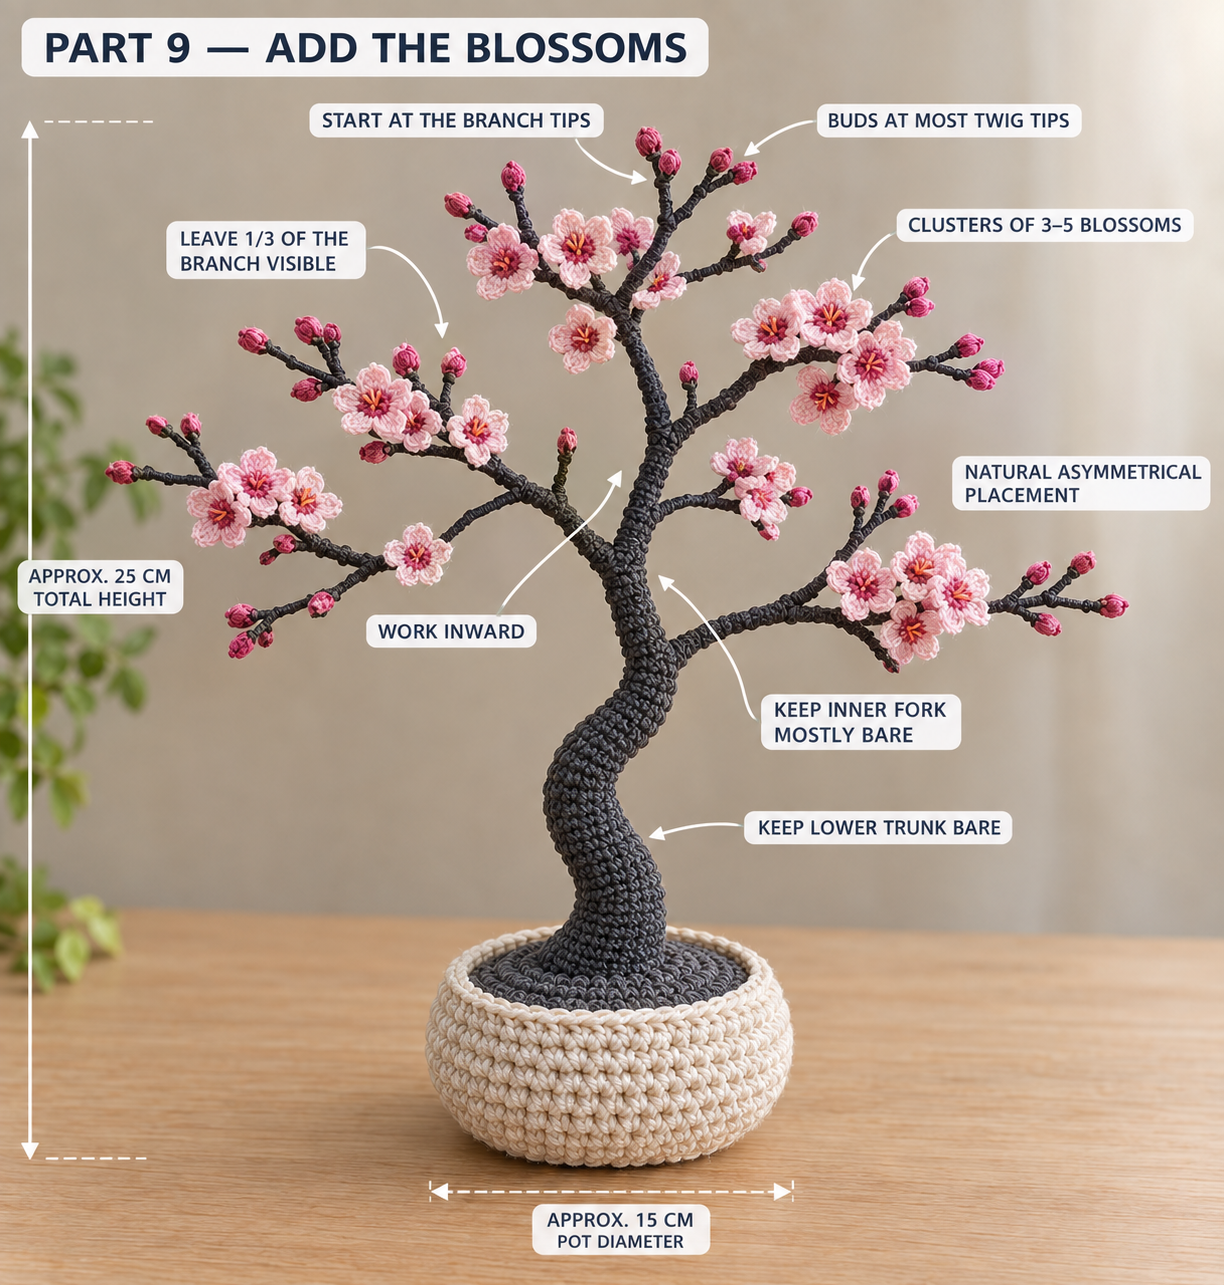
My finding: The finished tree looks most like a real bonsai when about a third of the branch is left showing. My first instinct was to cover every inch in flowers, but then it just looked like a pink ball on a stick. Cluster the blossoms near the tips, let a few buds poke out past them, and the dark twisting branches do half the decorating for you.
Make it yours — quick variations
| Variation | Change from base pattern |
|---|---|
| White blossom tree | Swap Color D for a soft white and Color C for pale blush. It suits a spring wedding table. |
| Autumn bonsai | Swap the blossoms for tiny rust, mustard and burgundy leaves. My crochet maple leaf pattern scaled down to DK on a 3 mm hook works well. |
| Tabletop mini | Use 4 wires of 10 in (25 cm), make 12 blossoms and 6 buds, and stop the pot base at Rnd 8 (48 sts) with 8 wall rounds. The result is about 6 in tall. |
| Sage pot | Make the pot in sage green instead of ecru to match a boho hanging basket on the same wall. |
| Spring set | Pair the tree with my crochet floral wreath in the same pinks for a matching front-door and hallway display. |
Troubleshooting the three things that go wrong
The tree leans or tips over
There's too little weight low down and too much up top. Add more poly pellets under the foam, and make sure the wire foot is glued into the foam rather than just pushed in. Also check that the S-curve brings the top of the tree back over the center of the pot. A trunk that ends up leaning off to one side will always tip.
The pot walls are floppy
Your tension is looser than mine, or the foam doesn't fill the pot. Press a slightly larger block of foam in so it pushes gently against the belly from inside. Next time, go down to a 3.75 mm hook for the pot.
The blossoms droop or spin around the branch
They're tied on with a single knot and no glue. Undo them, pass the tail through the wrapped yarn (not just around it), double-knot and add a small dot of tacky glue behind the flower's center. Once the glue dries, they'll stay facing exactly where you set them.
Frequently asked questions
How long does this mini crochet tree take to make? About 12 to 14 hours in total. That's roughly 2 hours for the pot, 30 minutes for the soil, 5 hours for 28 blossoms at about 10 minutes each, 45 minutes for the buds, 1 hour for the trunk sleeve, 2 hours for the armature and branch wrapping, and 2 hours for planting and flowering.
Can I make it without wire? Not as shown. Without an armature, a 10-inch trunk carrying 40 flowers will flop. If you'd like a wire-free version, stuff the trunk sleeve very firmly, skip the branches and cluster the blossoms on top as a round "pom" crown. You'll get a topiary rather than a bonsai.
What's the best yarn for the blossoms? A DK weight #3 cotton, like Paintbox Cotton DK. Cotton holds the notched petal tips crisply, and DK keeps each blossom around 1.25 in so the flowers stay in scale with the branches. A worsted cotton makes each flower nearly twice as big.
Is this safe for a child's room? It's safe as shelf decor out of reach. It isn't safe as a toy. The wire armature, the poly-pellet ballast and the small glued flowers are all hazards for children under 3 and for pets. Keep it somewhere little hands and curious cats can't get to.
How do I dust it? Use a hairdryer on its cool setting from about a foot away, or a clean, soft makeup brush. Don't wash it. Water will soak the floral foam and can loosen the glued joints.
Can I sell finished trees made from this pattern? Yes, you're welcome to sell physical trees made from this free pattern at craft fairs, on Etsy or as gifts. Please credit "Pattern by Wavode" on your listing and link back to this page. What you can't do is republish this write-up or my photos as your own pattern.
Related patterns on Wavode
- Crochet mini rose: another small-flower pattern, if you'd like to add a few roses in among the blossoms.
- Crochet floral wreath: the same spring pastels, worked into a door wreath.
- Crochet hanging basket: a boho home-decor piece that uses the same firm cotton construction as the pot.
Made this cherry blossom tree? Tag #wavodecrochet on Pinterest. I re-pin every finished make and credit the maker.
Pattern by Clara Hartwell for Wavode. Questions? Email me at support@wavode.com.