Ocean Wave Crochet Coaster

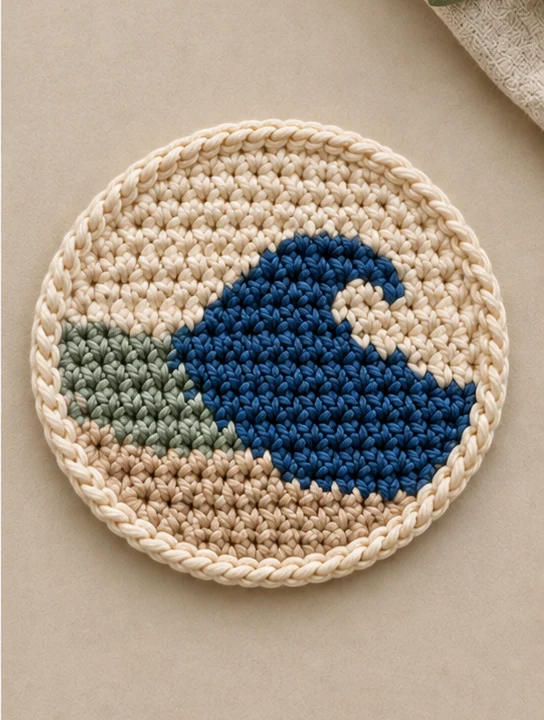
This free ocean wave crochet coaster pattern makes a 4.75-inch round beach coaster with a curling navy wave, a band of sage water, a sand shore and a cream sky. It's worked flat in rows of single crochet, with the colors carried inside the stitches, so the coaster comes out thick and sturdy. It uses about 38 yards of DK cotton in four colors and a 3.5 mm hook, and it takes 2 to 3 hours. Every row has written color counts.
Key Takeaways
- One flat piece, 24 rows + a border. The circle is shaped with simple increases and decreases at the row ends.
- Tapestry crochet in single crochet only. The carried yarn makes the coaster much thicker than plain sc. That's perfect under a hot mug.
- Never more than 3 colors in a row, and most rows use only 1 or 2.
- About 38 yd (35 m) of DK cotton per coaster. A set of four takes about 150 yd.
Why I love this wave coaster
A wave coaster is my favorite housewarming gift for anyone who loves the sea. It's small, it's useful every day, and it looks like a tiny piece of art on the table. I make them in sets of four, tied with twine, and they always get a "you made this?"
It's also a great first picture project. The first 6 rows are plain sand, so you can settle into the shaping before any color work starts. The wave has a big, simple shape, and the curl at the top is only a few rows. Once you've changed colors a few times, the rest is counting.
Why tapestry crochet for a coaster? Because it's thick. Working over the carried strands packs the fabric, so it soaks up drips and protects the table. A plain single-crochet coaster is thin, and a hot mug can leave a ring through it. This one feels like a little mat.
Skill level. Advanced beginner. You'll need single crochet, increases and sc2tog decreases, color changes and carrying yarn (I explain both below). The border uses reverse single crochet, with an easier option.
Looking for another piece for a beach house? My granny square beach tote is the perfect match. And my eyelet waves blanket brings the same ocean colors to the couch.
What you'll need
Yarn (DK #3 cotton)
- Cream for the sky and the border: about 18 yd (16.5 m).
- Navy for the wave: about 10 yd (9 m).
- Sand or light taupe for the shore: about 6 yd (5.5 m).
- Sage green for the water: about 3 yd (3 m).
- Paintbox Yarns Cotton DK or Scheepjes Catona (both DK #3) are good choices. Use 100% cotton for coasters: it's absorbent and handles heat, while acrylic can go shiny or melt under a very hot pot. In total, plan on 32–42 yd (29–38 m) per coaster.
Hook and notions
- 3.5 mm (US E-4) hook.
- A tapestry needle and scissors.
- Rust-proof pins and a towel, for blocking.
Gauge and finished size
For this pattern, gauge matters a little more than usual, because the picture needs square-ish stitches. Aim for about 22 sts and 22 rows to 4 in (10 cm) in tapestry single crochet. Tapestry sc is naturally a bit taller than plain sc, which is why the rows build a circle.
If your swatch is much wider than tall, go down half a hook size. If it's taller than wide, go up half a size.
Finished size: about 4.75 in (12 cm) across, including the border. That's roomy for a standard mug.
Abbreviations (US crochet terms)
- ch = chain
- sl st = slip stitch
- sc = single crochet
- inc = 2 sc in the same st
- sc2tog = single crochet 2 together (insert in the next st, pull up a loop, insert in the following st, pull up a loop, yarn over and pull through all 3 loops)
- rev sc = reverse single crochet, also called crab stitch (sc worked from left to right)
- RS / WS = right side / wrong side
- st(s) = stitch(es)
UK crocheters: this pattern uses US terms. US single crochet = UK double crochet.
How tapestry crochet works
Before you start, here are the three moves you'll repeat on every color row.
- Carrying. Lay the colors you're not using along the top of the row below. Then work each sc over them, so they're hidden inside the stitch. Only carry the colors that appear in that row.
- Changing color. Work the last stitch of the old color until 2 loops are left on the hook. Drop the old color, yarn over with the new color, and pull it through. The next stitch is in the new color.
- Keeping it tidy. Tug the carried strands gently every few stitches, so they lie flat but don't pucker the fabric. Turn the work clockwise at the end of one row, then counterclockwise at the end of the next. That keeps the balls from twisting together.
Adding a new color in the middle of a row: lay its tail along the top of the row from the very first stitch, and carry it until you need it. Retiring a color: after its last stitch, carry it for 3 or 4 more sts, then cut it close.
How the rows are written: the color counts are listed in the order you work them, from the start of the row to the end. On RS rows, the RS faces you, and the picture builds as you see it in the photos. Right-handed crocheters work each row from right to left.
Left-handed? Work the same written rows. Your wave will curl the other way, which looks just as nice.
The pattern — row by row
Every row starts with ch 1 (doesn't count as a st), then turn, except Row 1. The stitch count in brackets is the total for the row, including any increases.
Part 1 — The sand shore (Rows 1–6)
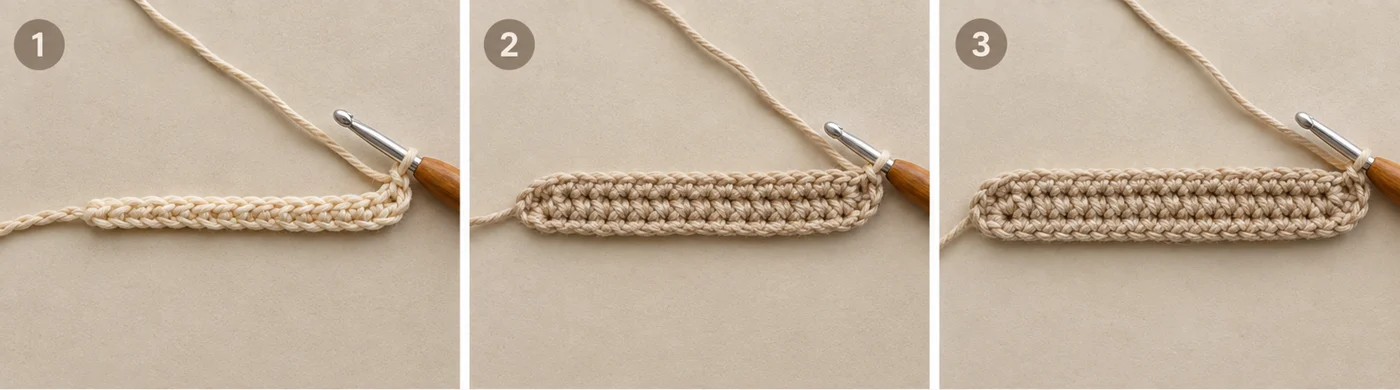
With sand, ch 9.
Row 1 (RS, 8 sts): sc in the 2nd ch from the hook and in each ch across. Colors: 8 sand.
Row 2 (WS, 12 sts): inc in the first 2 sts and the last 2 sts. Colors: 12 sand.
Row 3 (RS, 14 sts): inc in the first and last st. Colors: 14 sand.
Row 4 (WS, 16 sts): inc in the first and last st. Colors: 16 sand.
Row 5 (RS, 18 sts): inc in the first and last st. Colors: 18 sand.
Row 6 (WS, 20 sts): inc in the first and last st. Colors: 20 sand.
These first rows grow into a wide band with softly rounded ends. That's the bottom of your circle.
Part 2 — The water and the body of the wave (Rows 7–15)
Start carrying navy from the beginning of Row 7.
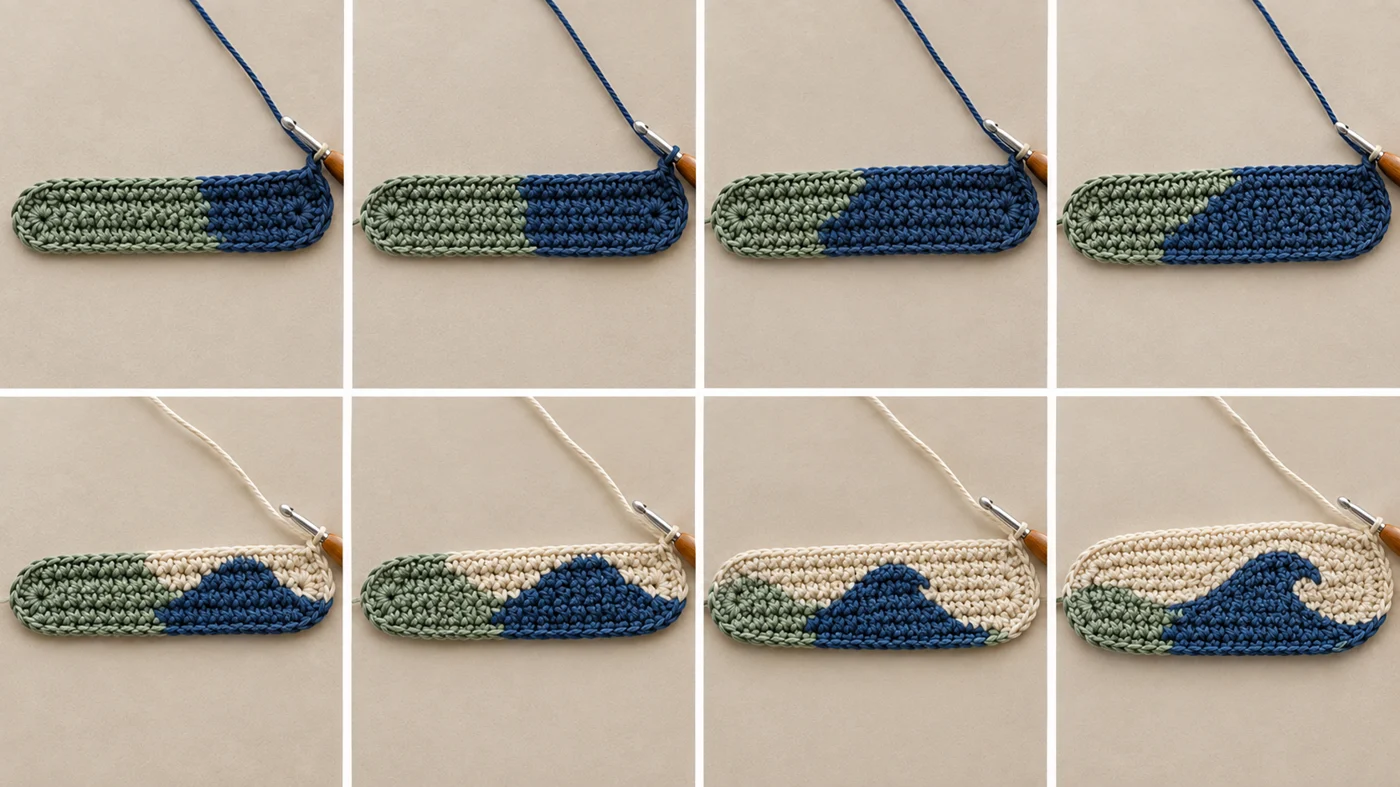
Row 7 (RS, 22 sts): inc in the first and last st. Colors: 2 sand, 8 navy, 12 sand.
Row 8 (WS, 22 sts): no shaping. Colors: 9 sand, 13 navy. After the last sand st, carry the sand for 4 sts, then cut it. Start carrying sage from the beginning of Row 9.
Row 9 (RS, 24 sts): inc in the first and last st. Colors: 16 navy, 8 sage.
Row 10 (WS, 24 sts): no shaping. Colors: 8 sage, 16 navy. Change to cream on the last yarn over of this row, and carry the navy and sage into Row 11.
Row 11 (RS, 24 sts): no shaping. Colors: 1 cream, 16 navy, 7 sage.
Row 12 (WS, 24 sts): no shaping. Colors: 7 sage, 15 navy, 2 cream. After the last sage st, carry the sage for 4 sts, then cut it.
Row 13 (RS, 24 sts): no shaping. Colors: 2 cream, 14 navy, 8 cream.
Row 14 (WS, 24 sts): no shaping. Colors: 9 cream, 12 navy, 3 cream.
Row 15 (RS, 24 sts): no shaping. Colors: 6 cream, 8 navy, 10 cream.
The sage band now sits on one side, at the water line, and the navy rises beside it like a peak. The sky starts to fill in above.
Part 3 — The curl and the sky (Rows 16–24)
This is where the wave rolls over. The small cream eye inside the curl is worked with the cream you're already carrying.
Row 16 (WS, 24 sts): no shaping. Colors: 11 cream, 6 navy, 2 cream, 2 navy, 3 cream.
Row 17 (RS, 22 sts): sc2tog over the first 2 sts and over the last 2 sts. Colors: 2 cream, 2 navy, 3 cream, 5 navy, 10 cream.
Row 18 (WS, 22 sts): no shaping. Colors: 11 cream, 9 navy, 2 cream.
Row 19 (RS, 20 sts): sc2tog over the first 2 sts and over the last 2 sts. Colors: 2 cream, 7 navy, 11 cream.
Row 20 (WS, 18 sts): sc2tog over the first 2 sts and over the last 2 sts. Colors: 11 cream, 4 navy, 3 cream. Carry the navy to the end of the row, then cut it.
Row 21 (RS, 16 sts): sc2tog over the first 2 sts and over the last 2 sts. Colors: 16 cream.
Row 22 (WS, 14 sts): sc2tog over the first 2 sts and over the last 2 sts. Colors: 14 cream.
Row 23 (RS, 12 sts): sc2tog over the first 2 sts and over the last 2 sts. Colors: 12 cream.
Row 24 (WS, 8 sts): sc2tog twice at the start and twice at the end. Colors: 8 cream.
Don't fasten off. You'll go straight into the border with the cream.
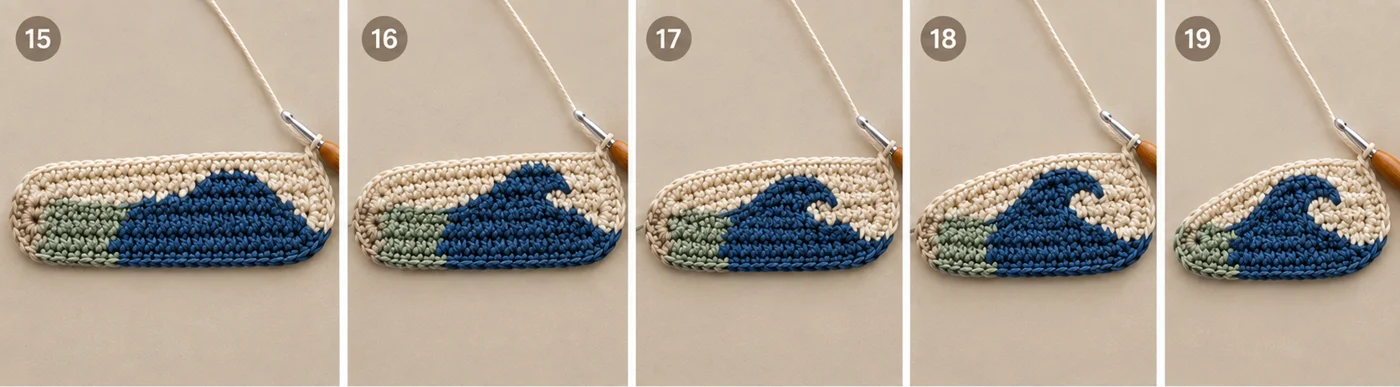
Check your picture. After Row 18, hold the piece at arm's length. You should see a clear hook at the top of the wave, with a little cream eye inside it. If the eye looks lopsided, count the navy and cream in Rows 16 and 17 again. It's easy to add one extra stitch there.
Part 4 — The border
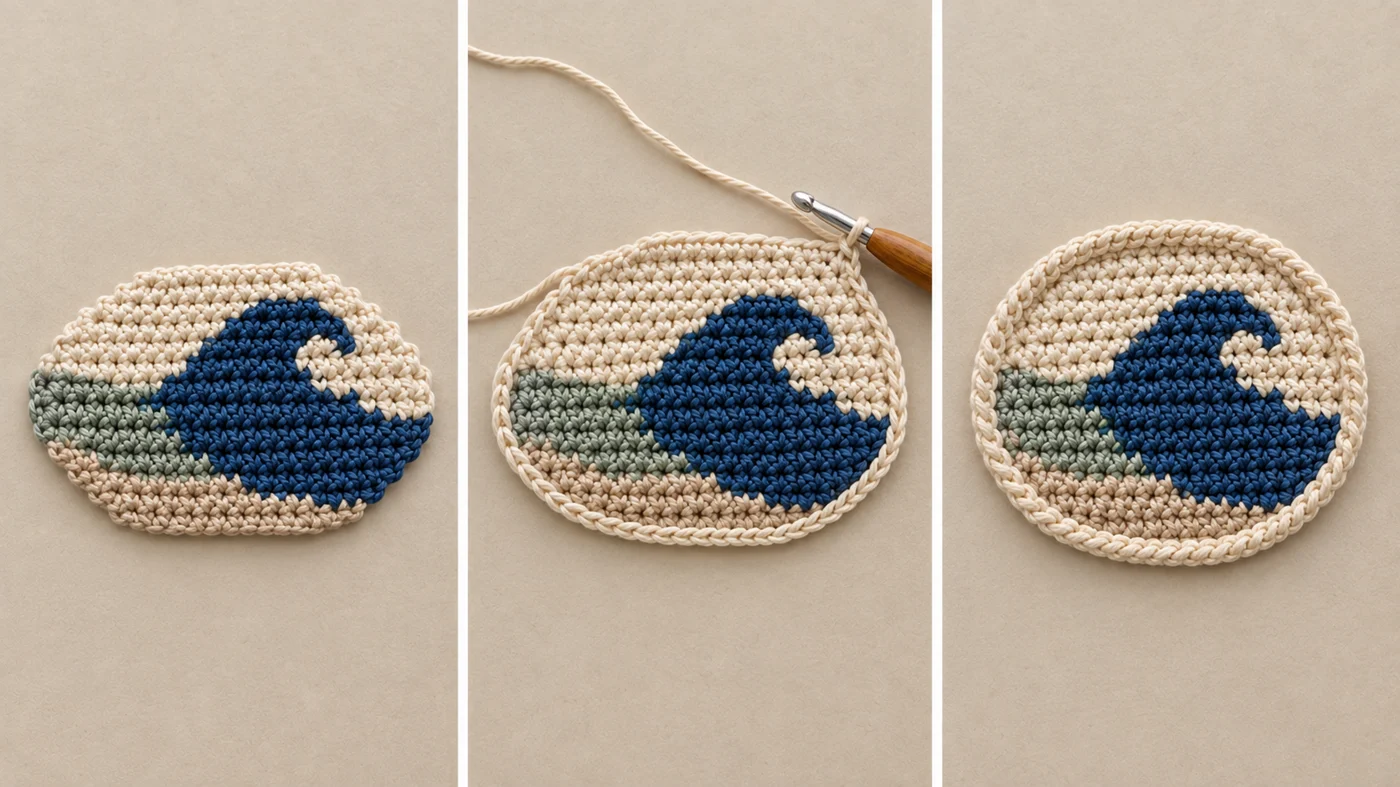
Before the border, your piece looks like a circle with slightly stepped edges. The border smooths them into a clean round.
Rnd 1 (RS): ch 1, then turn so the RS faces you. Sc evenly around the whole edge in cream. Work 1 sc in each row end, and 1 sc in each st of Row 1 and Row 24. Along the steps, where one row is wider than the next, work 1 sc for every 2 exposed sts. You'll have about 80 sts. The exact number doesn't matter, as long as the edge lies flat. Sl st into the first sc to join.
Rnd 2 (RS): ch 1. Work rev sc in each st around, from left to right. That gives the rope-like edge. Sl st into the first st to join. Fasten off.
Easier border. If crab stitch feels awkward, work Rnd 2 as a sl st in the back loop of each st instead. It gives a neat, flat edge.
Part 5 — Finish and block
- Weave in the tails on the back. Most of them are already hidden by carrying, so this only takes a few minutes.
- Block. Tapestry crochet in rows tends to lean a little. Pin the coaster into a circle, right side up, on a towel. Spray it with water until it's damp, then let it dry completely. Cotton holds its blocked shape well.
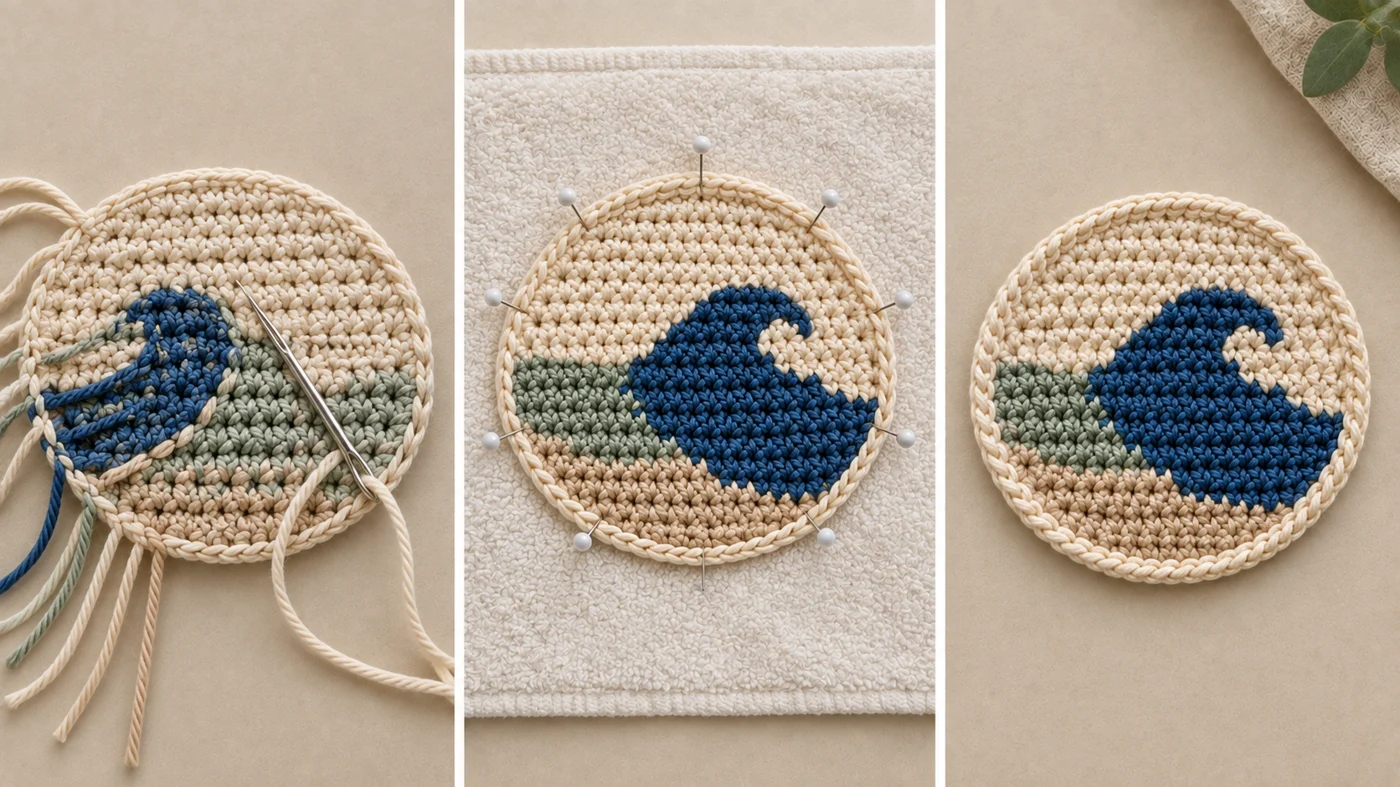
That's it! Put the kettle on and give your wave its first mug.
Make it yours — quick variations
| Variation | Change from base pattern |
|---|---|
| Sunset wave | Swap the cream sky for peach and the sage water for coral. Keep the navy wave. |
| Mirror pairs | For a set, work two coasters from the written rows and two with every row reversed (read each row's color counts backward). Half your waves curl left and half curl right. |
| Night sea | Make the sky navy and the wave cream. Everything else stays the same. |
| Mug rug | Add 2 more rounds of sc to the border (about 88, then about 96 sts, with a few increases spaced evenly) for a 5.5 in coaster. Add about 8 yd of cream. |
| Wall hanging | Make a coaster, sew a small brass ring to the back at the top, and hang it with a group of three. |
| Gift set | Make four coasters, stack them, and tie them with jute twine and a small seashell. |
Troubleshooting the three things that go wrong
The carried yarn shows through
Your stitches are too loose, or the carried strand is sitting on top of the row. Keep the carried yarn right along the top of the row below, and go down half a hook size if you still see flecks. Navy is the most likely to show through cream. A tighter tension usually fixes it.
The circle comes out oval
That's a gauge issue. If it's wider than tall, your stitches are wide. Go down half a hook size, or add firm blocking. If it's taller than wide, go up half a size. Blocking can fix a small difference, around 1/4 in.
The border ruffles or cups
A ruffle means too many stitches in Rnd 1, and cupping means too few. Pull it out and work it again. Try skipping one more st at each step for a ruffle, or adding 1 sc at each step for cupping.
Frequently asked questions
How long does the ocean wave coaster take? About 2 to 3 hours for your first one. There are 24 short rows, plus a two-round border. The color changes slow you down at first, especially in the curl, Rows 16–17. By your third coaster, it'll take closer to 1.5 hours.
How much yarn do I need? About 38 yd (35 m) of DK cotton per coaster: roughly 18 yd of cream, 10 yd of navy, 6 yd of sand and 3 yd of sage. For a set of four, one 50 g ball of each color is plenty, with lots of sage and sand left over.
Can I wash these crochet coasters? Yes. Cotton coasters can go in the washing machine on a warm, gentle cycle, ideally in a mesh bag. Lay them flat to dry and reshape them while they're damp. The colors may bleed a little on the first wash, so wash a new set separately or in cold water.
Is tapestry crochet hard for beginners? It's a small step up. If you can single crochet and change colors, you can do it. The trick is to carry the yarn you're not using along the top of the row and crochet over it. The first 6 rows are plain sand, so you'll have the shaping down before the color work begins.
Can I sell coasters made from this pattern? Yes, you're welcome to sell finished coasters made from this free pattern at markets, on Etsy or as gifts. Please credit "Pattern by Wavode" in your listing and link back to this page. What you can't do is republish this write-up or my photos as your own pattern.
Related patterns on Wavode
- Granny square beach tote: a monochrome cream tote with tassels.
- Eyelet waves blanket: an easy ripple throw in ocean colors.
- Daisy crochet potholder: a thick, heat-safe kitchen make.
- Crochet hanging basket: boho wall storage in cream and sage.
- Soft baby dolphin: a sky-blue ocean plush for little ones.
Made a wave coaster? Tag #wavodecrochet on Pinterest. I re-pin every finished make and credit the maker.
Pattern by Clara Hartwell for Wavode. Questions? Email me at support@wavode.com.