Tiny Crochet Sushi Roll

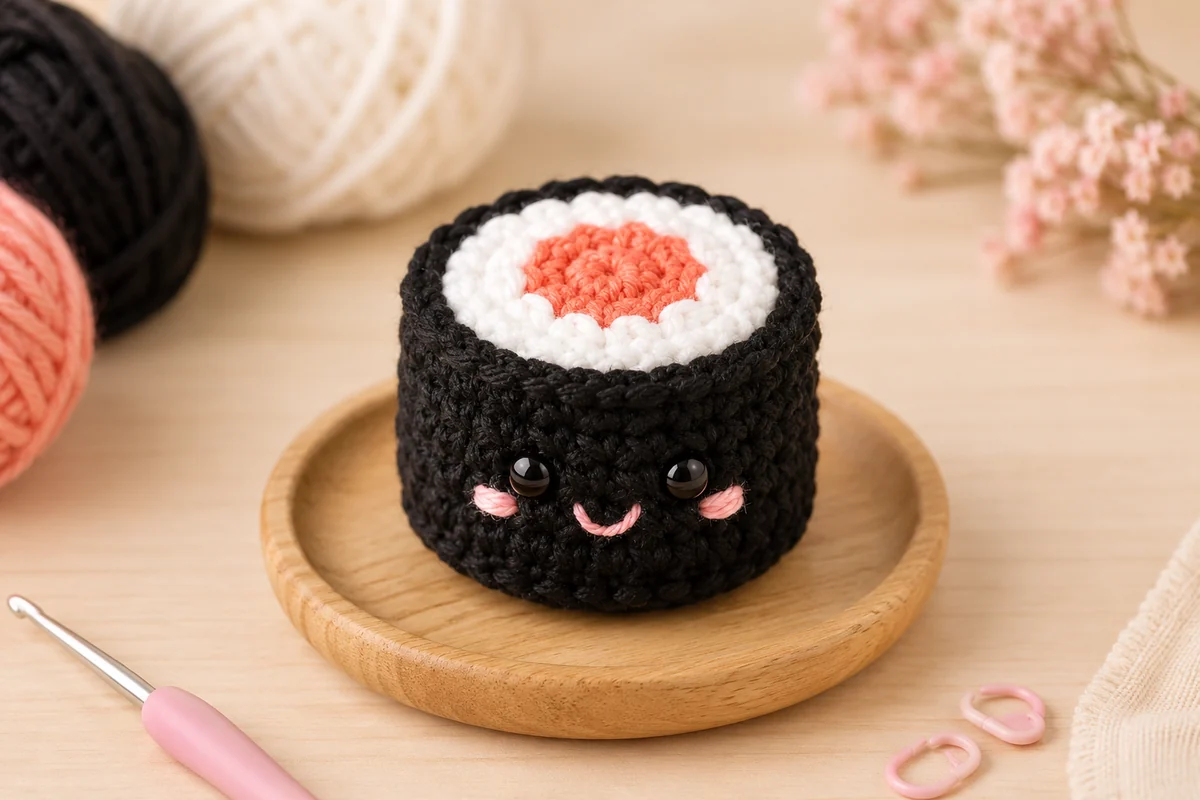
This free tiny crochet sushi roll pattern makes a 2-inch kawaii maki with a salmon center, a ring of rice and a black nori wrap. It's worked in one piece from the top down, in single crochet only, so there's nothing to sew together. You'll need about 40 yards of DK cotton scraps in four colors and a 2.5 mm hook, and it takes 1.5 to 2 hours.
Key Takeaways
- One piece, top to bottom. No separate parts, no assembly.
- Only single crochet, plus two back-loop rounds that make the crisp edges.
- About 40 yd (37 m) of DK cotton scraps: mostly black, a little white, salmon and pink.
- Make a whole platter. Swap the center color for cucumber, tamago or tuna.
Why I love this tiny sushi roll
It's the fastest smile I know how to crochet. It's a little cylinder with a face, and somehow everyone who sees one wants one. I've made them as desk buddies, party favors and gifts for the sushi lover in my life.
It's also a great first amigurumi. The shape is just a flat circle, a straight wall and another flat circle. The top and bottom use the same six-stitch increase rhythm, in reverse. If you can count to 36, you can make this.
The secret to the neat, "sliced" look is two rounds worked in the back loop only. They fold the fabric into sharp corners at the top and bottom edges. Without them, you get a soft marshmallow. With them, you get a roll that looks cut with a sushi knife.
Skill level. Beginner. You'll need a magic ring, single crochet, increases and decreases in the round, and a few color changes. I walk through each one below.
Love tiny food? My chunky dumpling and basket is its perfect partner. And if you like small projects you can clip anywhere, try my panda keychain.
What you'll need
Yarn (DK #3 cotton, all scraps)
- Black for the nori: about 28 yd (26 m).
- White for the rice: about 5 yd (4.5 m).
- Salmon orange or coral for the filling: about 4 yd (3.5 m).
- Pink for the smile and cheeks: about 1 yd (1 m).
- Paintbox Yarns Cotton DK is a good match, and any smooth DK cotton works. In total, plan on 35–45 yd (32–41 m). Cotton gives the cleanest edges and doesn't fuzz.
Hook and notions
- 2.5 mm (US B-1/C-2) hook. It's small on purpose, to keep the stitches tight.
- Two 6 mm black safety eyes (or black embroidery floss for a child-safe version, see below).
- A small handful of fiberfill stuffing.
- 1 stitch marker.
- A tapestry needle and scissors.
Gauge and finished size
Gauge isn't critical here. What matters is tension tight enough that the stuffing doesn't show through. If you can see white fiberfill between your black stitches, go down to a 2.25 mm hook.
Finished size: about 2 in (5 cm) across and 1.75 in (4.5 cm) tall. A slightly thicker cotton makes a slightly bigger roll, and that's fine.
Abbreviations (US crochet terms)
- MR = magic ring
- ch = chain
- sl st = slip stitch
- sc = single crochet
- inc = 2 sc in the same st
- dec = invisible decrease (insert the hook into the front loops of the next 2 sts, yarn over and pull through both, yarn over and pull through 2)
- BLO = back loop only
- st(s) = stitch(es)
- Rnd = round
- ( ) x6 = repeat what's in the brackets 6 times
UK crocheters: this pattern uses US terms. US single crochet = UK double crochet.
How the roll is built
Here's the whole shape in plain words:
- The magic ring is the center of the top face. That's where the salmon filling starts.
- Rnds 1–3 make a small salmon disc. You finish it off neatly, then join the white rice around it.
- Rnds 4–6 grow the circle: two rounds of white rice, then one round of black. That black round is the thin nori edge you see from the top.
- Rnd 7 is worked in the back loop only. The fabric turns down and starts the straight wall.
- Rnds 8–16 build the wall. Nothing changes; it's 36 sc every round.
- Rnd 17 is worked in the back loop only again. The fabric turns in and starts the bottom.
- Rnds 18–22 decrease back down to 6 sts, mirroring the top. The last round closes at the center of the bottom.
Work in continuous rounds, without joining. Put the marker in the first stitch of each round and move it up as you go.
The pattern — step by step
Part 1 — The salmon filling
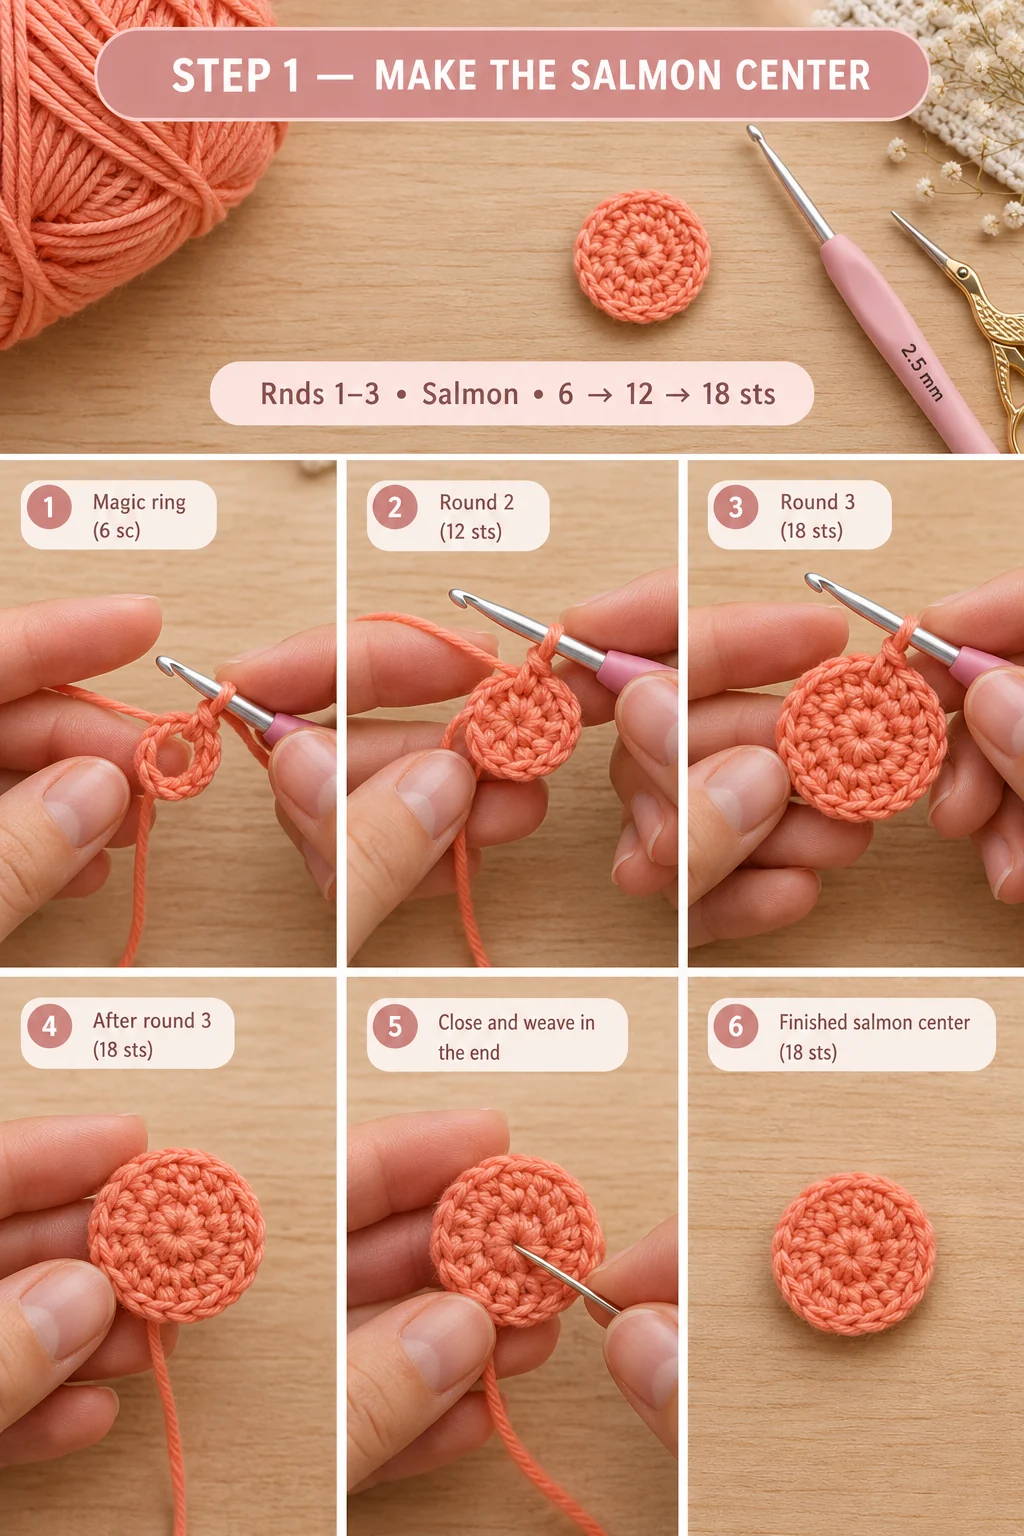
With salmon, make a magic ring.
Rnd 1: 6 sc in the MR. (6)
Rnd 2: inc x6. (12)
Rnd 3: (sc, inc) x6. (18)
Sl st into the next st and fasten off, leaving a 4-in tail. Pull the magic ring tail tight, then weave both tails in on the back of the disc and trim them. Starting the rice on a finished disc keeps the salmon circle perfectly round.
Part 2 — The rice ring
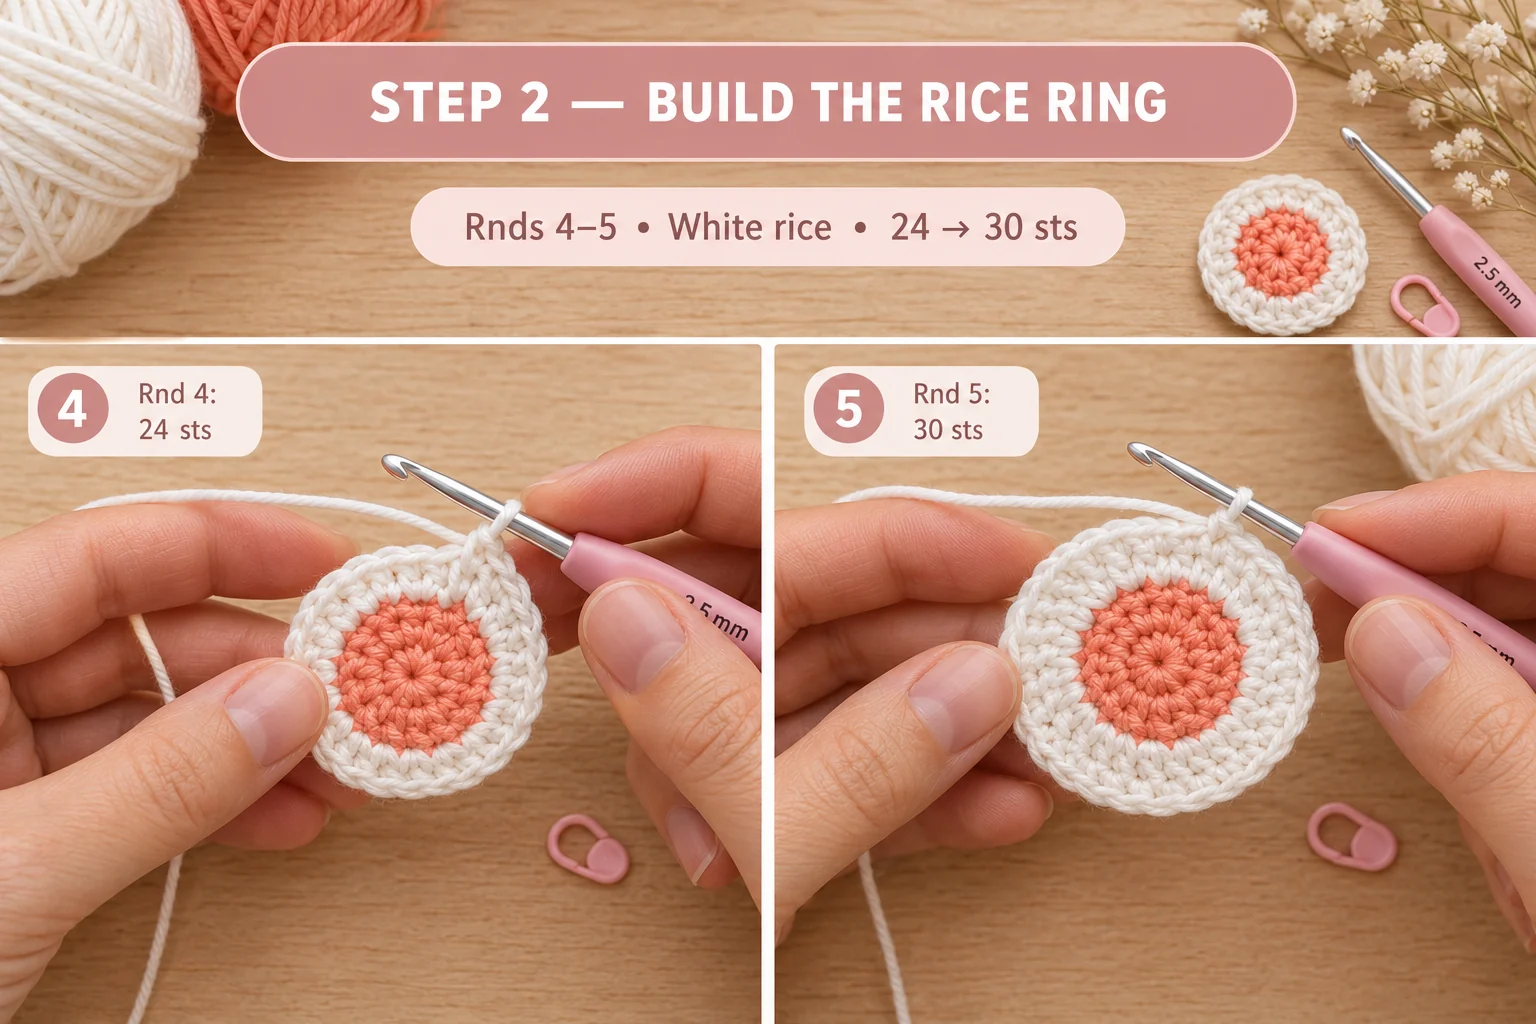
Join the white: with the right side of the disc facing you, insert the hook into any st of Rnd 3, pull up a loop of white and ch 1. Work the first sc of Rnd 4 into that same st.
Rnd 4: (2 sc, inc) x6. (24)
Rnd 5: (3 sc, inc) x6. (30)
Check that the circle lies flat. If it's starting to cup like a bowl, your increases are too tight. Try a looser tension on the increase stitches.
Changing to black cleanly. Work the last stitch of Rnd 5 until 2 loops are left on the hook. Drop the white, yarn over with black, and pull through. Cut the white, leaving a 4-in tail, and tie it loosely with the black tail on the back of the work.
Part 3 — The nori edge and the wall
You'll use black for the rest of the roll.
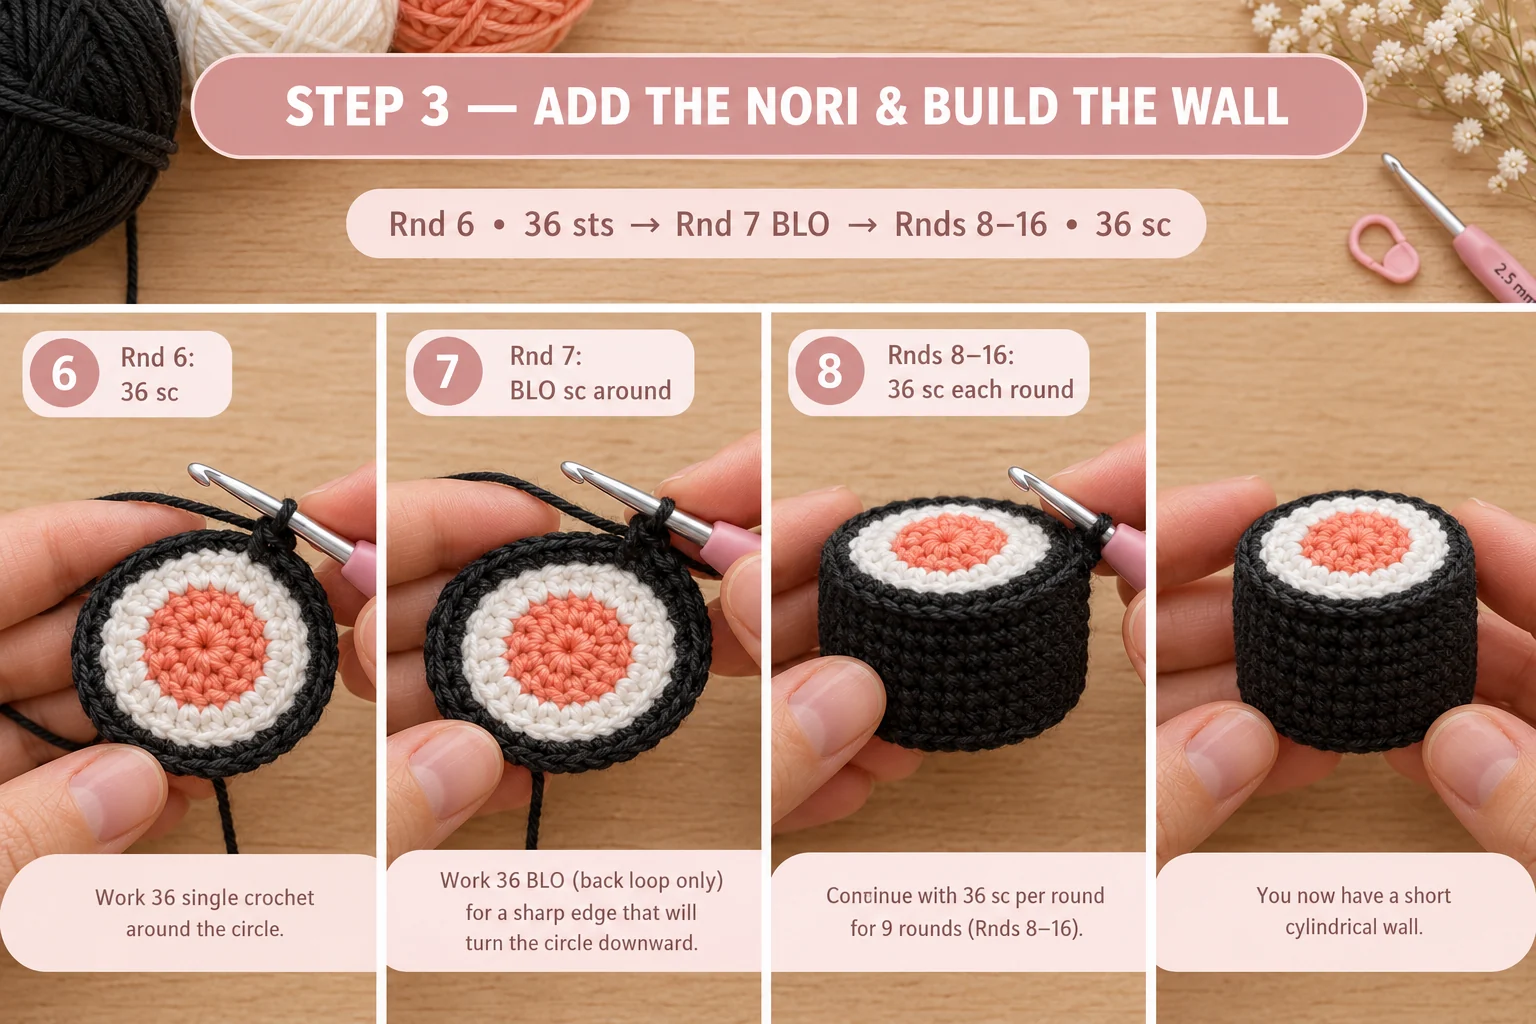
Rnd 6: (4 sc, inc) x6. (36)
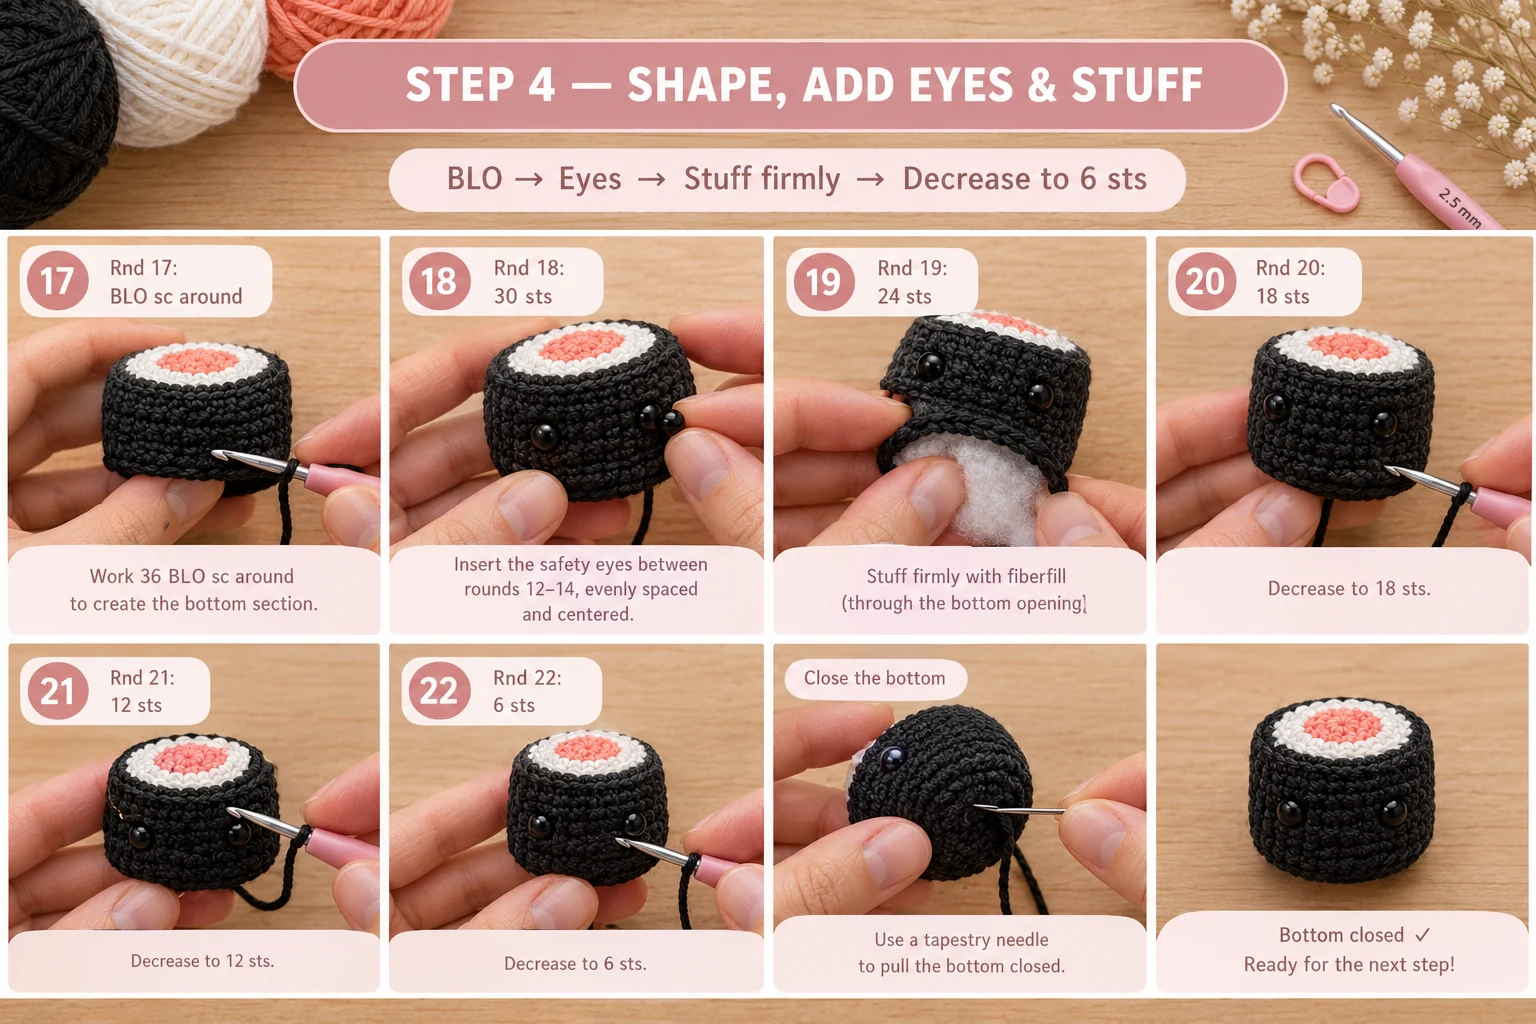
Rnd 7: BLO sc in each st around. (36)
The circle now turns down at the edge. On the top face you'll see a neat ridge of front loops right at the corner. That's your "cut" edge.
Rnds 8–16: sc in each st around. (36) That's 9 rounds.
The wall is now 10 rounds tall, counting Rnd 7, or about 1.5 in (4 cm).
Keep the wall straight. A wall that flares out means your tension got looser. One that narrows means you dropped a stitch. Count to 36 at the end of each round for the first few, until it's automatic.
Part 4 — Turn the bottom corner and add the eyes
Rnd 17: BLO sc in each st around. (36)
The fabric now turns in, and you've started the bottom.
Insert the safety eyes now, while the opening is wide. Put them between Rnds 12 and 13, 6 sts apart, centered on the side facing away from your color-change jog. Setting them a little below the middle of the wall gives the roll its sweet, chubby look. Push the washers on firmly from the inside.
Child-safe version. Safety eyes are not safe for children under 3, because they can come loose. For a small child, skip them and embroider each eye with black floss instead. Make a small filled oval of 4 or 5 straight stitches, with one tiny white stitch on top for the shine.
Part 5 — Stuff and close the bottom
Rnd 18: (4 sc, dec) x6. (30)
Rnd 19: (3 sc, dec) x6. (24)
Start stuffing now. Push it into the corners so the top stays flat and the wall stays round.
Rnd 20: (2 sc, dec) x6. (18)
Rnd 21: (sc, dec) x6. (12)
Top up the stuffing firmly. A tiny roll shows every soft spot, so add a little more than you think you need.
Rnd 22: dec x6. (6)
Fasten off, leaving a 6-in tail. Thread it onto the tapestry needle, and weave it through the front loop of each of the 6 sts. Pull it tight to close the hole. Then take the needle through the center and out the side, and trim the tail close so it disappears inside.
Part 6 — The face
- Smile. Thread about 12 in of pink onto your needle. Bring it out one round below the eyes, centered between them. Make a small U-shaped smile about 2 sts wide, using 2 short stitches. Knot it inside by taking the needle out the bottom, pulling gently and trimming the tail.
- Cheeks. Just below and outside each eye, make 2 or 3 short horizontal stitches in pink, side by side, over 1 st. That gives a soft little blush.
- Hide the tails. For each tail, take the needle into the roll and out the far side, then trim it close. The stuffing holds it in place.
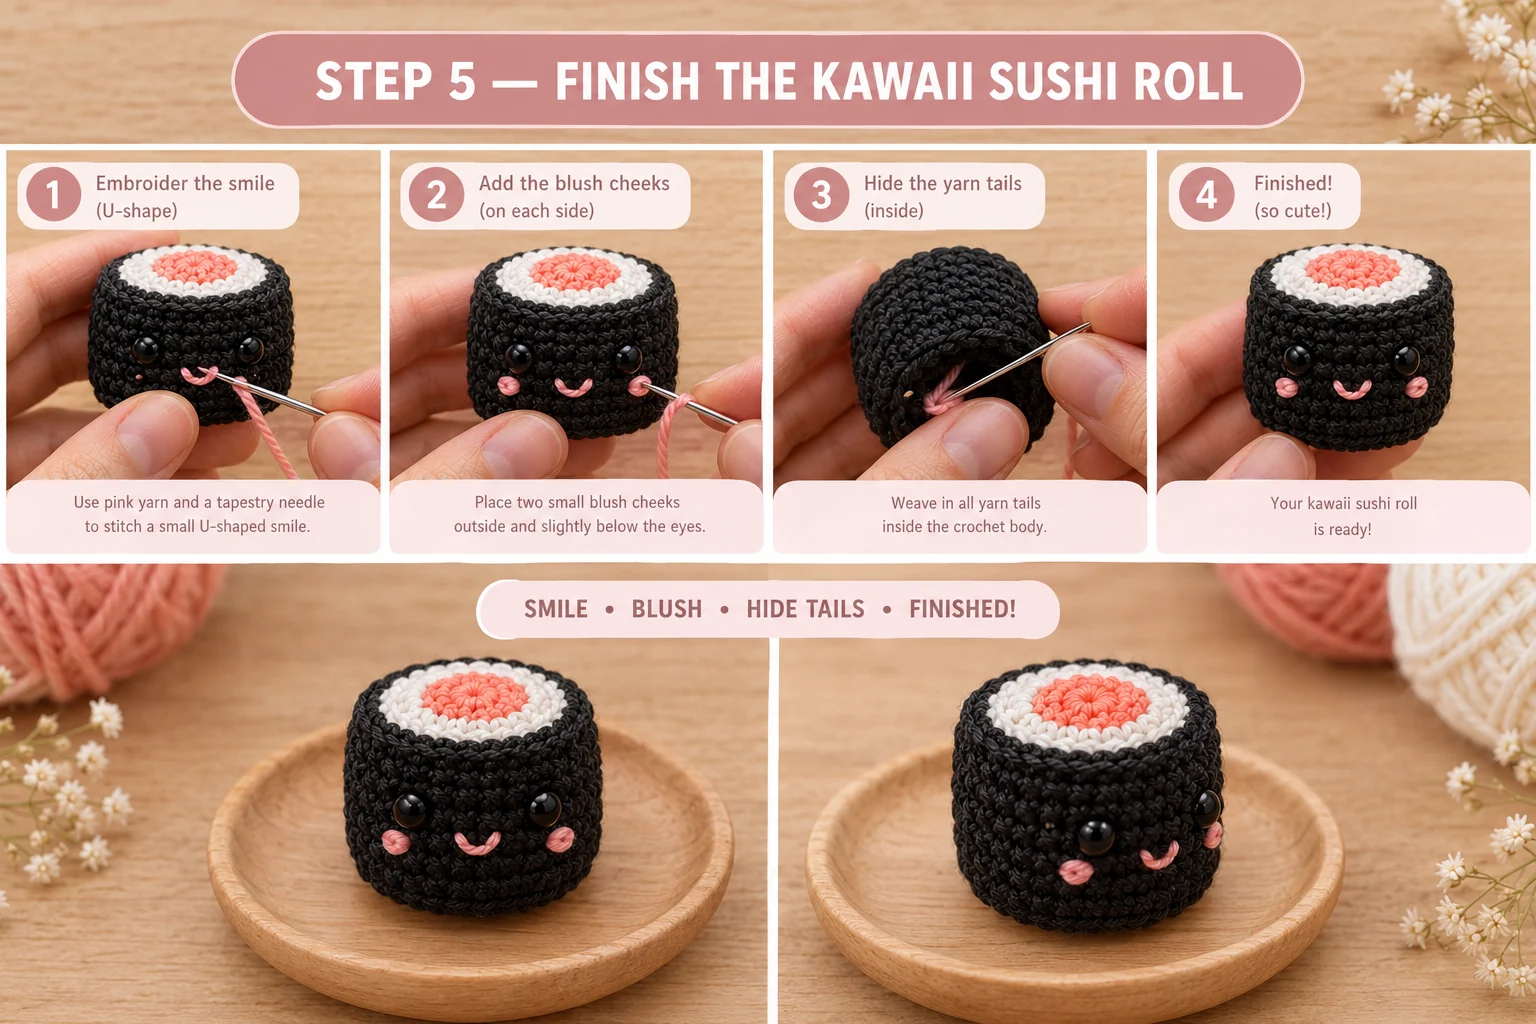
That's it! Set it on a little plate and try not to make five more.
Make it yours — quick variations
| Variation | Change from base pattern |
|---|---|
| Other fillings | Work Rnds 1–3 in green for cucumber, yellow for tamago or deep red for tuna. Everything else stays the same. |
| Double-faced roll | Stop after Rnd 16 and fasten off. Make a second top (Rnds 1–6 in salmon, white and black), leaving a 16-in black tail. Stuff the roll firmly. Hold the second top over the opening, right side out, and whipstitch its 36 edge sts to the 36 sts of Rnd 16. Now both ends show the filling. Add about 6 yd. |
| Taller roll | Add 2–4 wall rounds between Rnds 8 and 16. Each round adds about 0.15 in (4 mm) and about 2 yd of black. |
| Plain roll | Skip the face. It becomes a sweet, realistic maki for a play kitchen. Without safety eyes, it has no small hard parts, so it's the best choice for little kids. |
| Keychain | After Rnd 17, before you stuff, thread a 12-in doubled strand of black from the inside out through the top edge. Pass it through a split ring and back in 1 st over. Repeat through the same two holes 4 more times, then knot it firmly on the inside. Cotton stretches, so reinforce the loop if it loosens. Metal rings aren't safe for children under 3. |
| A sushi set | Make 3 rolls with different fillings. Pair them with my chunky dumpling and basket for a tiny takeout order. |
Troubleshooting the three things that go wrong
The top is cupped instead of flat
Your increases are pulling tight. This happens a lot with cotton on a small hook. Loosen up a little on the increase stitches, or go up to a 2.75 mm hook just for Rnds 1–6. Then go back to 2.5 mm for the wall.
The colors show a "step" where the rounds change
That's the jog you get in any spiral. It's why I put the eyes on the side away from it. For a smoother change to black, work the first stitch of the new color as a slip stitch instead of a sc, then carry on.
The corners are soft and rounded
The back-loop rounds are doing their job only if you catch just the back loop. Double-check Rnds 7 and 17. Also stuff firmly into the edges. A roll that's under-stuffed loses its corners, even with the BLO rounds.
Frequently asked questions
How long does the tiny sushi roll take? About 1.5 to 2 hours for your first one. There are 22 short rounds, and the wall rounds go quickly once you're in the rhythm. The face takes about 10 minutes. By your third roll, it'll be closer to an hour.
How much yarn do I need? About 40 yd (37 m) of DK cotton in total. Most of it is black, about 28 yd. The rice ring takes about 5 yd of white, the filling about 4 yd of salmon, and the face about 1 yd of pink. It's a perfect scrap-busting project.
Is this sushi amigurumi safe for babies? Not as written. The 6 mm safety eyes can come loose and are a choking hazard for children under 3. For a small child, embroider the eyes with black floss, skip any keychain hardware, and sew every tail securely. A plain roll with no face is the simplest safe version.
Can I use a different yarn weight? Yes. The rounds stay the same, and only the size changes. Worsted #4 on a 3.5 mm hook makes a roll about 2.5 in across. Super bulky blanket yarn on a 5 mm hook makes a big squishy roll about 5 in across. Just keep the hook small enough that the stuffing doesn't show through.
Can I sell sushi rolls made from this pattern? Yes, you're welcome to sell finished rolls made from this free pattern at markets, on Etsy or as gifts. Please credit "Pattern by Wavode" in your listing and link back to this page. What you can't do is republish this write-up or my photos as your own pattern.
Related patterns on Wavode
- Chunky dumpling and basket: a squishy dumpling that fits snugly in its own lidded basket.
- Panda keychain: a one-hour black-and-white mini amigurumi.
- Crochet mushroom keychain: a kawaii red-cap amanita with an embroidered smile.
- Campfire keychain: a tiny bonfire with logs and stones.
Made a sushi roll? Tag #wavodecrochet on Pinterest. I re-pin every finished make and credit the maker.
Pattern by Clara Hartwell for Wavode. Questions? Email me at support@wavode.com.