Christmas Granny Square

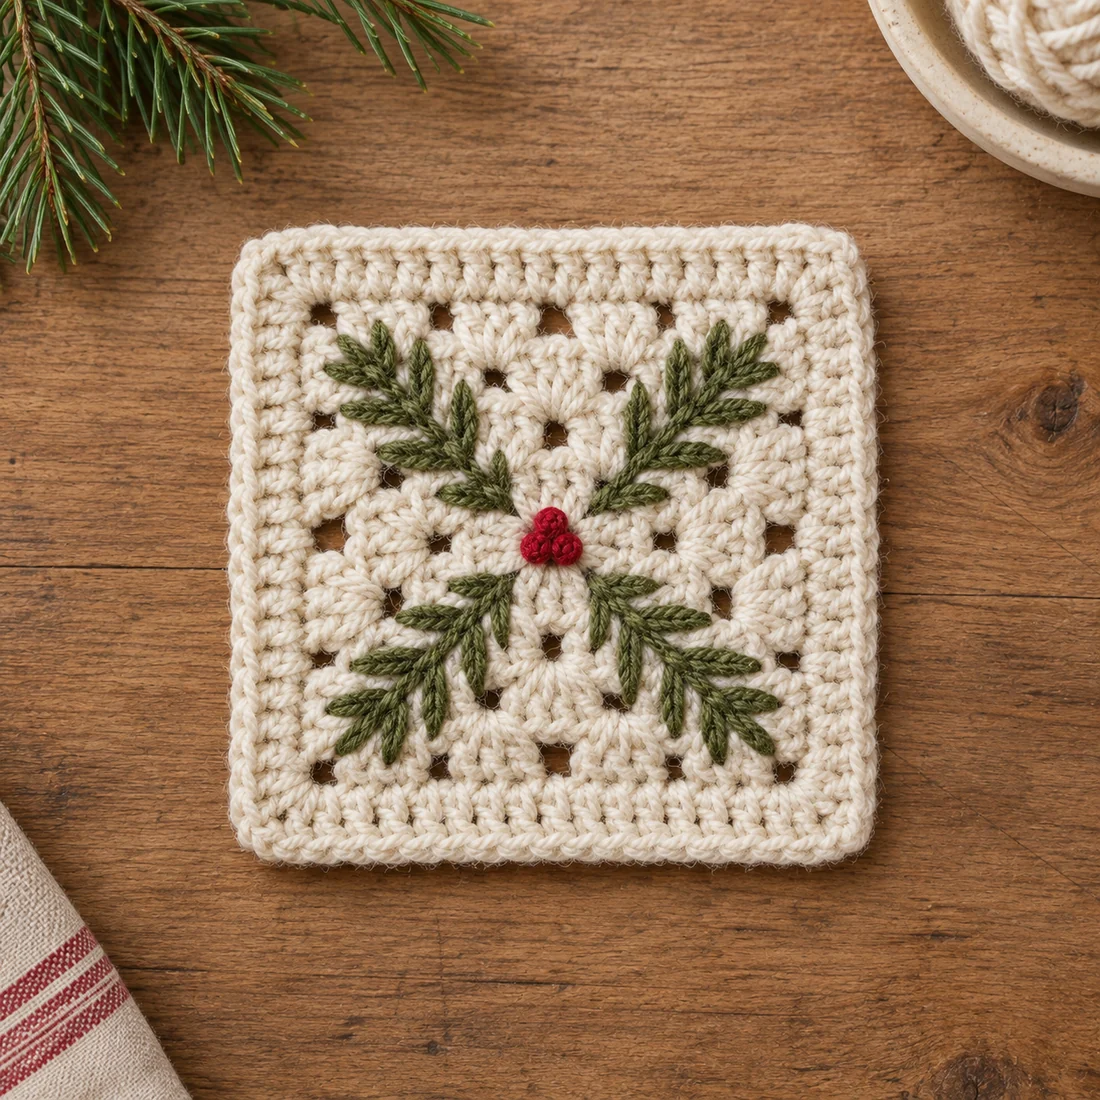
This free Christmas granny square crochet pattern makes a 5.5-inch cream square with four olive pine sprigs running from the center to each corner, around a little red berry. The square is a classic five-round granny with a single crochet border. The pine sprigs are simple straight stitches sewn on afterward, anchored on the corners of the granny rounds, so there's no measuring and no color changes. It takes about 28 yards of cream, 4 yards of green and 1 yard of red worsted yarn, a 5 mm hook and 1.5 to 2 hours.
Key Takeaways
- A classic granny, then a sprig on top. Five rounds of granny clusters, one round of single crochet, then the embroidery.
- The corners are your map. Each round's corner chain sits on the diagonal, so every stem stitch runs from one corner to the next.
- 52 straight stitches and 3 French knots finish the design: 13 per branch, plus the berry.
- About 33 yd (30 m) of worsted yarn in total. A throw-size blanket of 99 squares takes about 2,800 yd of cream.
Why I love this square
Every November I start a new holiday project, and this is the square I keep coming back to. It looks calm and a bit Scandinavian, not loud. The cream granny holes let the light through, and the green sprigs sit on top like a pressed branch.
It's also the easiest way I know to make a granny square look special. The crochet part is a granny you might already know by heart. The design comes from the needle, and even that follows the square's own corners. If you can thread a tapestry needle, you can stitch a pine sprig.
Why embroider the pine instead of crocheting it in? Because stitched sprigs stay crisp. A crocheted color change inside granny clusters gets blurry at this size. Straight stitches lie flat and give those clean, slanted needles you see in the photo.
Skill level. Easy. You'll need chains, slip stitches, double crochet and single crochet. The embroidery uses only straight stitches and French knots, and I explain both below.
Looking for more Christmas makes? My scalloped crochet Christmas tree sits beautifully next to a stack of these squares. And my crochet Christmas gnome is a quick wall hanging for the front door.
What you'll need
Yarn (worsted #4)
- Cream or oatmeal for the square: about 28 yd (26 m).
- Olive or sage green for the pine sprigs: about 4 yd (3.5 m).
- Cherry red for the berry: about 1 yd (1 m).
- Lion Brand Vanna's Choice or Red Heart Super Saver (both worsted #4 acrylic) give the soft, matte look in the photo. In total, plan on 30–36 yd (27–33 m) per square.
Making coasters or mug rugs? Use a worsted cotton such as Lily Sugar 'n Cream (worsted #4) instead. Acrylic can go shiny or melt under a very hot mug.
Hook and notions
- 5 mm (US H-8) hook.
- A tapestry needle with a blunt tip. You'll pierce chains and stitches with it, and a blunt tip slides between the plies instead of splitting them.
- Scissors, rust-proof pins and a towel for blocking.
Gauge and finished size
Gauge isn't critical for a single square, but it matters when you join squares into a blanket. After Round 3, your square should measure about 3.5 in (9 cm) across. If it's bigger, go down half a hook size. If it's smaller, go up half a size.
Finished size: about 5.5 in (14 cm) square after blocking, including the border.
Abbreviations (US crochet terms)
- MR = magic ring
- ch = chain
- sl st = slip stitch
- sc = single crochet
- dc = double crochet
- sp = space (ch-1 sp, ch-2 sp)
- st(s) = stitch(es)
- cluster = a group of 3 dc worked into the same space
UK crocheters: this pattern uses US terms. US single crochet = UK double crochet, and US double crochet = UK treble crochet.
Part 1: The granny square
The whole square is worked in the round with the right side facing you. You never turn. The ch 3 at the start of each round counts as the first dc.
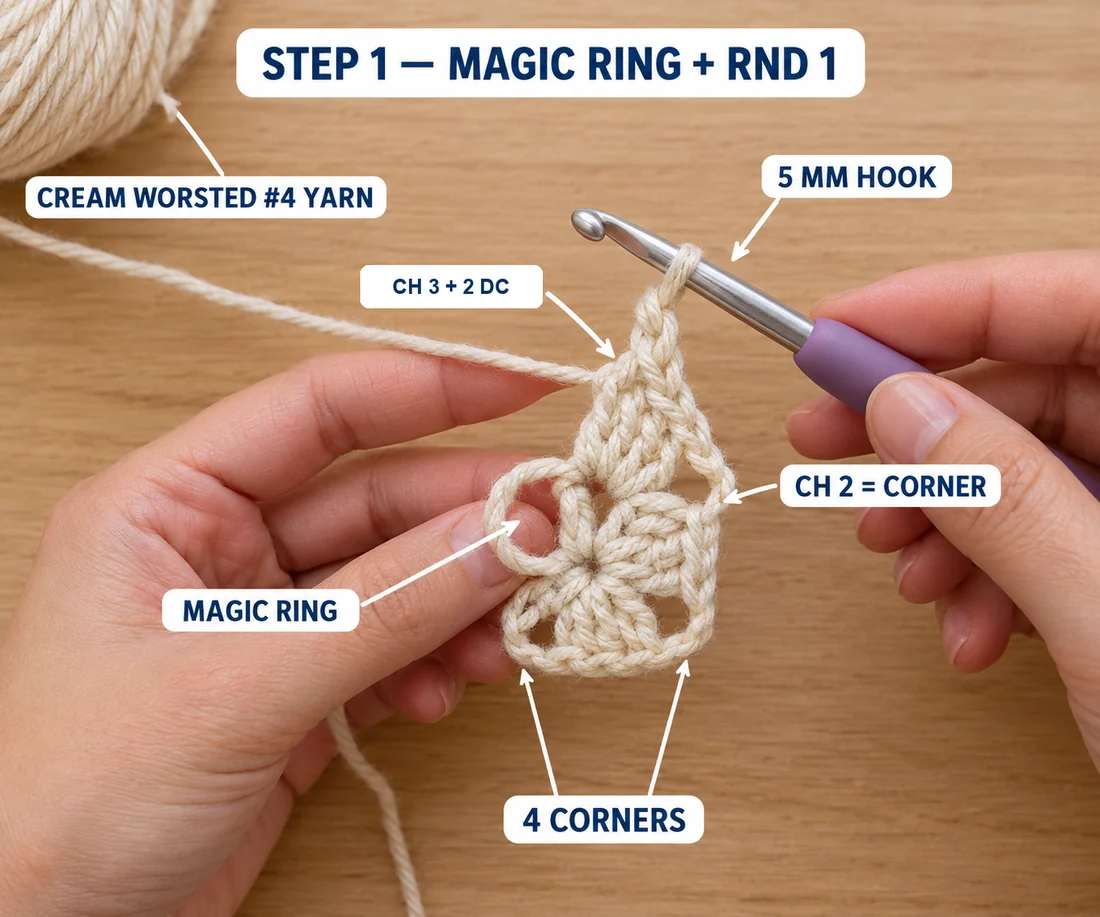
Rnd 1: In cream, make a MR. Ch 3, 2 dc in the ring, ch 2, *3 dc in the ring, ch 2; repeat from * 2 more times. Sl st into the top of the ch-3 to join. Pull the tail firmly to close the center. [12 dc: 4 clusters, 4 corner ch-2 sps]
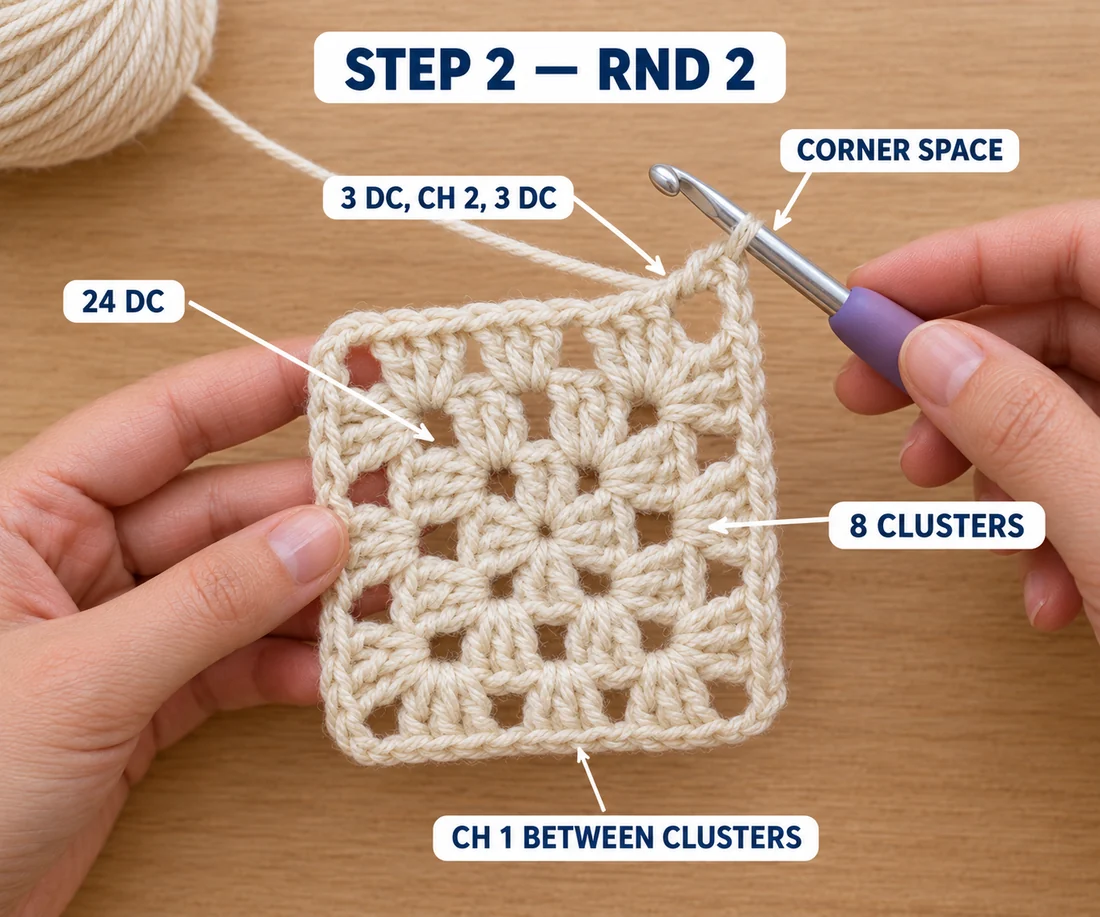
Rnd 2: Sl st in the next 2 dc and into the corner ch-2 sp. Ch 3, then work (2 dc, ch 2, 3 dc) in the same sp. *Ch 1, then (3 dc, ch 2, 3 dc) in the next corner ch-2 sp; repeat from * 2 more times. Ch 1, then sl st into the top of the ch-3. [24 dc: 8 clusters, 4 ch-1 sps]
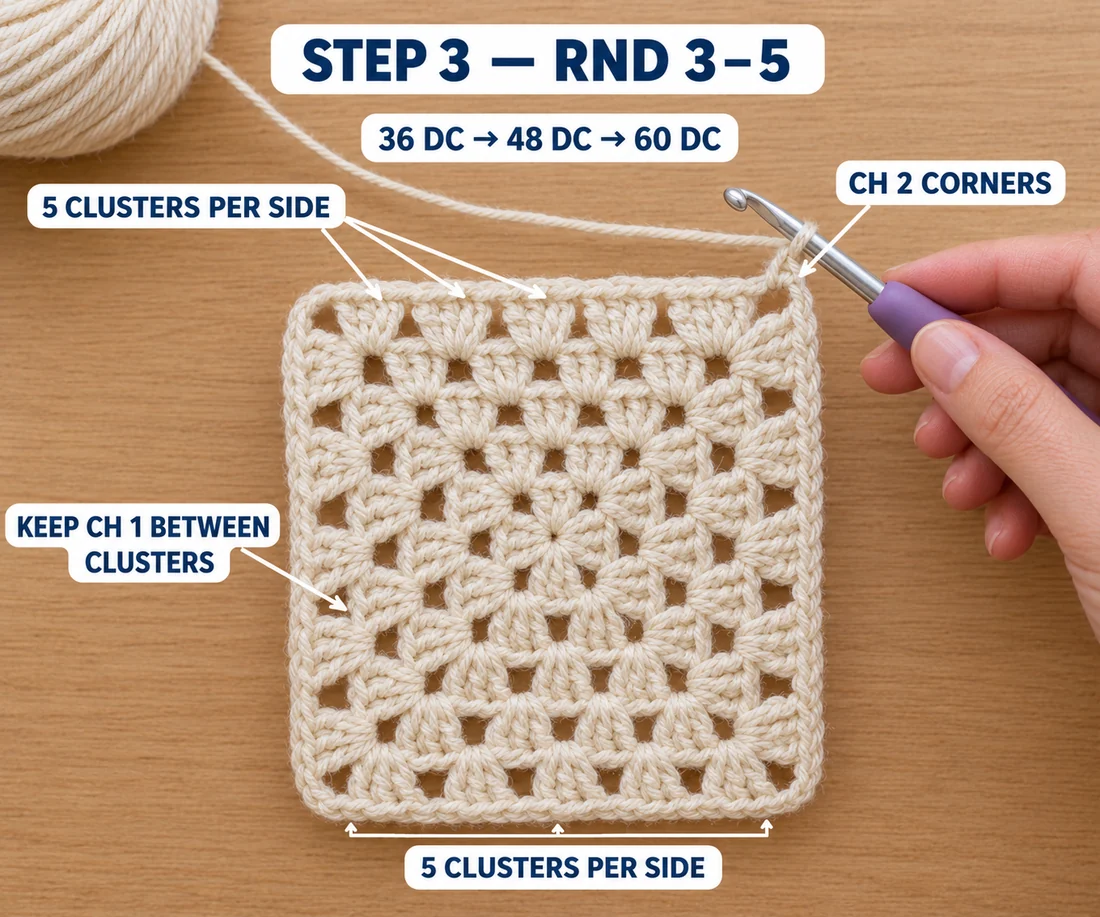
Rnd 3: Sl st in the next 2 dc and into the corner ch-2 sp. Ch 3, then (2 dc, ch 2, 3 dc) in the same sp. *Ch 1, 3 dc in the next ch-1 sp, ch 1, (3 dc, ch 2, 3 dc) in the next corner sp; repeat from * 2 more times. Ch 1, 3 dc in the last ch-1 sp, ch 1, then sl st into the top of the ch-3. [36 dc: 12 clusters, 8 ch-1 sps]
Rnd 4: Work as Rnd 3, but between corners work (ch 1, 3 dc) in each ch-1 sp along the side, then ch 1 before the next corner. [48 dc: 16 clusters, 12 ch-1 sps]
Rnd 5: Work as Rnd 4. [60 dc: 20 clusters, 16 ch-1 sps]
Each side now has 5 clusters: half of each corner group, plus 3 clusters in between.
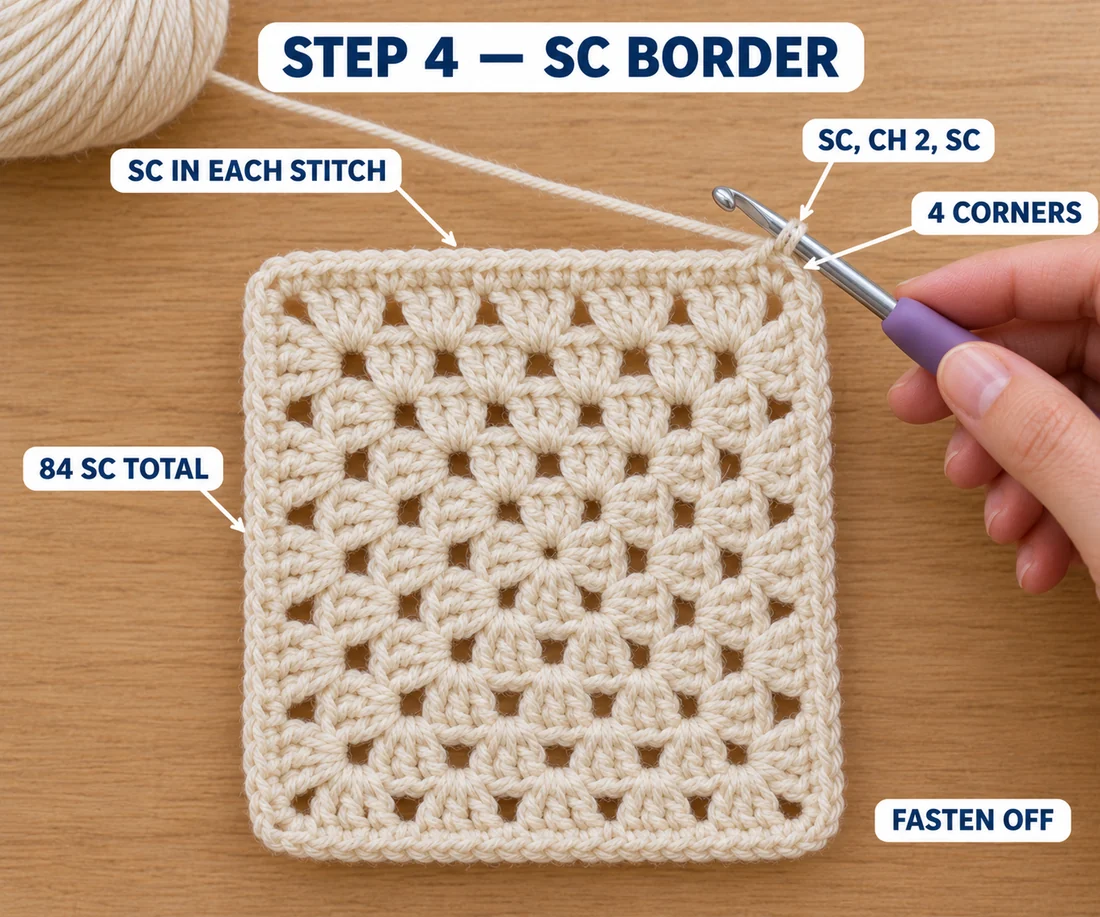
Rnd 6 (border): Ch 1. Sc in the same st as the join and in the next 2 dc. *(Sc, ch 2, sc) in the corner ch-2 sp. Sc in each dc and each ch-1 sp along the side, to the next corner. Repeat from * 3 more times. On the last side, you'll stop after the sc in the final ch-1 sp, right before the first sc of the round. Sl st into the first sc to join. Fasten off. [84 sc: 21 per side, 4 corner ch-2 sps]
Weave in your tails now, before you embroider. The embroidery sits on top, and loose tails would get caught in it.
Block before you stitch
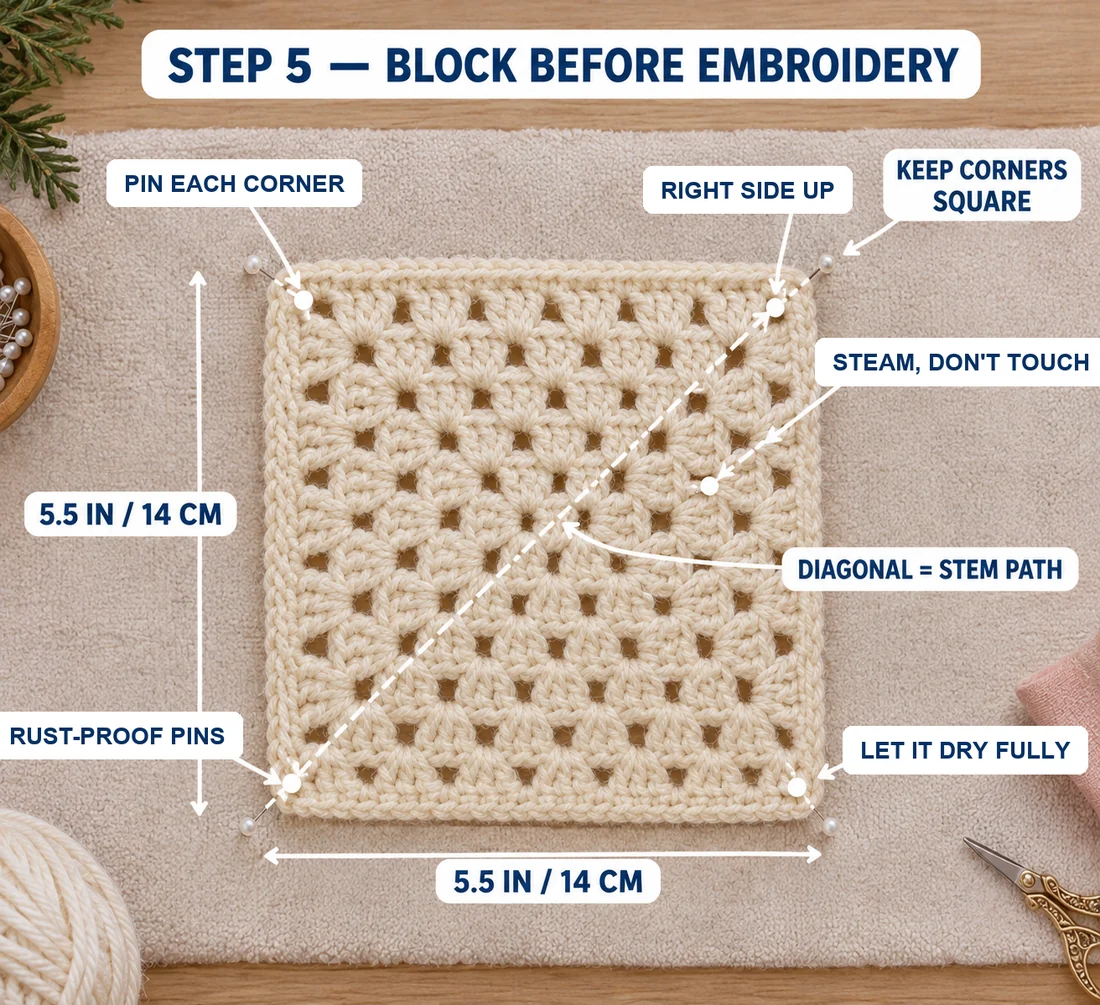
Pin the square to 5.5 in (14 cm) on a towel, right side up, with straight edges and square corners. For acrylic, hold a steam iron 1 in above it and let the steam soak in. Don't touch the iron to the yarn. For cotton, spray it with water until damp. Let it dry completely.
Blocking first opens up the granny holes and makes the corners line up on a clean diagonal. That's the line your pine stems will follow.
Part 2: How the pine sprigs work
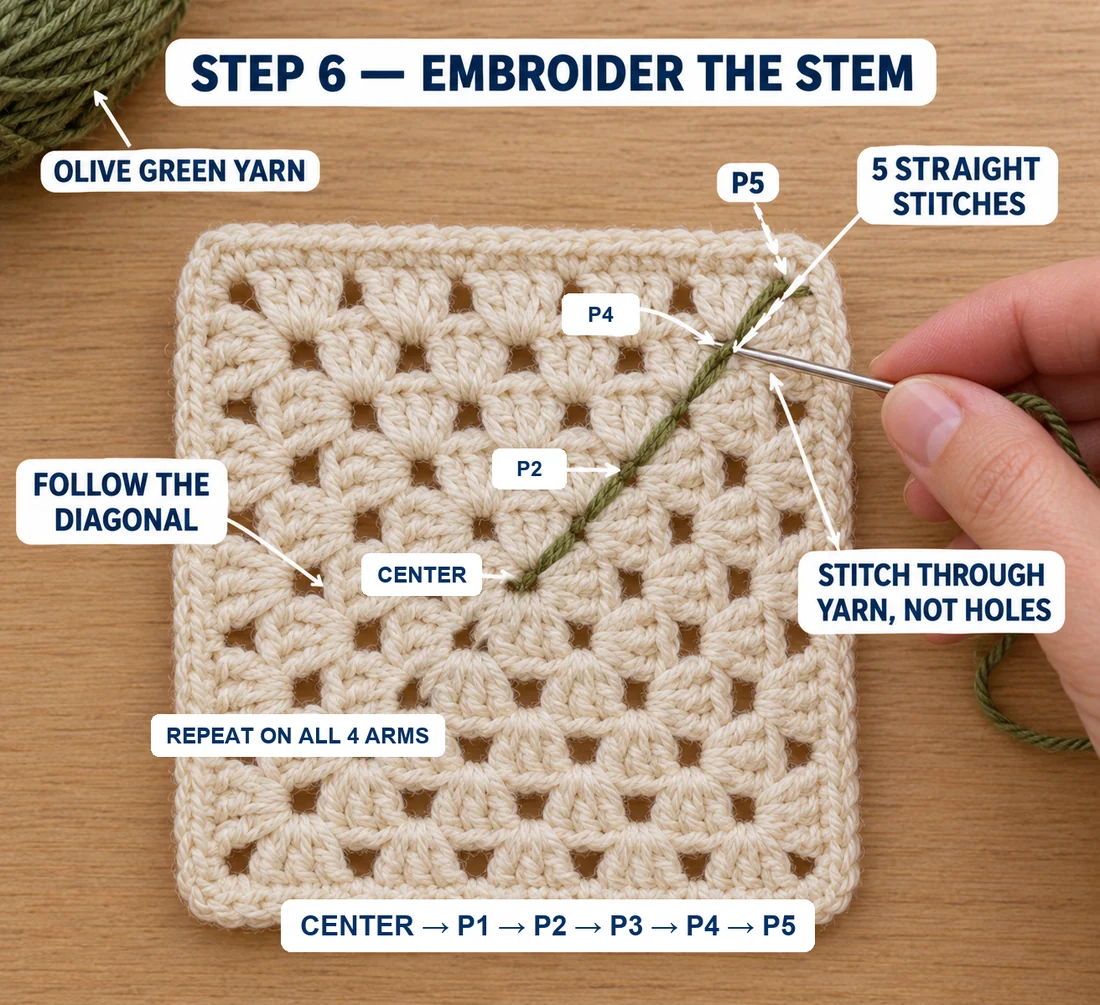
Before you thread the needle, look at one corner of your square. Each round's corner ch-2 sits on the diagonal, one above the other, like a ladder. Those five corner chains are the anchor points for the stem of each sprig. I call them P1 to P5, for the corners of Rounds 1 to 5.
You'll see each corner chain at the bottom of the corner hole of the next round. Pierce the chain itself with your needle, not the empty hole.
Three rules for tidy embroidery on a granny square:
- Always go through yarn, never through a hole. Each stitch starts and ends by piercing a chain or the top of a dc.
- Don't float across holes on the back. When you move from one point to the next, run the yarn through the backs of nearby stitches. A strand stretched across a hole shows through from the front.
- Lay each stitch flat, without pulling. A tight straight stitch puckers the granny. A good one sits on the surface, plump and smooth.
Work with one strand of green in the tapestry needle, about 36 in (90 cm) long. That's enough for one branch plus tails.
Part 3: Stitch the pine sprigs
Hold the square right side up. Work one branch at a time, from the center out to a corner.
The stem (5 stitches per branch)
- On the back, weave the green tail through the backs of the Rnd 1 stitches for about 1 in.
- Come up right at the edge of the magic ring, where the Rnd 1 cluster meets the corner. Go down at P1, the Rnd 1 corner chain. That's your first stem stitch.
- Come up at P1 and go down at P2. Repeat, P2 to P3, then P3 to P4.
- Come up at P4 and go down at P5, the Rnd 5 corner chain, just inside the border. That's the tip of the branch.
The stem now runs in a straight line from the center to the corner, in 5 short stitches.
The needles (8 stitches per branch)
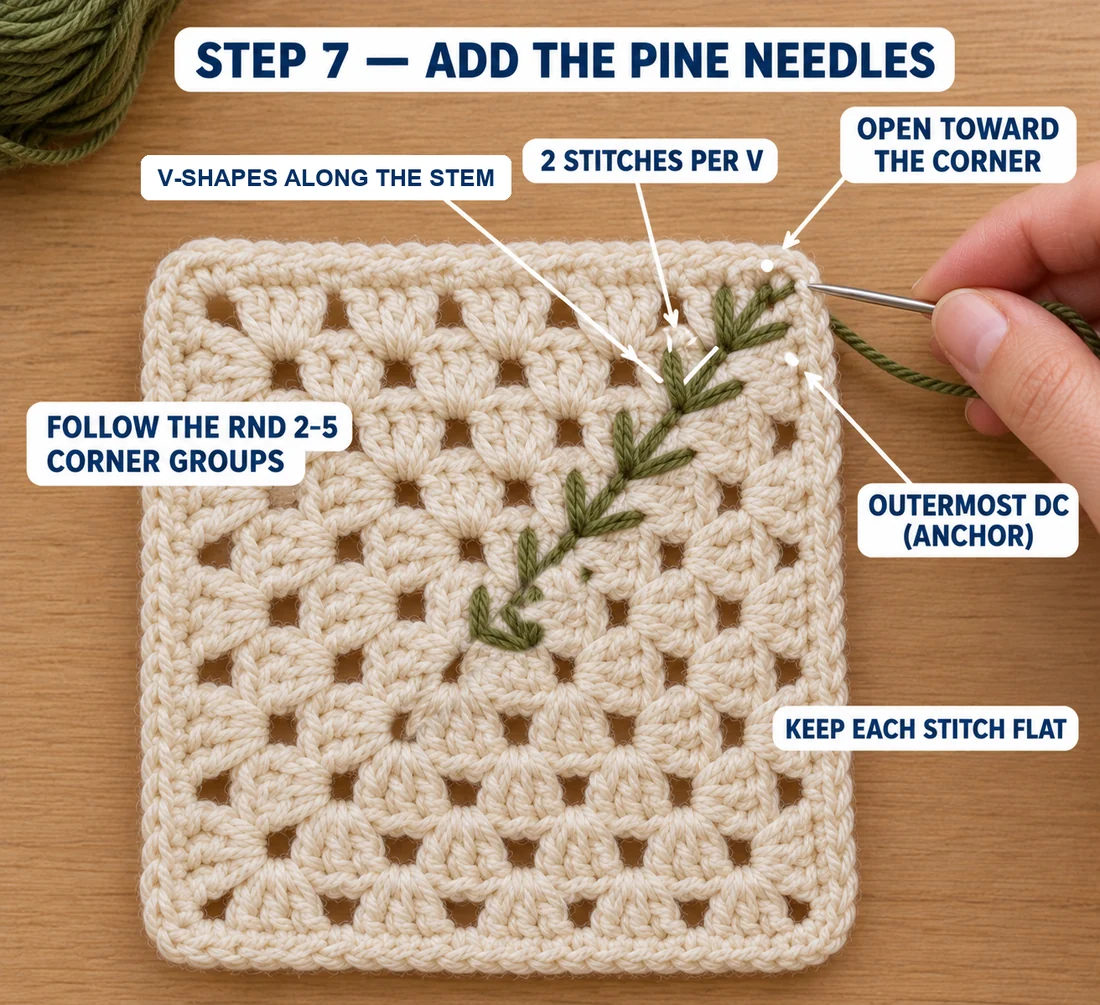
Each pair of needles makes a V along the stem, opening toward the corner. The needles slant forward, like a real pine sprig.
Look at the corner group of Rnd 2: it's two clusters with a ch-2 between them. On each side, find the outermost dc of that corner group: the third dc, the one farthest from the ch-2.
- Come up at the top of that outermost dc on the left side of the corner group of Rnd 2. Go down at P1, right beside the stem.
- Come up at the top of the outermost dc on the right side of the same corner group. Go down at P1, on the other side of the stem.
- Repeat at P2 (using the corner group of Rnd 3), at P3 (Rnd 4) and at P4 (Rnd 5).
That's 4 V's per branch. The last V and the tip stitch meet at P4, which gives the branch its pointed end.
- On the back, weave the tail through the backs of the Rnd 4 and Rnd 5 stitches, then trim it.
Repeat the stem and the needles for the other three corners. You'll have 4 branches, 13 stitches each.
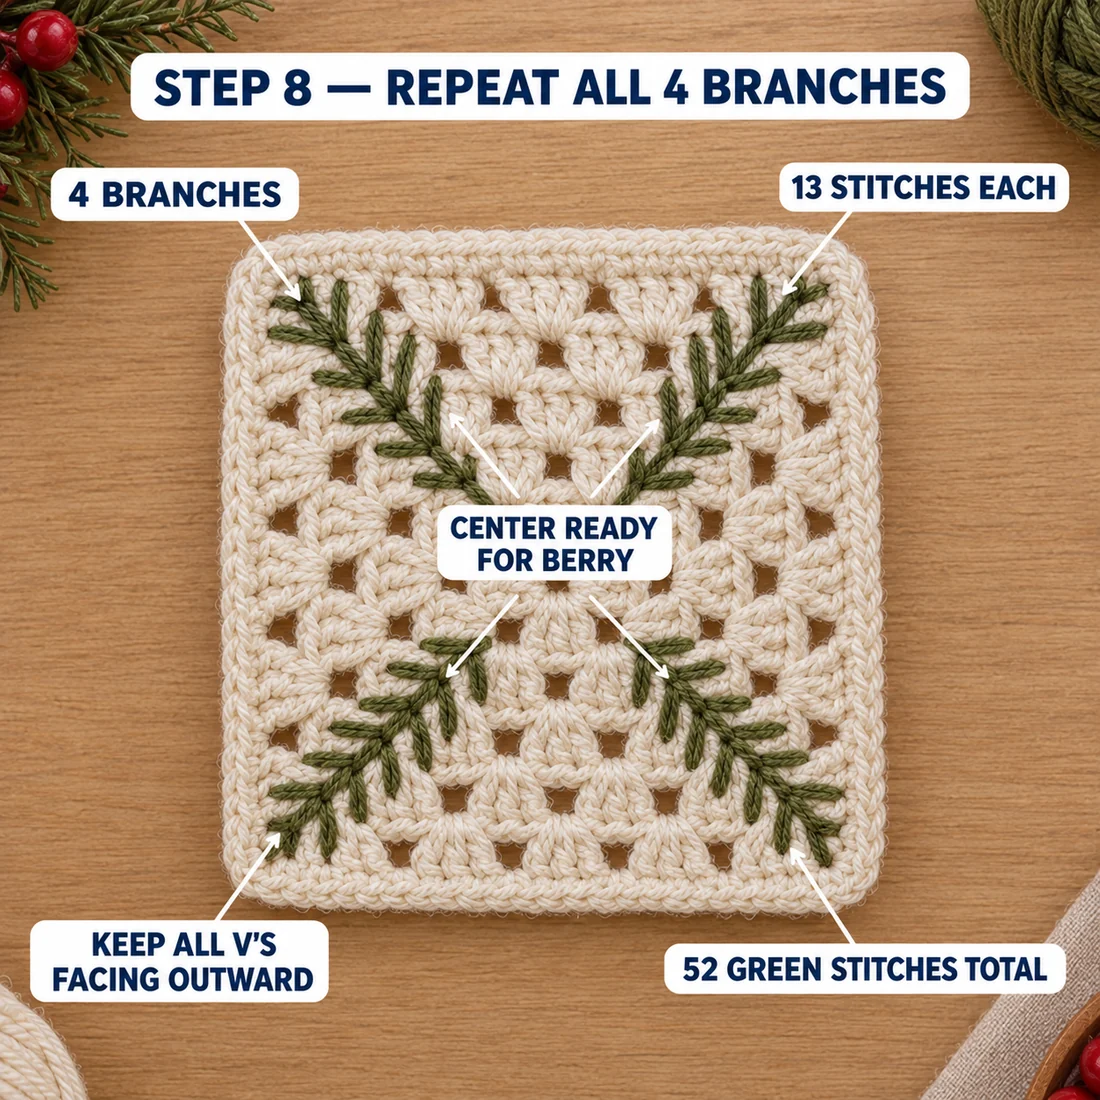
Check your sprigs. Hold the square at arm's length. All four branches should look the same, with the V's opening outward. If one looks crooked, you probably picked the wrong dc on one side. Pull out that needle stitch and try again. Straight stitches come out in seconds.
Part 4: The red berry
The four stems meet at the center, where the magic ring closes. The berry covers that meeting point.
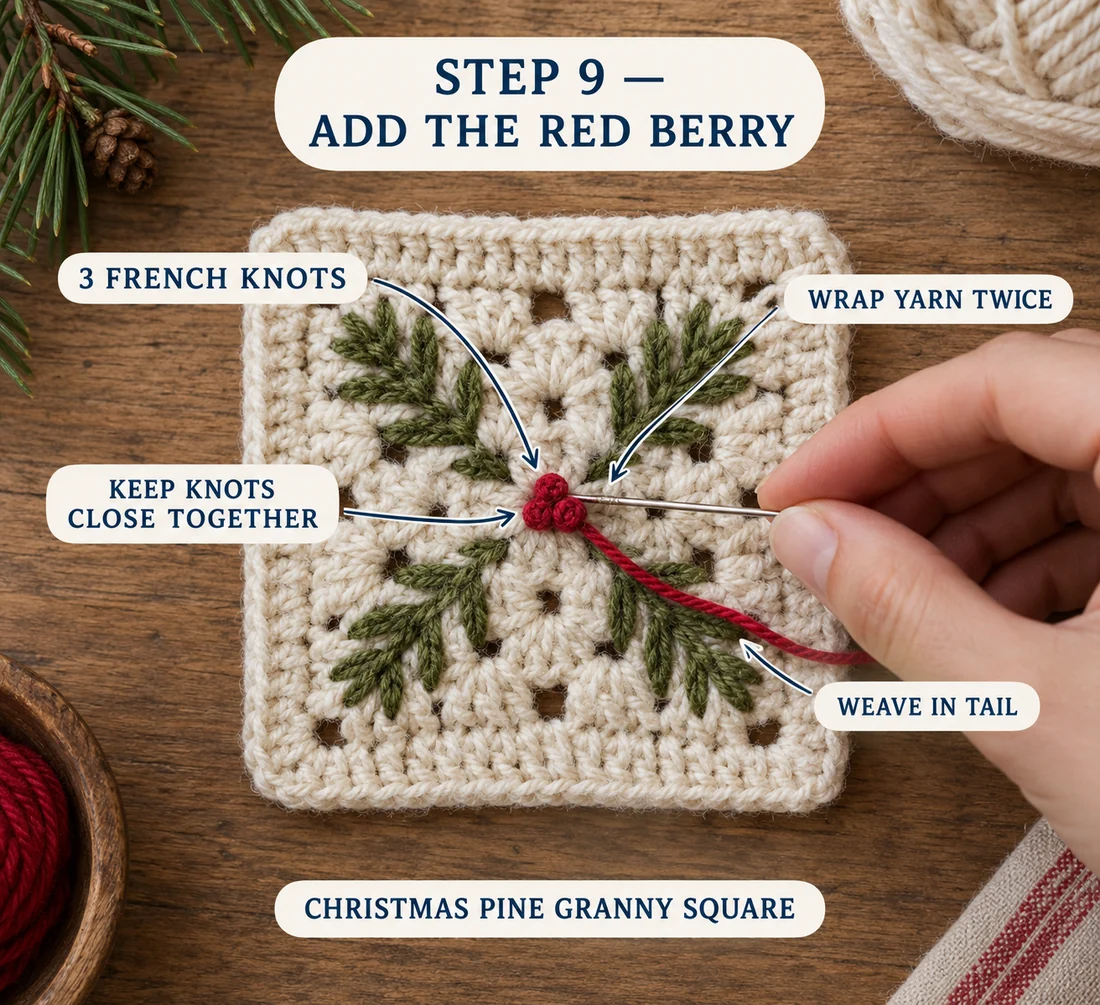
How to make a French knot: bring the needle up where you want the knot. Wrap the yarn twice around the needle, close to the fabric. Hold the wraps snug with your thumb, then push the needle back down one ply away from where it came up. Pull gently until the knot sits tight on the surface.
- Thread 18 in (45 cm) of red, and weave the tail through the backs of the Rnd 1 stitches.
- Make 3 French knots in a small triangle right over the center, touching each other. Anchor each one in the base of a Rnd 1 stitch around the ring.
- Weave the tail in on the back and trim it.
The three knots bunch into one round, textured berry, just like the photo.
That's it! Give the square a final light steam from above to settle the stitches.
Make it yours — quick variations
| Variation | Change from base pattern |
|---|---|
| Snowberry | Make the berry in white, and the square in pale grey or light sage. |
| Hanging ornament | Make 2 squares, embroider one, then sc them together through both layers with the border round. At one corner, ch 12 and sl st back into the same corner sp to make a hanging loop. |
| Mug rug | Work in worsted cotton, as above. Add 1 more round of sc to the border (3 sc in each corner) for a 6 in mug rug. |
| Throw pillow | Make 9 squares and join them 3 × 3 for a 16 in pillow front. Back it with fabric or a plain crochet panel. |
| Table runner | Make 24 squares and join them 3 × 8 for a runner of about 16.5 × 44 in (42 × 112 cm). |
| Christmas blanket | Make 99 squares and join them 9 × 11 for a throw of about 50 × 60 in (127 × 152 cm). Plan on about 2,800 yd of cream, 400 yd of green and 100 yd of red, plus the joining yarn. Alternate stitched and plain squares to halve the embroidery. |
Joining squares: embroider every square before you join them. Join with a whipstitch through the back loops, or a slip stitch seam on the wrong side, matching the 21 border sc along each side.
Troubleshooting the three things that go wrong
The square curls or waves
A cupped square usually means your dc are tight at the corners. Make sure the corner is (3 dc, ch 2, 3 dc), and don't skip the ch 1 between clusters. A wavy edge means one side has an extra cluster. Count 5 clusters per side on Rnd 5.
The sprigs look lopsided
The stems follow the corner chains, so a crooked stem means the square is crooked. Block it square first, then stitch. If only the needles look off, check that each one ends at the outermost dc of a corner group, not at a side cluster.
The green shows through the holes
That's a float on the back, a strand crossing an open space. Unpick the last stitch, and travel through the backs of the dc posts instead. Weave every tail through solid stitches, never across a hole.
Frequently asked questions
How long does the Christmas granny square take? About 1.5 to 2 hours for your first one. The five granny rounds and the border take 45 minutes to an hour. The 52 straight stitches and the berry take another 30 to 45 minutes. By your fourth or fifth square, you'll finish one in about an hour.
How much yarn do I need for a Christmas granny square blanket? Each square uses about 28 yd of cream, 4 yd of green and 1 yd of red worsted yarn. A 50 × 60 in throw of 99 squares takes about 2,800 yd of cream, 400 yd of green and 100 yd of red. Add about 10% for joining and a border.
Can I crochet the pine branches instead of embroidering them? You can surface crochet them, working slip stitches along the stems with the yarn held behind the square. The line comes out thicker and less crisp, though. For the slanted needles, straight stitches with a tapestry needle give a much cleaner result on a small square.
Is this granny square good for beginners? Yes. If you can chain, slip stitch and double crochet, you can make the square. The embroidery uses only straight stitches and French knots. The corner chains show you exactly where every stitch goes, so there's nothing to measure.
Can I sell items made from this pattern? Yes, you're welcome to sell finished squares, ornaments, pillows or blankets made from this free pattern, at markets or on Etsy. Please credit "Pattern by Wavode" in your listing and link back to this page. What you can't do is republish this write-up or my photos as your own pattern.
Related patterns on Wavode
- Scalloped crochet Christmas tree: a tabletop tree on a paper cone.
- Crochet Christmas gnome: a bobble-stitch wall hanging with poinsettia trim.
- Granny square beach tote: the same classic granny, in a cream bag.
- Barnaby the teddy bear lovey: a bear head on a soft granny blanket.
- Autumn patchwork throw: a square-by-square blanket for the cozy months.
Made a pine granny square? Tag #wavodecrochet on Pinterest. I re-pin every finished make and credit the maker.
Pattern by Clara Hartwell for Wavode. Questions? Email me at support@wavode.com.