Crochet Shopper Bag Pattern

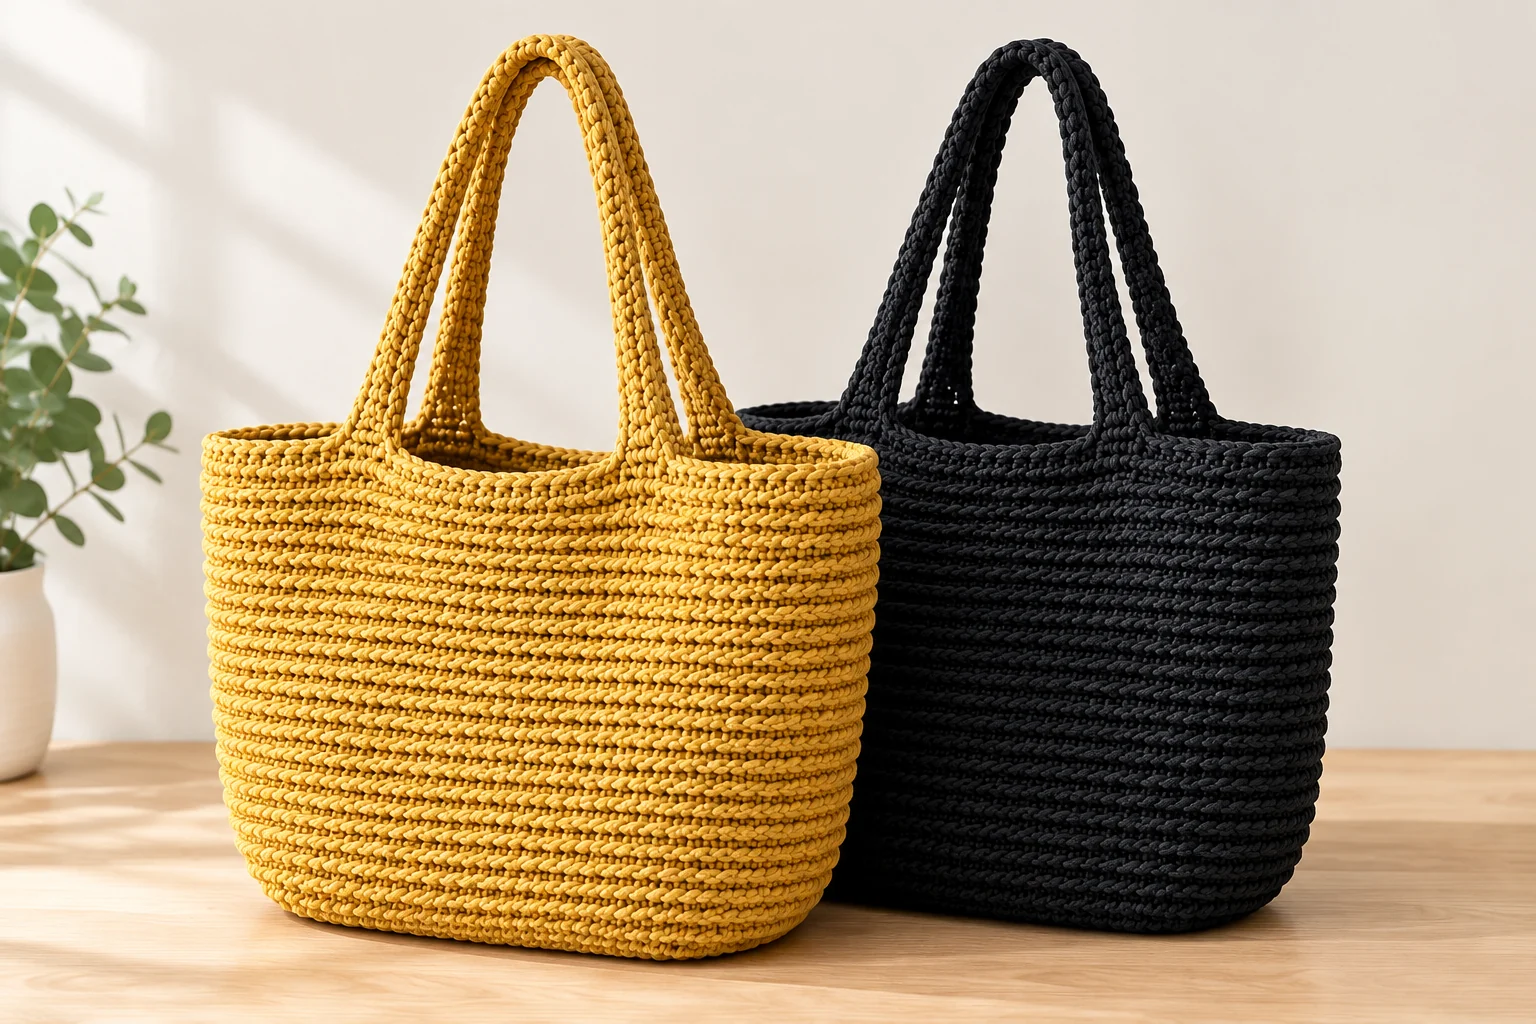
This free crochet shopper bag pattern makes a roomy everyday tote, about 14 inches wide and 13 inches tall, in 4 mm polyester cord on a 5 mm hook. It's worked in one piece from the bottom up: an oval base, then spiral rounds in the back loop only for that rope-ridge texture, then two long handles crocheted right into the top. There's nothing to sew on. You'll need about 360 yards of cord, and it takes 10 to 12 hours.
Key Takeaways
- One piece, no seams. Oval base, sides and handles are all worked in continuous rounds.
- The handles are built in, so there's no sewn joint to pull loose under a heavy load.
- Stitches: chain, single crochet, single crochet in the back loop only and slip stitch.
- Budget ~360 yd (330 m) of 4 mm polyester cord. Two 200 m spools cover it.
Why I love this crochet shopper bag
This is the bag I grab for the farmers' market, the library and the weekly "I'll only buy three things" grocery run. It holds a lot, it goes over the shoulder, and it stands up by itself when you set it down. Polyester cord is the reason. It makes a dense, springy fabric that keeps its shape, wipes clean and doesn't fuzz after a month of use.
The texture is just single crochet in the back loop only, worked in a spiral without turning. Each round leaves its front loop lying on the outside, so the bag gets those chunky horizontal ridges that look like twisted rope. It's a very simple stitch that looks far more complicated than it is.
The part I'm proudest of is the handles. You don't make them separately. You chain across a gap in one round, then crochet over that chain for three more rounds. Each handle ends up as part of the bag's own fabric, so there's no sewn joint for a full load of apples to rip out.
Skill level. Advanced beginner. If you can work single crochet in the round, you can make this. What's new is the oval base, keeping count in a spiral, and handling cord, which is stiffer than yarn. I go slowly through all three.
Want something smaller first? My crochet hobo bag uses the same kind of cord in a compact shoulder-bag shape. And my roundup of free crochet bag patterns for beginners starts with a mesh market tote you can finish in an afternoon.
What you'll need
Cord
- ~360 yd (330 m) of 4 mm braided polyester cord. I've shown it in mustard and in black. It's sold as "polyester cord for bags" or "crochet cord", usually on 100–200 m spools. Your tension and the brand change the amount, so plan on 330–400 yd (300–365 m). Two 200 m spools are plenty.
- Check the label says polyester and braided. Cotton macramé cord of the same thickness is heavier, frays at the cut ends and makes a floppier bag.
- Substitute: two strands of worsted #4 cotton held together, if you can match the gauge below. You'll need about 750 yd of worsted in total. The bag will be softer and slouchier, so I'd add the base insert described in Finishing.
Hook and notions
- 5 mm (US H-8) hook. An ergonomic handle helps a lot, because cord is hard on the hands.
- 4 locking stitch markers.
- Large-eye tapestry needle and sharp scissors.
- A lighter or a dab of fabric glue to seal cord ends.
- Optional: a piece of plastic canvas for a base insert, a magnetic snap, and a leather or metal "handmade" tag.
Gauge
Single crochet in BLO, worked in the round: 11 sts × 11 rnds = 4 in (10 cm).
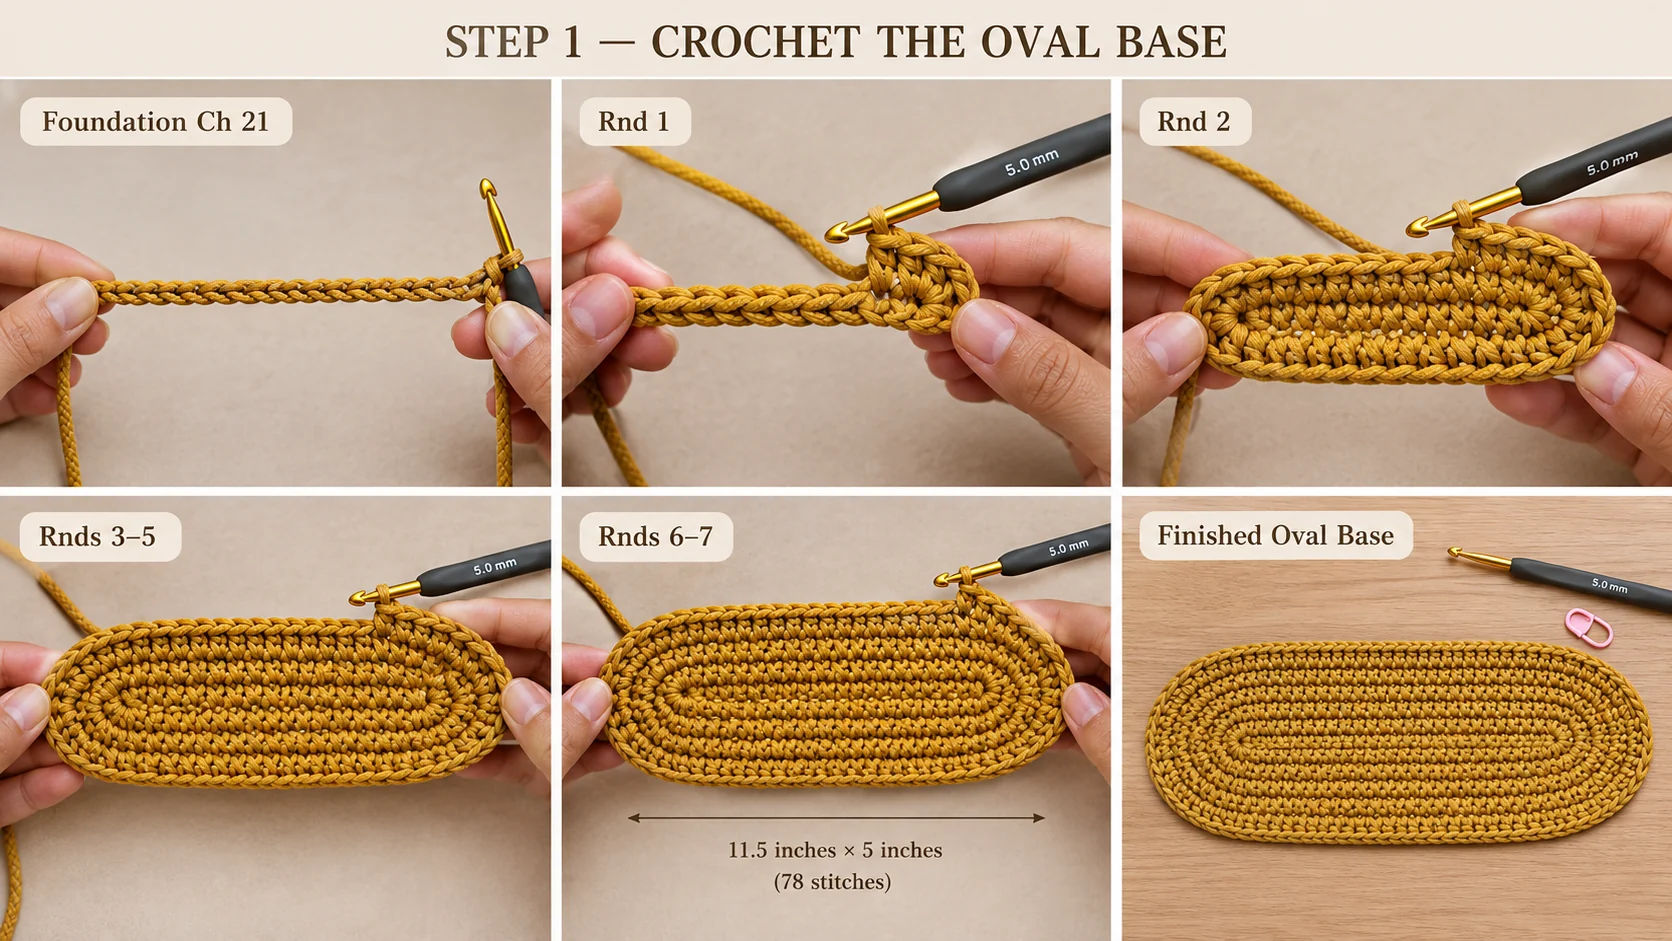
The easiest swatch is the base itself: work Rounds 1–7 and measure it. It should be about 11.5 in long and 5 in wide. If it's bigger, go down to a 4.5 mm hook. A loose cord bag stretches and sags, and that's the most common way these bags go wrong.
If the cord is fighting you and your wrist aches, go up to 5.5 mm, then check the base again.
Abbreviations (US crochet terms)
- ch = chain
- sc = single crochet
- sl st = slip stitch
- BLO = back loop only
- st(s) = stitch(es)
- rnd(s) = round(s)
- inc = 2 sc in the same st
UK crocheters: this pattern uses US terms. US single crochet = UK double crochet.
Finished size
- Width: approximately 14 in (36 cm), measured flat.
- Height: approximately 13 in (33 cm) from base to rim.
- Base: approximately 11.5 × 5 in (29 × 13 cm), oval.
- Handle drop: approximately 9–10 in (23–25 cm) above the rim, depending on tension. That's long enough to wear on the shoulder over a coat.
How the bag goes together
Here's the shape in plain words before you start. You crochet an oval base around a foundation chain. Then, without fastening off, you switch to the back loop only and work up the sides in a spiral until the bag is nearly full height. In the next round you chain across two gaps, one on the front and one on the back. The following rounds are worked over those chains, so they turn into handles. A slip-stitch round firms up the rim. Last, you edge the underside of each handle.
Everything is worked with the outside of the bag facing you. You never turn.
The pattern — step by step
Part 1 — Oval base
Work in continuous rounds. Don't join at the end of a round and don't turn. Put a marker in the first st of each round and move it up as you go.
Foundation: Ch 21.
Rnd 1: Sc in the 2nd ch from the hook, sc in the next 18 ch, 3 sc in the last ch. Rotate the chain and work along its other side: sc in the next 18 ch, 2 sc in the last ch (the same ch as your first sc). (42 sts)
Rnd 2: Inc in the first st, sc in the next 18 sts, inc in each of the next 3 sts, sc in the next 18 sts, inc in each of the next 2 sts. (48 sts)
Rnd 3: [Sc in the next st, inc] once, sc in the next 18 sts, [sc in the next st, inc] 3 times, sc in the next 18 sts, [sc in the next st, inc] twice. (54 sts)
Rnd 4: [Sc in the next 2 sts, inc] once, sc in the next 18 sts, [sc in the next 2 sts, inc] 3 times, sc in the next 18 sts, [sc in the next 2 sts, inc] twice. (60 sts)
Rnd 5: [Sc in the next 3 sts, inc] once, sc in the next 18 sts, [sc in the next 3 sts, inc] 3 times, sc in the next 18 sts, [sc in the next 3 sts, inc] twice. (66 sts)
Rnd 6: [Sc in the next 4 sts, inc] once, sc in the next 18 sts, [sc in the next 4 sts, inc] 3 times, sc in the next 18 sts, [sc in the next 4 sts, inc] twice. (72 sts)
Rnd 7: [Sc in the next 5 sts, inc] once, sc in the next 18 sts, [sc in the next 5 sts, inc] 3 times, sc in the next 18 sts, [sc in the next 5 sts, inc] twice. (78 sts)
The base should lie flat, about 11.5 × 5 in. If it's ruffling, your stitches are too loose, so go down a hook size. If it's cupping, check your counts, because an increase has gone missing.
Part 2 — Sides
Rnd 8: Sc in BLO in each st around. (78 sts)
This first back-loop round leaves the front loops of Rnd 7 as a neat ridge all around the base edge. Your flat oval will start to curl up into a shallow dish. That's exactly right.
Rnds 9–39: Sc in BLO in each st around. (78 sts)
Keep the outside of the bag facing you. The sides go straight up with no increases. After Rnd 39 the bag is about 11.5 in tall from the base.
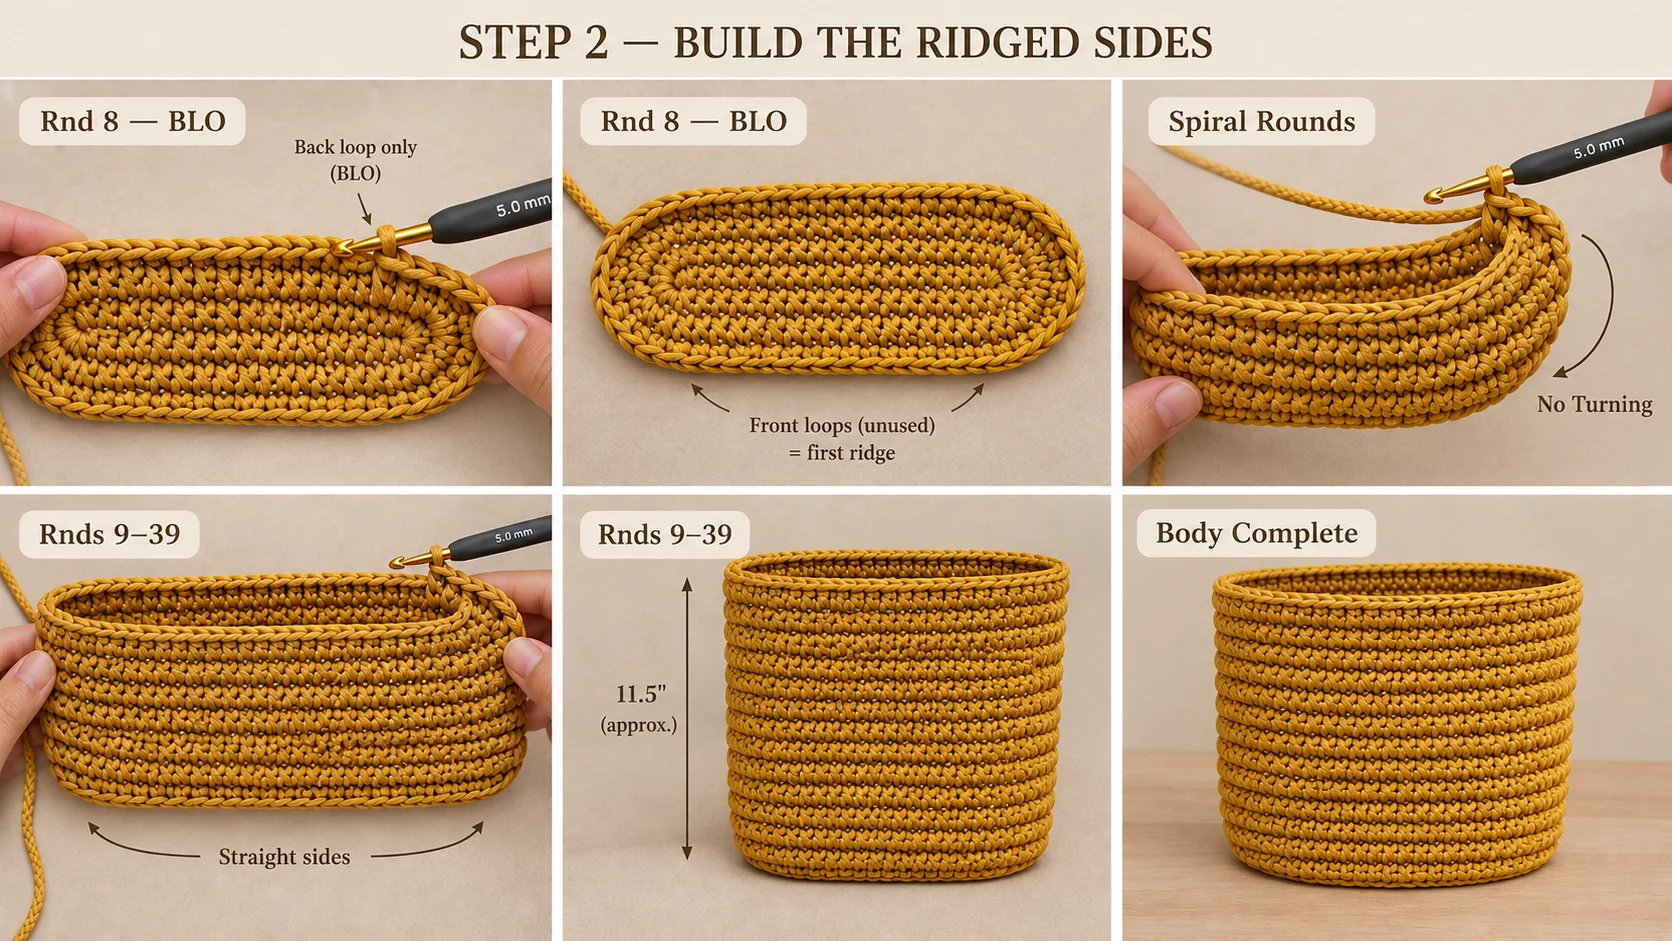
Why BLO in a spiral makes ridges: In back-loop single crochet you leave the front loop of every stitch unworked. When you work in rows and turn, those loops alternate between the two faces. In a spiral you never turn, so every round leaves its front loop on the outside of the bag. They stack up as one twisted ridge per round, which is what gives the bag its rope look.
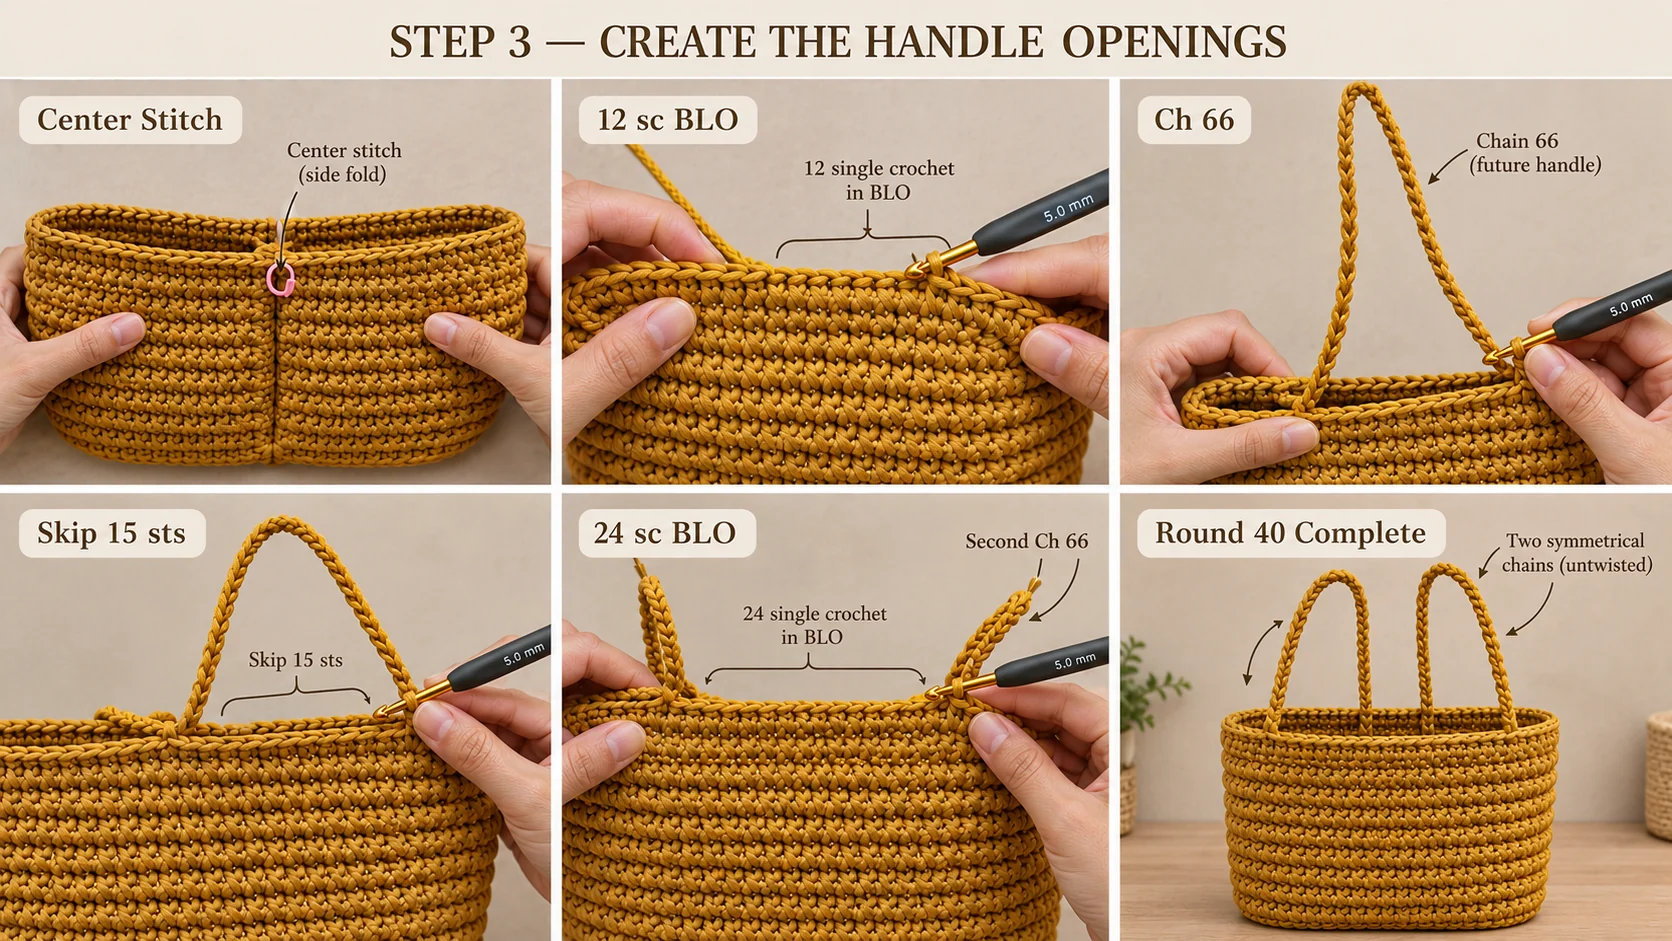
Line up the start of the round. In a spiral, your marker slowly drifts sideways, so reset it before the handles. Flatten the bag with the long straight sides of the base at the front and back. Keep working sc in BLO until you reach the stitch sitting at the center of one side fold. Put your marker in that stitch. It's now stitch 1 of Rnd 40. It doesn't matter if this adds a few stitches to Rnd 39.
Part 3 — Handle round
Your marker now sits on a side fold, so stitches 1–39 are the front and 40–78 are the back.
Rnd 40: Sc in BLO in the next 12 sts, ch 66 loosely, skip the next 15 sts, sc in BLO in the next 24 sts, ch 66 loosely, skip the next 15 sts, sc in BLO in the next 12 sts. (48 sc and two ch-66 handles)
Each handle is centered on its face, with 12 sts on either side. Make sure neither chain is twisted before you anchor it. Lay the bag flat and check that each chain arches up cleanly.
Check the chain length. Laid flat and unstretched, each ch-66 should measure about 24 in (61 cm). Cord chains tend to come out tight. If yours is much shorter, rip it back and chain again on a hook one size larger, then switch back.
Part 4 — Build up the handles
Rnd 41: Sc in BLO in the next 12 sts, sc in the back bump of each of the next 66 ch, sc in BLO in the next 24 sts, sc in the back bump of each of the next 66 ch, sc in BLO in the next 12 sts. (180 sts)
Working into the back bump leaves a clean V on the underside of each chain. You'll edge into those Vs later.
Rnds 42–43: Sc in BLO in each st around. (180 sts)
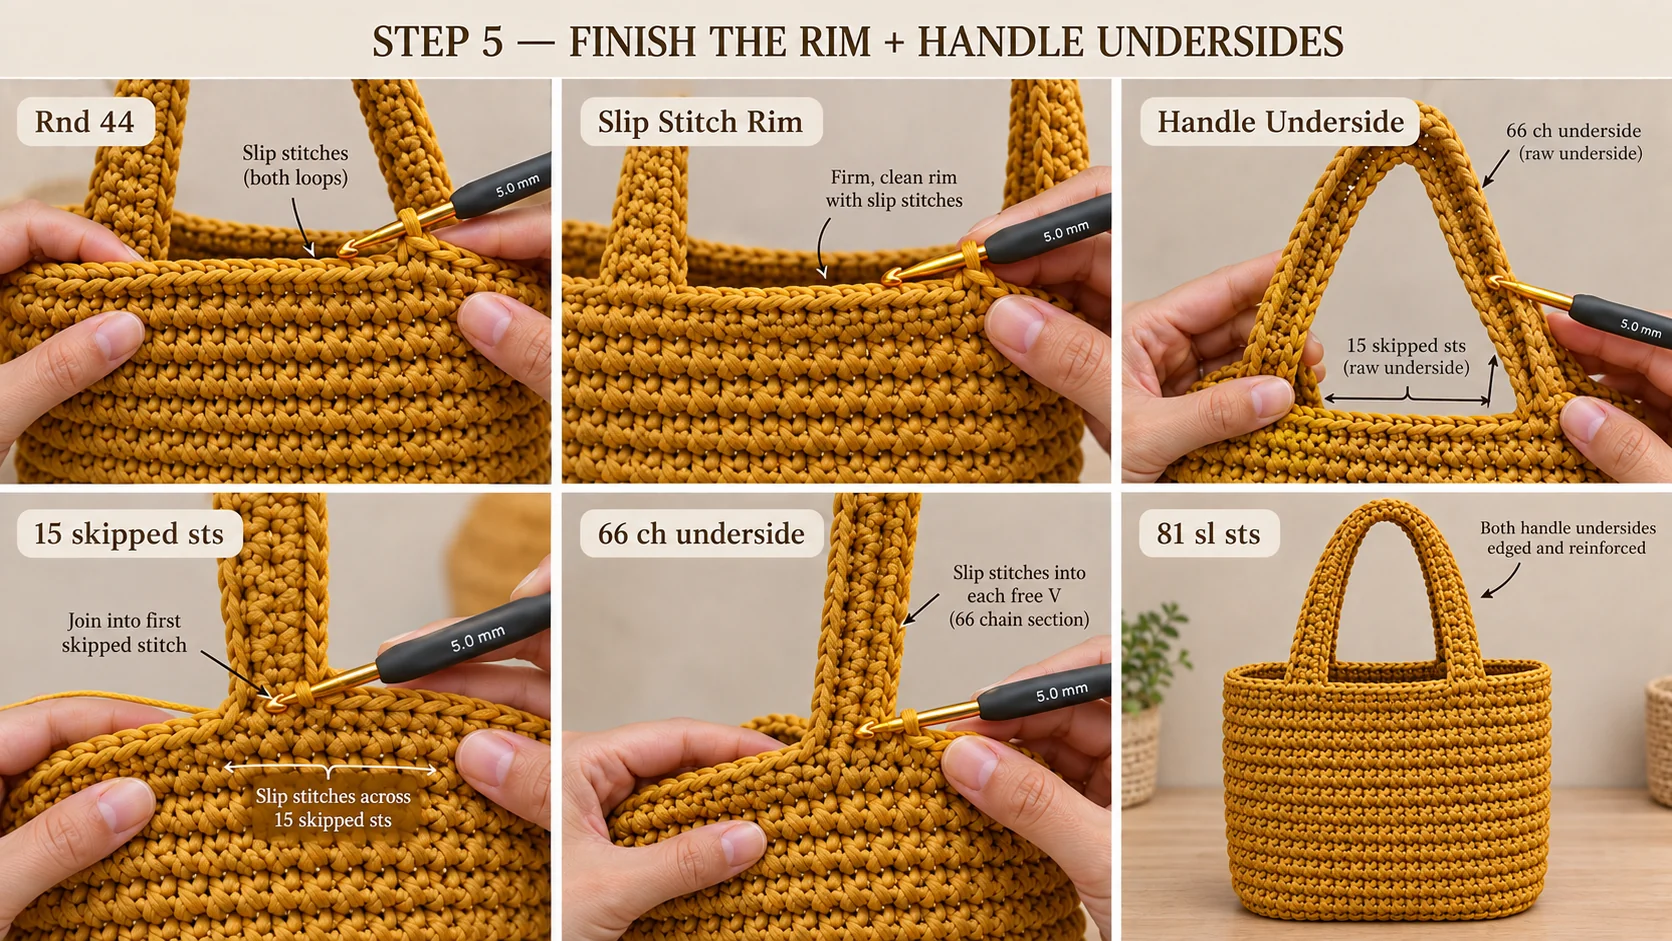
Rnd 44: Sl st loosely through both loops in each st around. Sl st into the next st to smooth out the spiral step. Fasten off and seal the end.
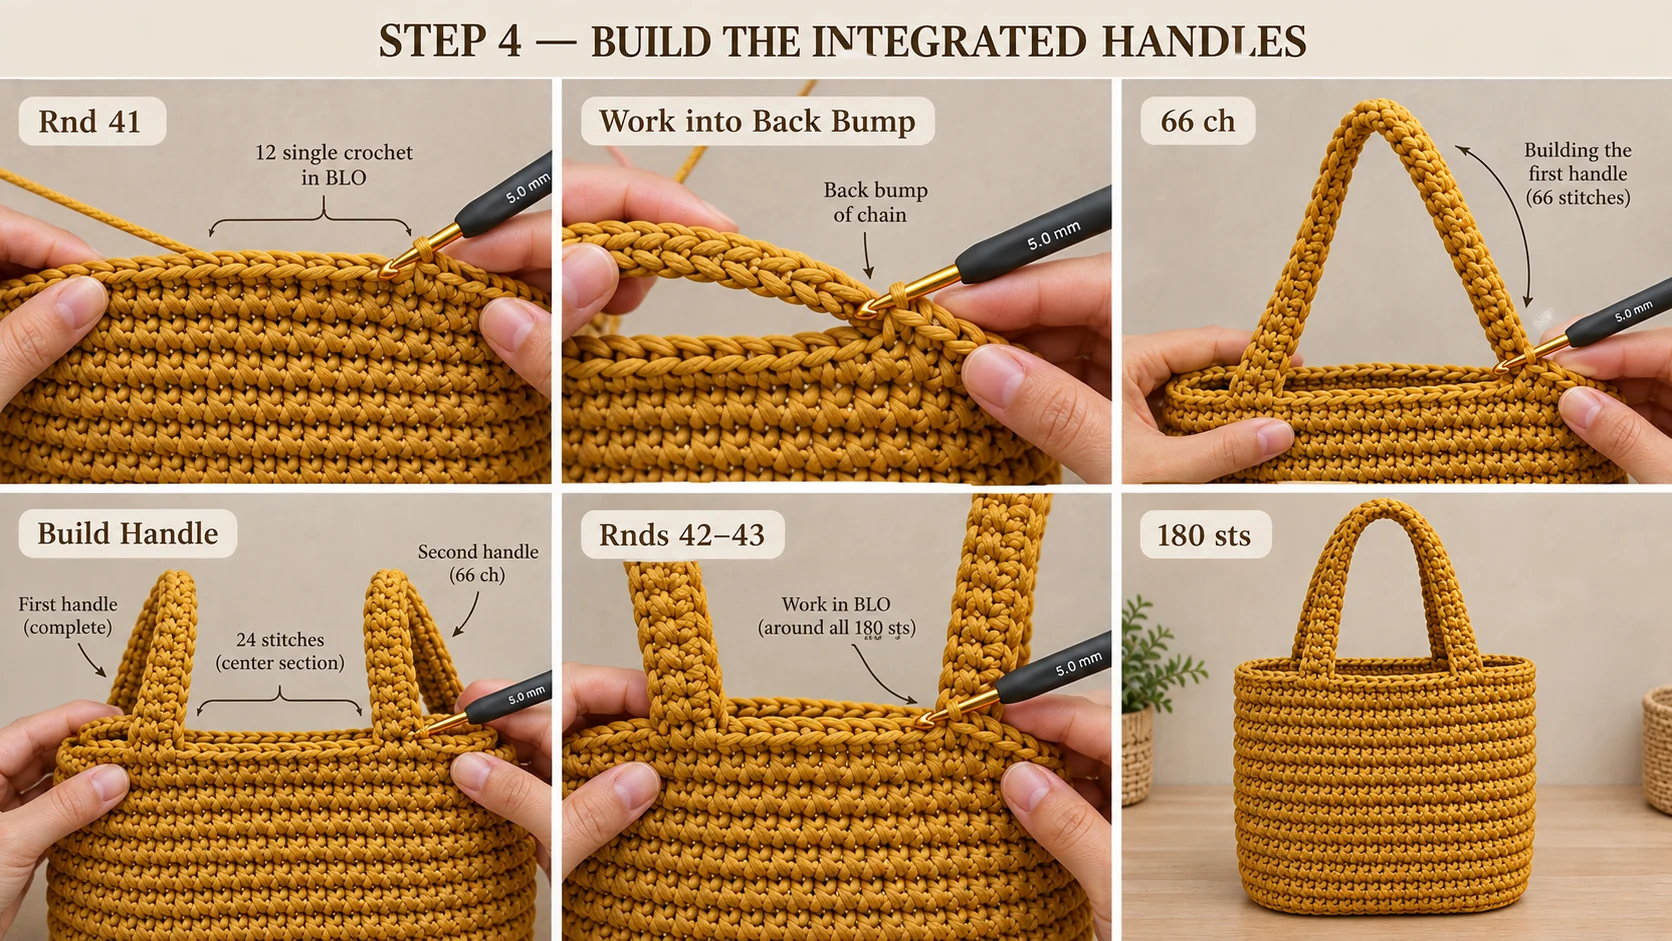
The rim between each pair of handle feet sits a little lower than the rest of the rim. That little scoop is what lets the handles stand up and fold neatly over your shoulder.
Don't skip Rnd 44. A single crochet rim stretches under load. A round of slip stitches barely stretches at all, so it works like binding along the top edge and along the outside of both handles.
Part 5 — Edge the handle undersides
Each handle has a raw underside: the 15 skipped stitches at the rim and the bottom of the chain above them. That edge is a single strand, so it would slowly stretch. Bind it off with slip stitches.
- Join the cord in the first skipped stitch at one handle foot.
- Sl st in each of the 15 skipped sts.
- Carry on up the handle's underside, sl st in the free V under each of the 66 ch.
- Sl st into the first sl st to close the ring. (81 sl sts) Fasten off and seal the end.
Repeat on the other handle.
Part 6 — Finishing
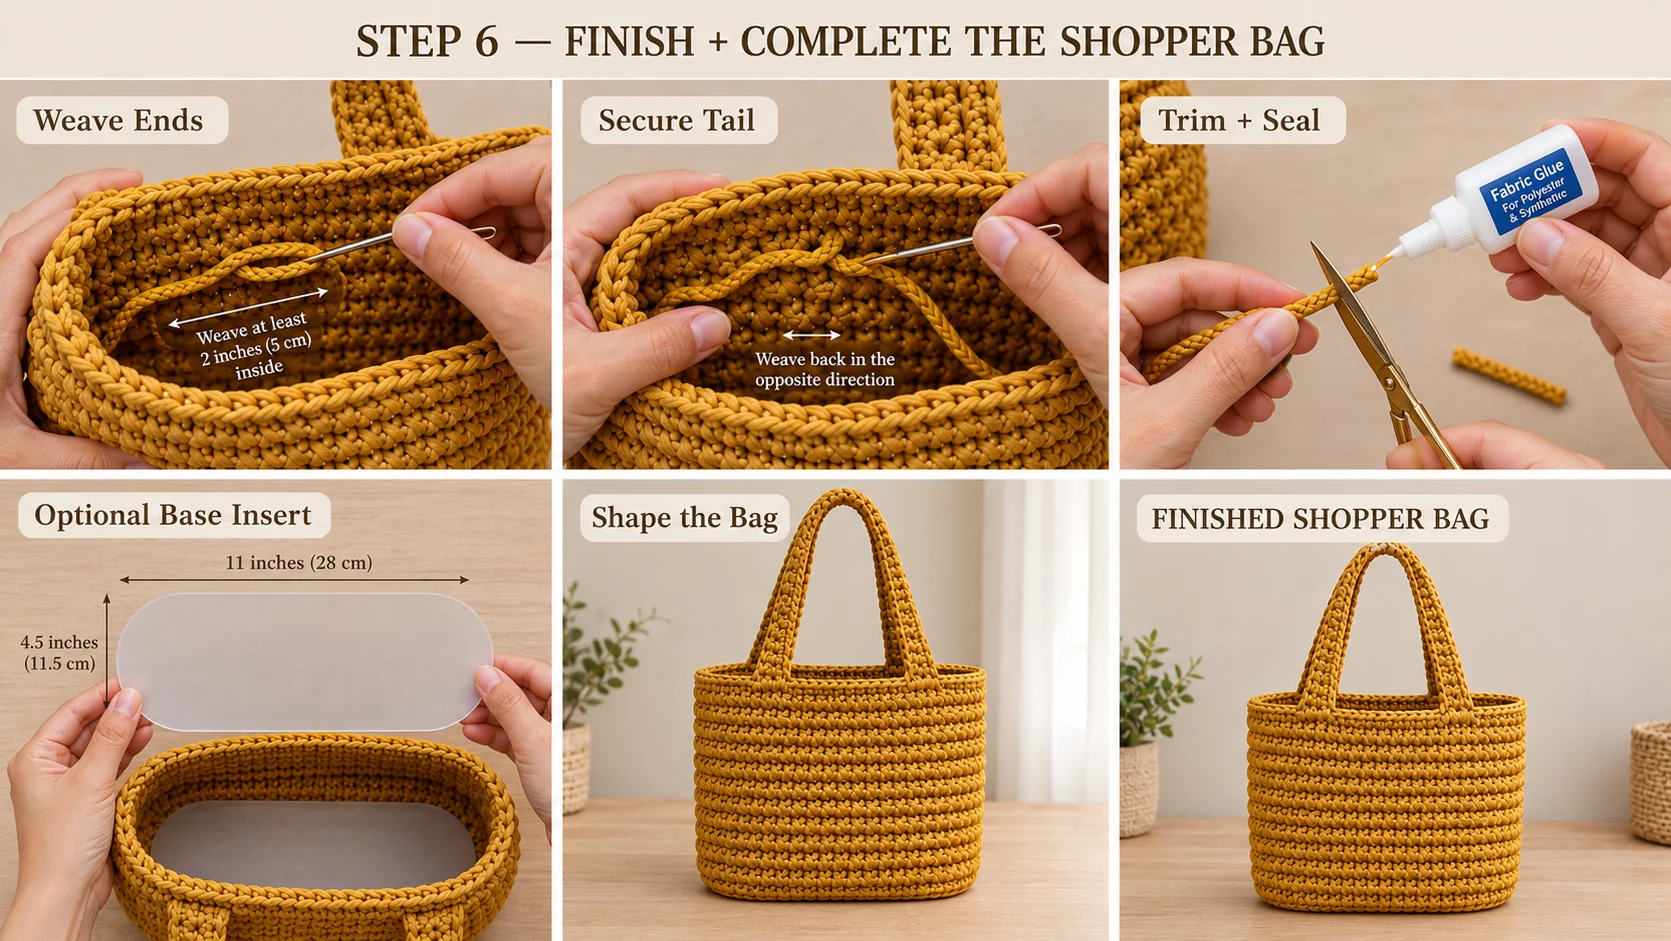
- Weave in every end for at least 2 in, then turn and go back through the stitches the other way. Polyester cord is slippery, so trim close and dab the cut end with fabric glue. If you'd rather melt it, touch it very briefly with a lighter, and keep the flame well away from the fabric.
- Optional — base insert. Cut plastic canvas into an 11 × 4.5 in oval with rounded corners and drop it into the bottom. It stops the base from bowing when the bag is full.
- Optional — magnetic snap. Sew one half inside the front and one inside the back, centered, 1 in below the rim. Back each half with a small felt square so it doesn't pull through.
- Optional — tag. Sew a small leather or metal tag to the rim beside a handle foot, using strong thread in a matching color.
Make it yours — quick variations
| Variation | Change from base pattern |
|---|---|
| Black or two-color | Work it all in black like the second bag in my photo, or switch to a contrast color from Rnd 36 for a colored rim and handles. |
| Shorter handles | Ch 50 instead of 66 in Rnd 40 for a hand-carry tote with a drop of about 6 in. Rnd 41 becomes 148 sts. |
| Bigger beach tote | Ch 25 for the foundation, so every "sc in the next 18" becomes "sc in the next 22". That gives 86 sts after Rnd 7. Work the sides to Rnd 45, then use sc 13 · ch 70 · skip 17 · sc 26 · ch 70 · skip 17 · sc 13 for the handle round. |
| Ribbed look | For vertical ribs instead of rope ridges, try my two-tone crochet tote bag in worsted cotton. |
| Something smaller | My chunky crochet handbag works up in about three hours. |
Troubleshooting the three things that go wrong
The bag is slanting or twisting
A slight lean is normal in spiral rounds, because each stitch sits a little to the right of the one below. Cord shows it more than yarn. Two things keep it in check. Keep your tension even, and don't pull the loop on the hook extra tight at the end of each stitch. If the lean still bothers you, wash the finished bag, stuff it with towels so it's square and let it dry.
The handles are different lengths
One chain came out tighter than the other. Measure both ch-66s side by side before you work Rnd 41. They should match within half an inch. If one is short, rip it back to its first chain and redo it. It takes two minutes then, and far longer once three rounds are built on top.
The rim is wavy or flares out
The rim flares when the handle-round stitches are looser than the sides, which often happens as you get excited near the finish. Rip back Rnd 44 and redo the slip stitches more firmly. If the whole top flares, rework Rnds 42–44 one hook size smaller.
Frequently asked questions
How long does this crochet shopper bag take to make? About 10 to 12 hours in total. That's roughly 1 hour for the oval base, 7 to 8 hours for the sides, and 2 to 3 hours for the handles, rim and edging. Cord is slower than yarn and tough on the hands, so work in short sessions and rest in between.
How much cord do I need? About 360 yd (330 m) of 4 mm polyester cord for the size shown. The base takes roughly 40 yd, the sides about 240 yd, and the handles, rim and edging about 70 yd. Tension and cord brand shift that, so plan on 330–400 yd. Two 200 m spools cover it.
Can I use regular yarn instead of cord? Yes. Hold two strands of worsted #4 cotton together and match the gauge of 11 sc × 11 rounds = 4 in. You'll need about 750 yd of worsted. The bag will be softer and will slouch more, so I'd use the plastic canvas base insert.
How much weight can the handles take? Because the handles are part of the fabric and not sewn on, they're the strongest part of the bag. They carry groceries and a couple of books without complaint. Like all crochet, the cord relaxes a little with heavy loads. The slip-stitch rim and underside edging keep that stretch small.
How do I wash a polyester cord bag? Spot clean with a damp cloth and a drop of mild soap for everyday marks. For a deeper clean, hand wash in cool water, squeeze the water out gently in a towel, and dry it flat, stuffed with a towel so it keeps its shape. Don't tumble dry or iron it.
Can I sell bags made from this pattern? Yes, you're welcome to sell finished bags made from this free pattern at markets, on Etsy or as gifts. Please credit "Pattern by Wavode" on your listing and link back to this page. What you can't do is republish this write-up or my photos as your own pattern.
Related patterns on Wavode
- Crochet hobo bag: a ribbed mocha shoulder bag in polyester cord, with a one-piece gusset strap.
- Two-tone crochet tote bag: cream and blush worsted cotton with vertical back-loop ribs.
- Granny square crochet bag: a boho cream tote with tassels.
- Free crochet bag patterns for beginners: six designs, starting with a mesh market tote.
Made this shopper bag? Tag #wavodecrochet on Pinterest. I re-pin every finished make and credit the maker.
Pattern by Clara Hartwell for Wavode. Questions? Email me at support@wavode.com.