Crochet Flower Bouquet Bag Charm

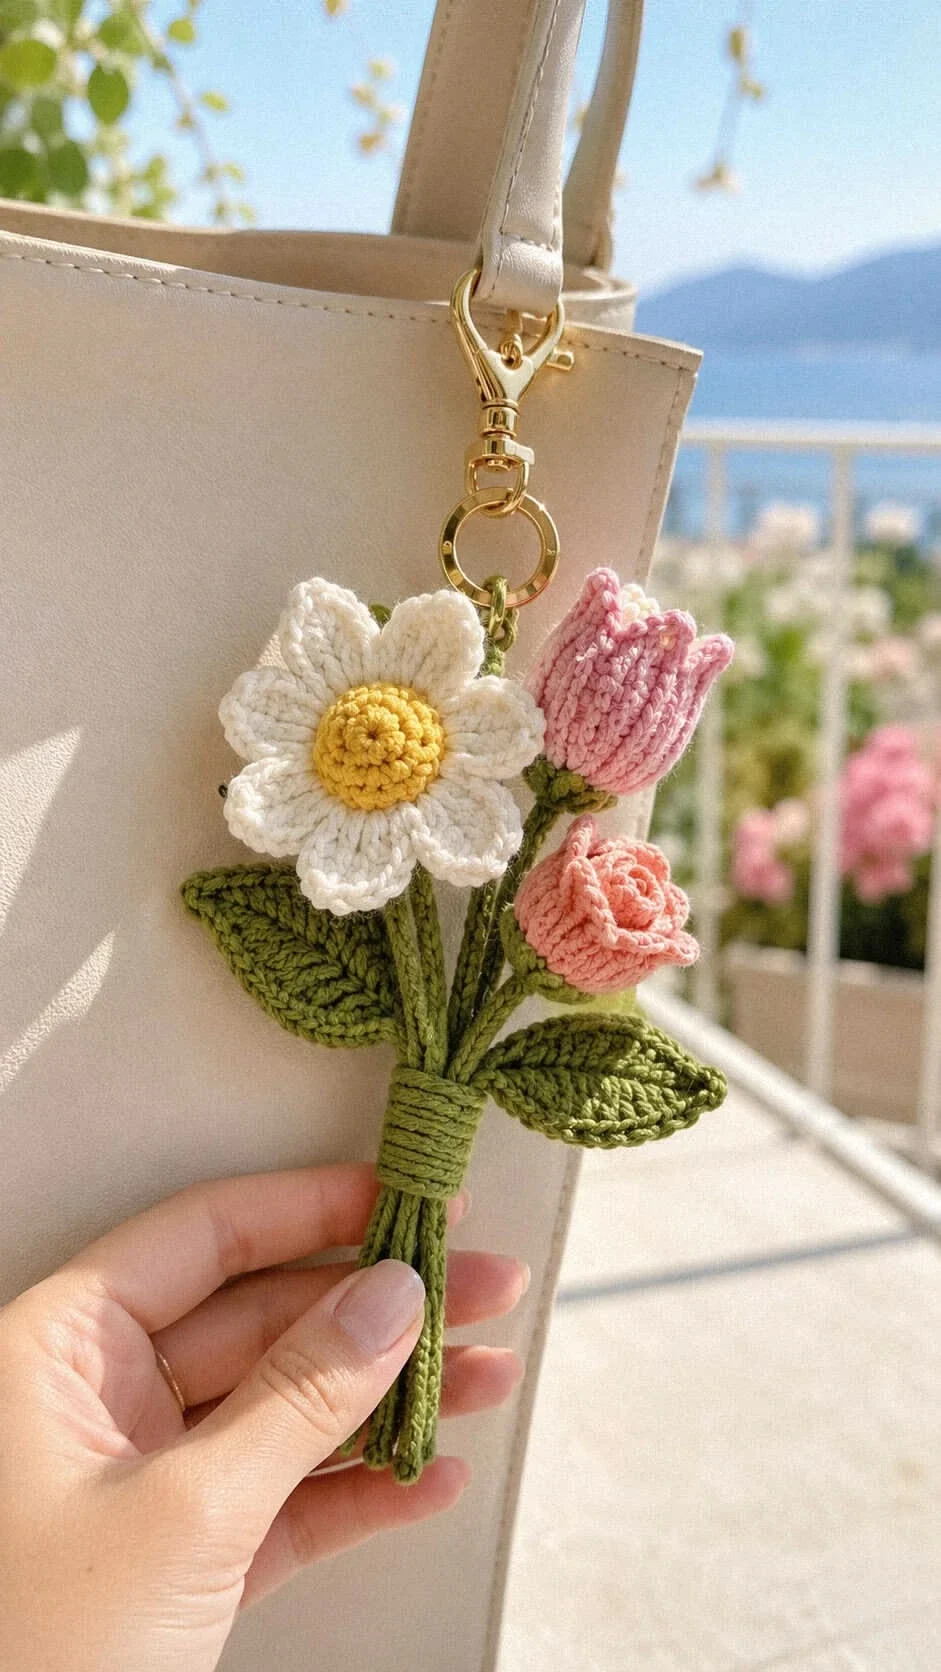
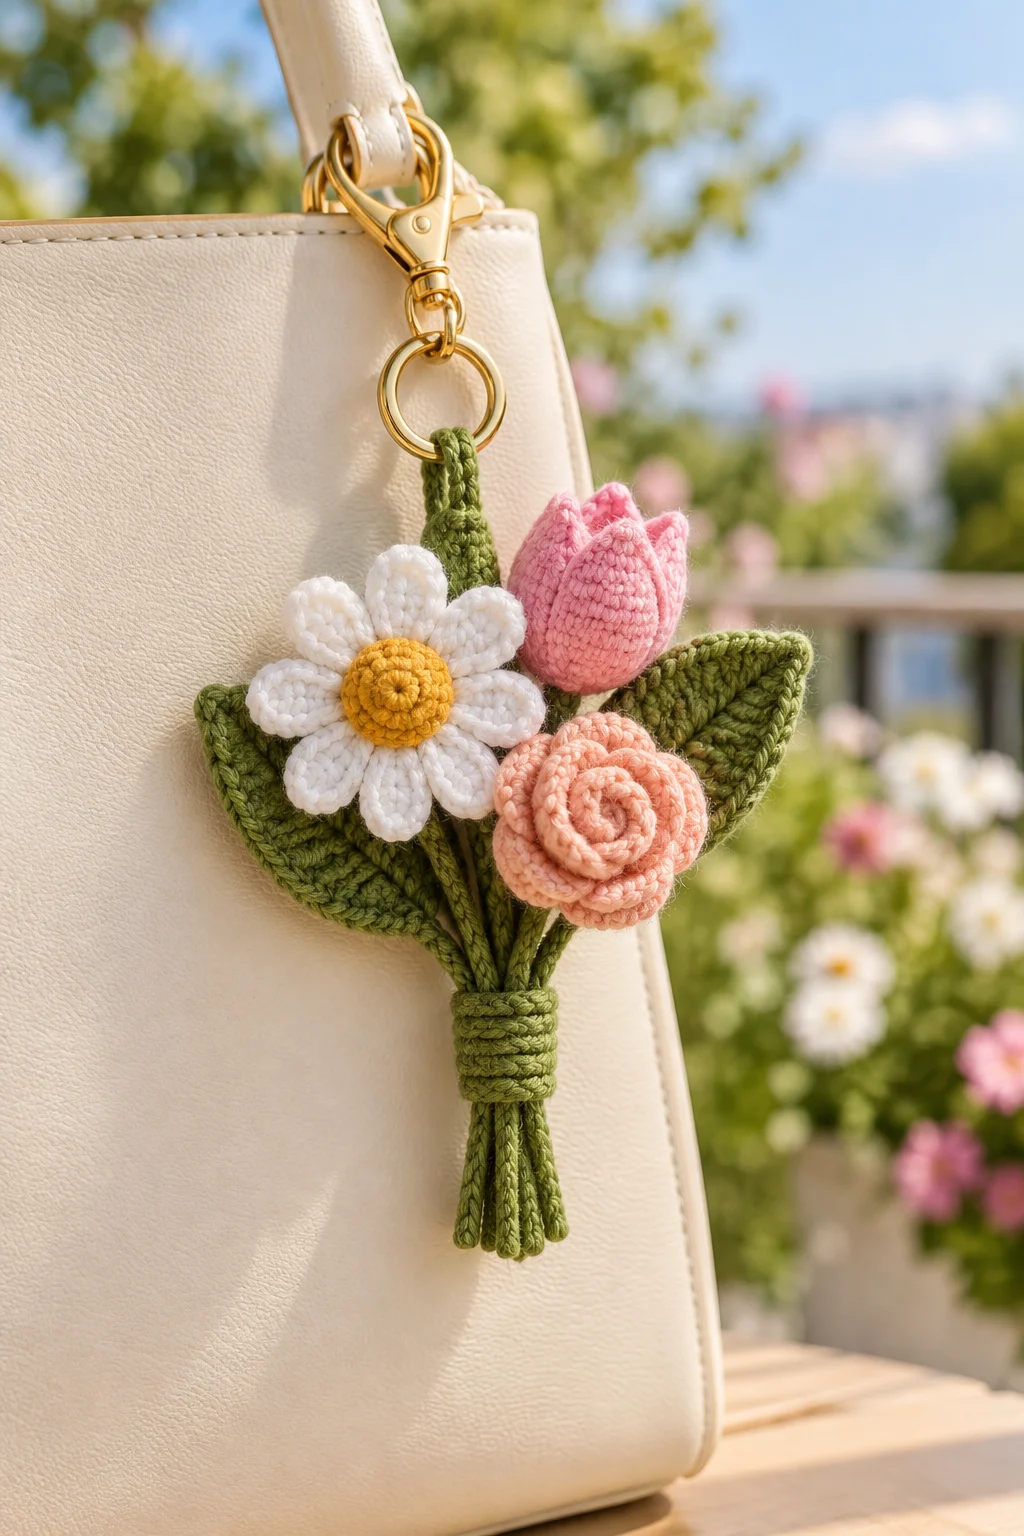
This crochet flower bouquet bag charm is a tiny hand-tied posy for your purse: a white daisy with a domed yellow center, a closed pink tulip and a rolled peach rose, with two big leaves and a wrapped green band around the stems. It's DK cotton on a 3 mm hook, and it uses about 40 to 50 yards across five colors. Plan on 3 to 4 hours, so one long evening or two short ones.
Key Takeaways
- Three flowers, three techniques: a joined-round daisy, a tulip worked in a spiral, and a rose rolled from a single strip.
- A hidden hanger carries the weight. A folded slip-stitch cord runs from the ring down into the wrapped band, so no flower ever takes the pull.
- About 40–50 yd of DK #3 cotton in white, yellow, pink, peach and green. Great for scraps.
- Metal clasp and ring: not for children under 3.
Why I love this bag charm
I made the first one for my own tote, and three friends asked for one within a week. It's that kind of project. A small bouquet that never wilts, clipped right where you see it every day. What better gift for a teacher, a bridesmaid or a mom?
It also looks fussier than it is. Each flower is a short, separate piece. The daisy is four rounds. The tulip is a little cup with three pointed petals. The rose is one strip that you roll up like a cinnamon bun. If you can crochet in the round, you can make all three.
The part I care about most is hidden. A bag charm swings, bumps into doors and gets squished in a crowded bag. So this one has a spine. A folded green cord holds the key ring at the top and runs down behind the flowers into the wrapped band. That's where everything is stitched together. The cord takes the pull, and the flowers just sit pretty.
Pattern at a glance
- Stitches: chain, slip stitch, single crochet, half double crochet, double crochet and a picot.
- Yarn: DK #3 cotton, about 40–50 yd (37–46 m) total, in five colors.
- Hook: 3 mm (US C/2–D/3). It's a little smaller than most DK ball bands suggest, so the petals stay crisp and the tulip holds its shape.
- Construction: 6 steps: daisy → tulip → rose → leaves, stems and hanger → build and wrap the bouquet → clasp.
- Finished size: about 6¼ in (16 cm) long from the hanging loop to the longest stem, and 4 in (10 cm) wide across the leaves. The clasp and ring add about 2 in (5 cm). Tension will shift this a little.
- Time: 3–4 hours. Allow about 1½ hours for the three flowers, 45 minutes for the leaves, stems and hanger, and 45 minutes for assembly.
- Skill level: advanced beginner. You should be comfortable with a magic ring, joining rounds and sewing small pieces.
What you'll need
Yarn (DK #3 cotton, ~40–50 yd / 37–46 m total)
- Olive green (leaves, stems, hanger, wrap, calyx, tulip base): 20–25 yd (18–23 m). A soft olive or moss green looks the most natural.
- Candy pink (tulip): 7–8 yd (6.5–7.5 m).
- White or cream (daisy petals): 6–7 yd (5.5–6.5 m).
- Peach or salmon pink (rose): 5–6 yd (4.5–5.5 m).
- Mustard or golden yellow (daisy center): 2–3 yd (2–3 m).
These amounts come from the stitch counts in the pattern, plus sewing tails, with a little margin. Keep every color a true DK #3 cotton or milk-cotton blend, such as Paintbox Yarns Cotton DK. A worsted #4 cotton like Lily Sugar 'n Cream will make that flower noticeably bigger than the others.
Hook and notions
- 3 mm crochet hook
- A small pinch of polyfil stuffing (for the tulip and the daisy center)
- Tapestry needle
- 2 stitch markers
- A few pins
Hardware (gold tones match the photo)
- 1 swivel lobster clasp keychain with a 20–25 mm split ring (they're usually sold together)
- Split-ring pliers, or a sturdy fingernail
No-metal option: skip the clasp and tie the charm onto your bag handle with a 10-inch (25 cm) green slip-stitch cord. I explain it in Step 6.
Tension
You don't need a strict gauge. The fabric should be firm, and the tulip should stand up on its own without stuffing showing through. If your petals feel floppy, drop to a 2.75 mm hook.
Abbreviations (US terms)
- MR: magic ring
- ch: chain
- sl st: slip stitch
- sc: single crochet
- hdc: half double crochet
- dc: double crochet
- inc: 2 sc in the same stitch
- BLO: back loop only
- picot: ch 3, sl st in the 3rd ch from the hook
- sp: space
- R: round
- st(s): stitch(es)
The daisy and the calyx are worked in joined rounds. At the end of each round, sl st into the first stitch. The ch 1 at the start of a round doesn't count as a stitch. The tulip is worked in a continuous spiral, so mark the first stitch of each round.
Step 1 — Crochet the daisy
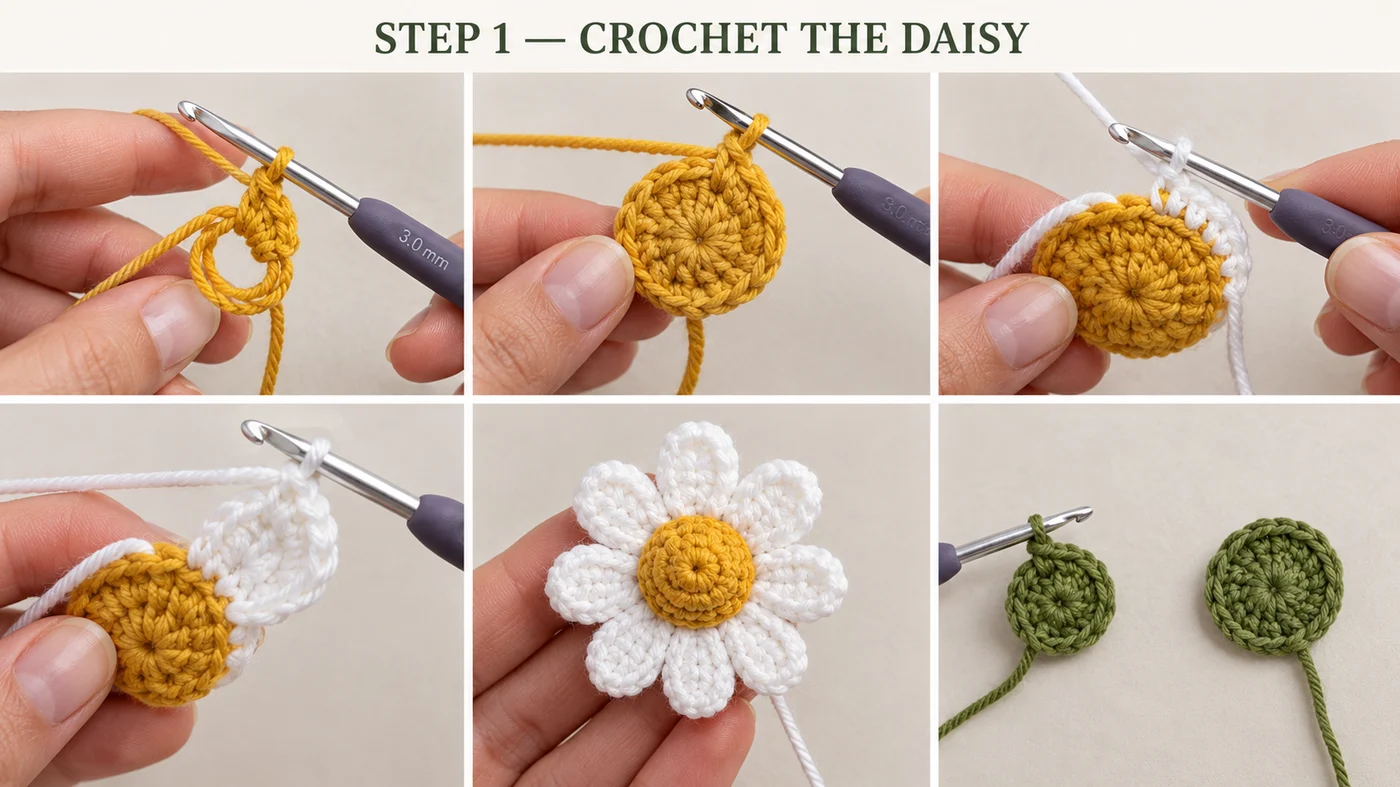
The magic ring is the front center of the daisy. Pull it tight and weave that tail to the back.
R1 (yellow): Ch 1, 8 sc in MR. Join. (8 sts) R2 (yellow): Ch 1, inc in each st around. Join. (16) Fasten off yellow. R3 (white, BLO): Join white in the back loop of any st. Ch 1, sc in the same st, ch 3, skip 1 st, sc in the BLO of the next st, ch 3, skip 1 st; repeat 6 more times. Join to the first sc. (8 sc and 8 ch-3 sps) R4 (white): Sl st into the first ch-3 sp. In each ch-3 sp: (sc, hdc, 5 dc, hdc, sc). Join to the first sc. (8 petals)
Fasten off leaving a 10-inch tail on the back. You'll use it to tack the daisy to the tulip later. Working R3 in the back loops pushes the yellow center forward a little. The daisy is about 2¼ in (5.5 cm) across.
Daisy backing disc (make 1, in green)
This small disc covers the back of the daisy and holds its stem.
R1: Ch 1, 6 sc in MR. Join. (6 sts) R2: Ch 1, inc in each st around. Join. (12)
Fasten off leaving a 12-inch tail. It's about 1 in (2.5 cm) across. Set it aside until Step 5.
Step 2 — Crochet the tulip
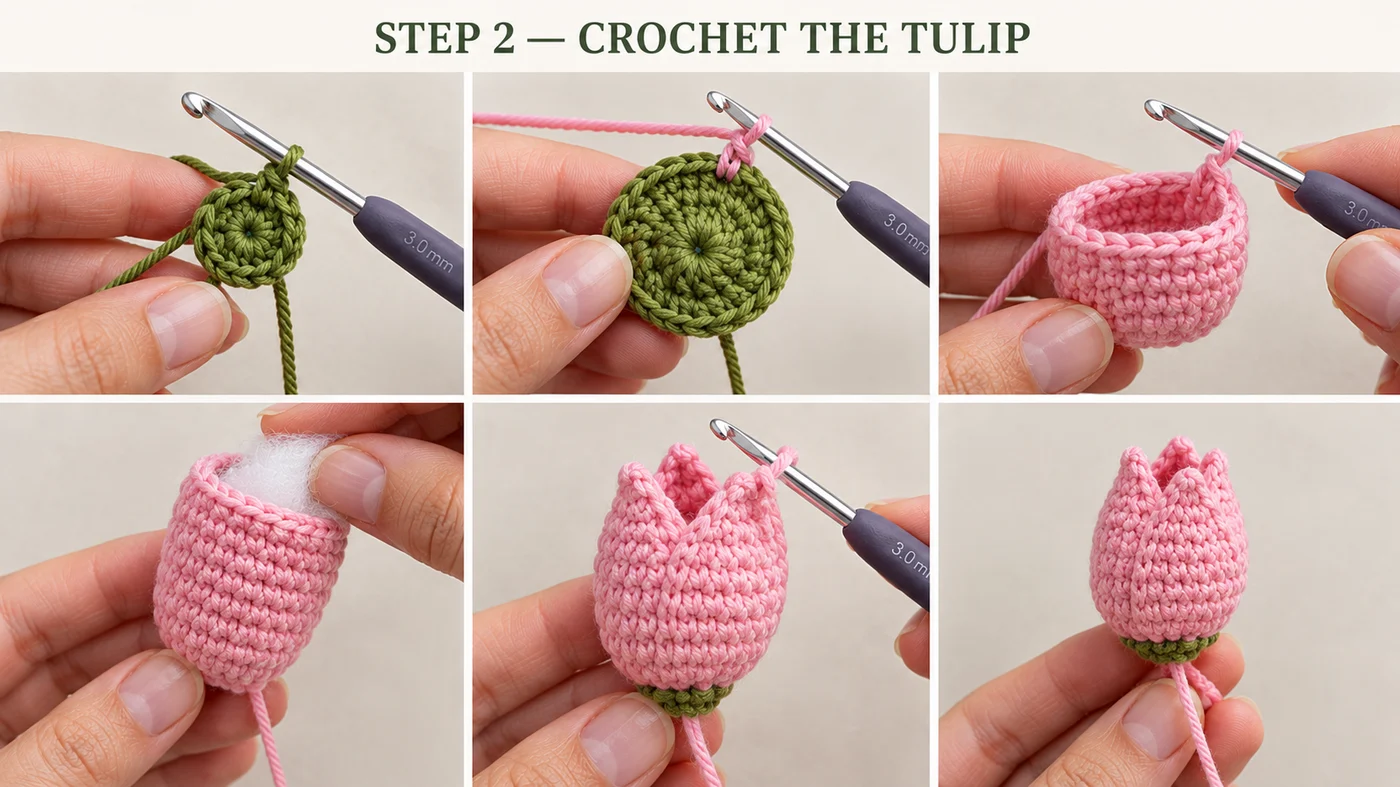
The tulip is a small cup worked from the bottom up. The magic ring is the base, where the stem goes. The pointed petal round is the top. Start in green, so the base looks like a little calyx.
Leave an 8-inch tail when you make the magic ring. You'll sew the stem into the base with it.
R1 (green): 6 sc in MR. (6 sts) R2 (green): Inc in each st around. (12) On the last stitch, switch to pink on the final yarn over. Cut green, leaving a short tail to weave inside. R3 (pink): Sc 1, inc; repeat 6 times. (18) R4–R8 (pink): Sc in each st around. (18) That's 5 rounds.
Stuff lightly, just up to R7. Pink yarn scraps work instead of polyfil, and nothing white will peek out.
R9 (petal points): Sl st in the next st, sc in the next st, (hdc, dc) in the next st, picot, (dc, hdc) in the next st, sc in the next st, sl st in the next st; repeat 2 more times. (3 pointed petals)
Each point uses 6 stitches of R8, so the three points share the round evenly.
Close the bud. Fasten off leaving an 8-inch tail. Thread it down to the dip between two points, then pass it through the dip between each of the other points. Pull gently so the three petals lean in, like a tulip that hasn't opened yet. Knot inside and hide the end in the stuffing.
The tulip is about 1 in (2.5 cm) wide and 1¾ in (4.5 cm) tall.
Step 3 — Crochet the rolled rose
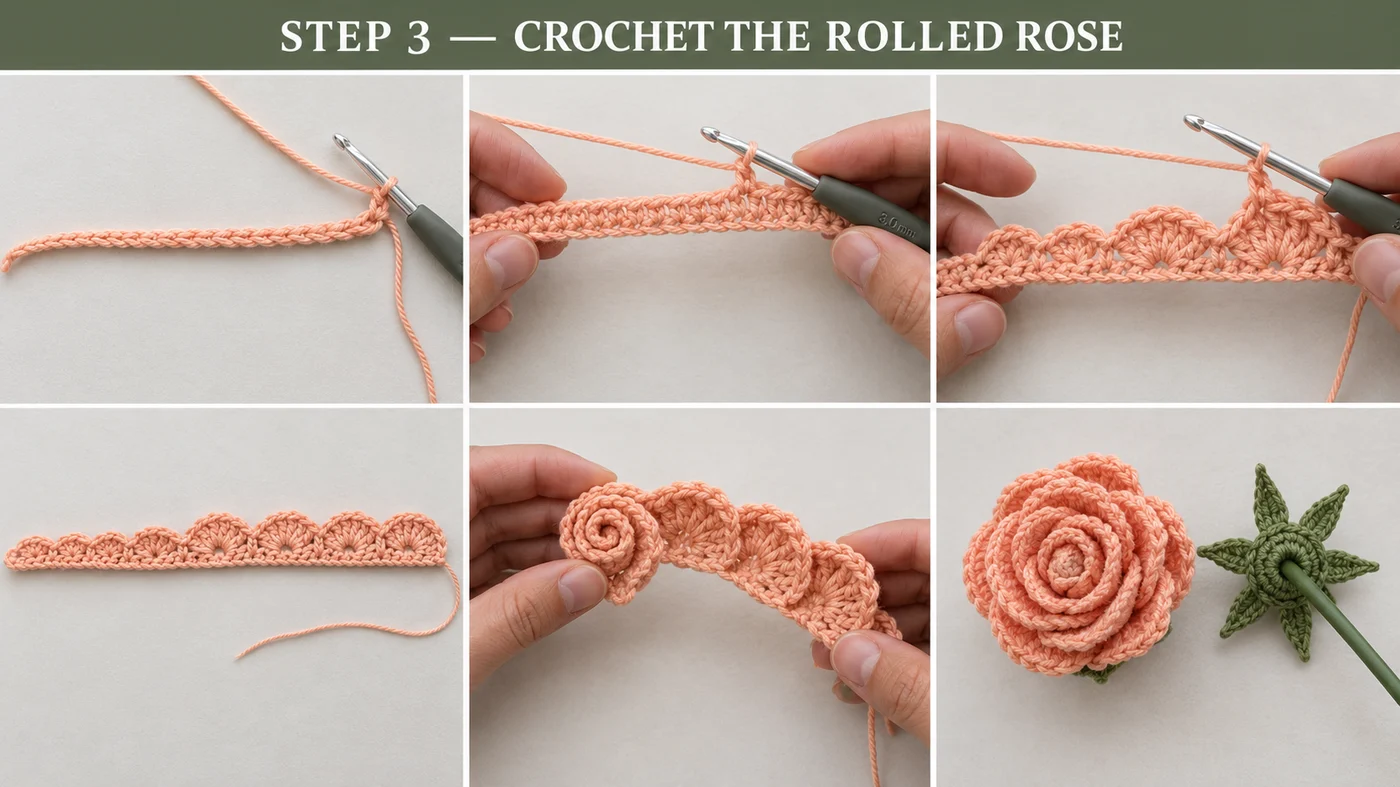
The rose starts as one flat strip. The small shells at the start become the tight center, and the bigger shells become the open outer petals.
Foundation (peach): Leave a 6-inch starting tail. Ch 30. Row 1: Sc in the 2nd ch from the hook and in each ch across. (29 sc) Ch 1, turn. Row 2: Sc in the first st. Skip 1 st, 5 hdc in the next st, skip 1 st, sc in the next st; repeat 2 more times. Then skip 1 st, 5 dc in the next st, skip 1 st, sc in the next st; repeat 3 more times. (7 shells: 3 small, 4 large)
Fasten off leaving an 18-inch tail. The strip is about 5½ in (14 cm) long.
Roll it. Hold the strip with the shells at the top and the flat edge at the bottom. Start at the starting-tail end, where the small shells are. Roll the first two shells tightly for the center, then roll the rest a little looser so the outer petals open out. The long tail ends up on the outside.
Sew the base. Thread the long tail on a needle. Stitch through all the layers at the flat bottom edge, crossing from side to side, 6 to 8 times. Keep the tail hanging. Weave the starting tail into the base.
The rose is about 1½ in (4 cm) across.
Rose calyx (make 1, in green)
R1: Ch 1, 6 sc in MR. Join. (6 sts) R2: Ch 1, inc in each st around. Join. (12) R3: Sl st in the next st, ch 3, sl st in the 2nd ch from the hook, sc in the next ch, sl st in the next st; repeat 5 more times. (6 small sepals)
Fasten off leaving a 10-inch tail. Leave the magic ring a little loose. The stem goes through it in Step 5.
Step 4 — Leaves, stems and the hanger (in green)
Leaves (make 2)
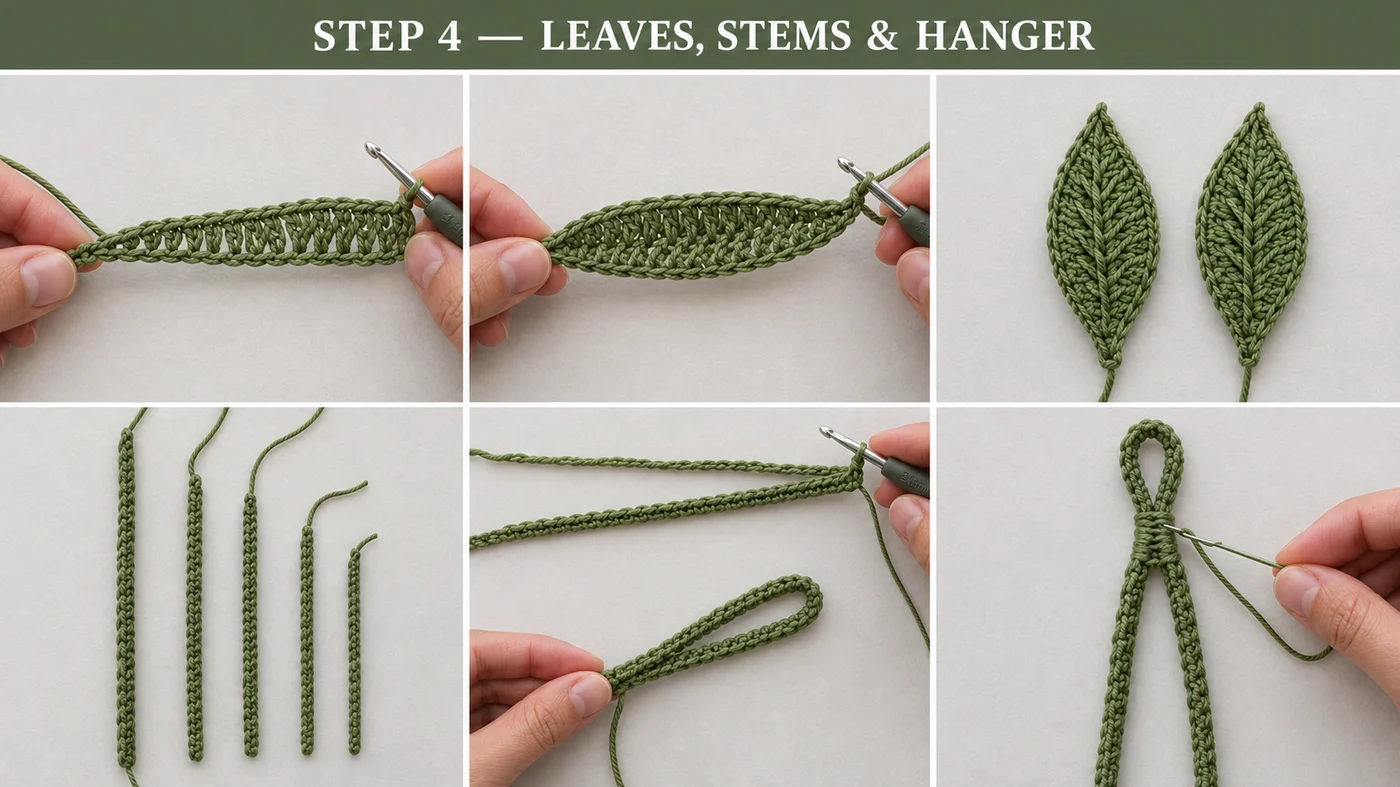
The leaf is worked around a foundation chain. Leave an 8-inch starting tail. That tail comes out at the rounded base of the leaf, right where you'll sew it. The tip is where the round ends.
Ch 13.
Side 1 (tip to base): Starting in the 2nd ch from the hook, sc in the first ch, hdc in the next ch, dc in each of the next 7 ch, hdc in the next ch, sc in the next ch, then 3 sc in the last ch (the base, next to your starting tail).
Side 2 (base to tip): Rotate and work along the other side of the chain. Sc in the next ch, hdc in the next ch, dc in each of the next 7 ch, hdc in the next ch, sc in the last ch.
Point: Ch 2, sl st in the 2nd ch from the hook, then sl st in the first sc of Side 1.
Fasten off and weave this short tail into the back. Each leaf is about 2¼ in (5.5 cm) long. The stitches on the two sides lean toward each other, which gives the chevron texture in the photo.
Optional vein: with the same green, work a line of surface slip stitches up the middle of each leaf, from the base to about ½ in from the tip.
Stems (make 5)
A plain chain stretches. A slip stitch worked into the back bumps is much firmer, so every stem is made this way.
For each stem, leave an 8-inch starting tail. Chain the number below, then sl st in the back bump of the 2nd ch from the hook and in the back bump of each ch across. Fasten off leaving another 8-inch tail. Both tails now sit at the same end. That end is the top of the stem, where the flower goes.
- Daisy stem: ch 28, about 5 in (13 cm).
- Tulip stem: ch 26, about 4¾ in (12 cm).
- Rose stem: ch 18, about 3¼ in (8 cm).
- Filler stems (make 2): ch 17, about 3 in (7.5 cm). These just make the bundle fuller. Weave their tails into the cord.
Your chain gauge may differ from mine, so go by the inches if the counts don't match.
Hanger
This is the spine of the charm. Leave an 8-inch starting tail. Ch 55, or until the chain measures 10 in (25 cm). Sl st in the back bump of the 2nd ch from the hook and each ch across. (54 sl sts) Fasten off and weave both tails into the cord.
Fold it in half. Make a loop about ½ in (1.3 cm) tall at the fold. With a separate 12-inch length of green, sew the two legs together just below the loop, through both cords, 10 stitches or more. This joint holds the ring, so don't skimp. Weave the ends into the cord.
The two legs now hang down about 4½ in (11.5 cm) below the loop.
Step 5 — Build and wrap the bouquet
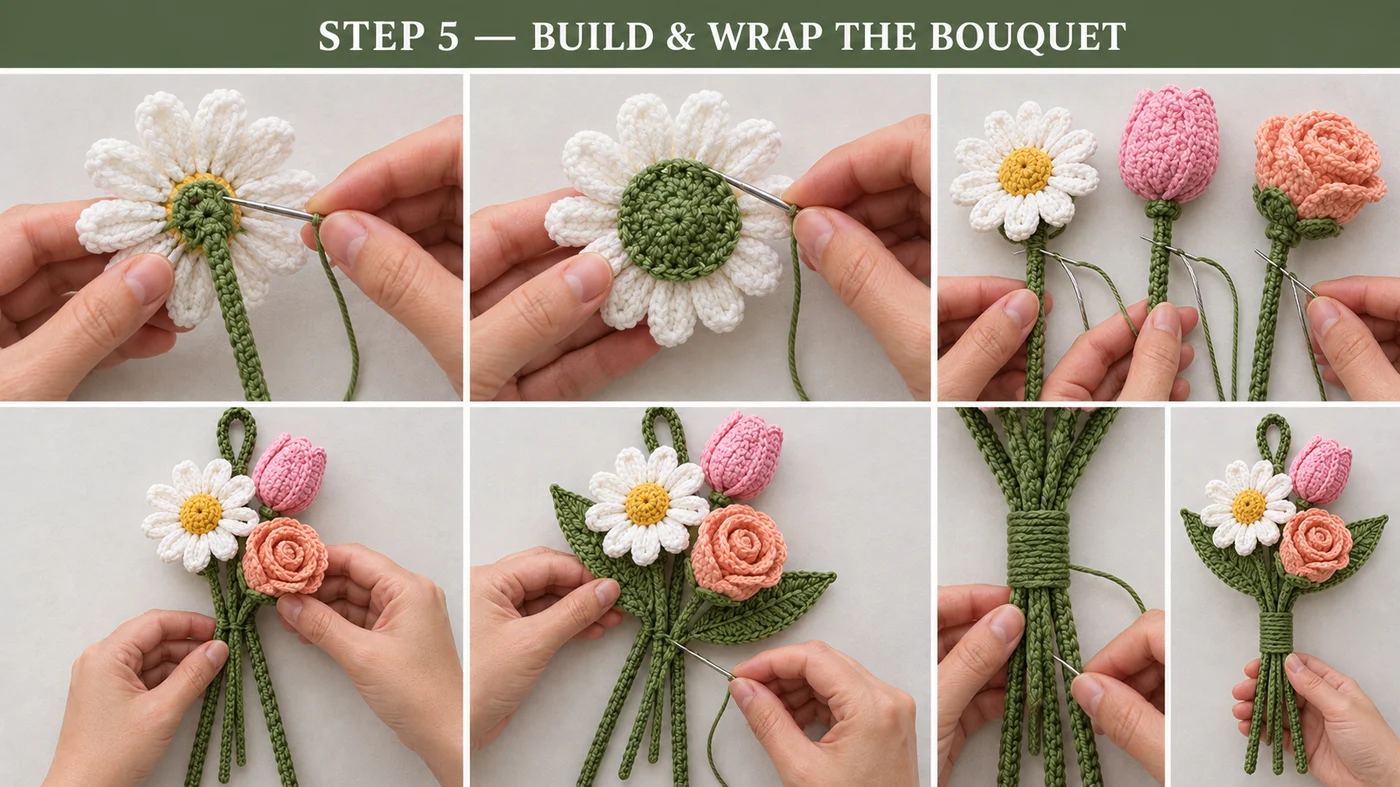
Attach the flowers to their stems
Daisy. Lay the daisy face down. Place the top of the daisy stem at the center back, with the stem running straight down past the bottom petals. Sew it on with both stem tails, 6 stitches through R1 and R2. Tuck a tiny pinch of stuffing behind the yellow center, then place the green backing disc over it, tails underneath. Whipstitch the disc's edge to the back of R3 with its 12-inch tail. When you cross the stem, go through it too, twice. Keep the rest of that tail.
Tulip. Push the top of the tulip stem against the green base. Sew it on with the tulip's 8-inch magic-ring tail and both stem tails, 8 stitches through the stem and the first two rounds. Knot and weave in.
Rose. Thread the top of the rose stem through the calyx's magic ring, from the back. Sew the stem to the rose base with the rose's long tail, 6 to 8 stitches. Slide the calyx up under the rose and pull its ring snug around the stem. Using the calyx tail, tack each sepal tip to the outer petals. Weave in.
Lay out the bouquet
Lay the hanger on the table with the loop at the top. Measurements are down from the top of the loop. Pin everything first, then sew.
- Daisy (left, center at 1¼ in / 3 cm). Place the daisy so its right petals cover the hanger. Using the backing disc's tail, sew the disc to both hanger legs, 6 stitches or more. The loop should peek out above the top petals.
- Tulip (upper right, base at 1½ in / 4 cm). Lean it up and to the right, with its lower side touching the daisy's right petals. Run its stem down and in toward the hanger. Tack the tulip's green base to the daisy's back with the daisy's 10-inch petal tail.
- Rose (right, base at 2¾ in / 7 cm). Place it below the tulip and to the right. Run its stem down beside the others.
- Gather the stems. At 3½ in (9 cm), bring all the cords together into one bundle: the two hanger legs in the middle, then the daisy, tulip and rose stems. Add the two filler stems, with their tops just above this point.
- Leaves. Tuck the base of one leaf into the top left of the bundle, pointing up and left under the daisy. Tuck the other into the top right, pointing out to the right, below the rose. Sew each leaf base into the bundle with its starting tail, 4 stitches.
Stitch and wrap the band
Stitch the bundle first. With a 12-inch length of green, sew through the whole bundle at the 3½-inch mark, side to side, 5 times. Go through both hanger legs every time. This is the joint that carries the charm, and the wrap will hide it.
Wrap it. Cut 3 yd (2.7 m) of green. Lay the first 2 in (5 cm) along the bundle, pointing down. Starting at the top, wrap tightly downward over it, 15 to 18 times, so the band is about ¾ in (2 cm) wide. Thread the end on a needle. Pass it up under the wraps, then through the middle of the bundle 3 times. Trim both ends close.
The stem ends should hang about 2½ in (6.5 cm) below the band, a little staggered. Don't cut the stems. If one stem is much longer, fold its end up inside the bundle and stitch it there.
Lift the bouquet by the loop and give it a gentle shake. Does anything flop forward? Add a tacking stitch behind it, into the hanger.
Step 6 — Add the clasp
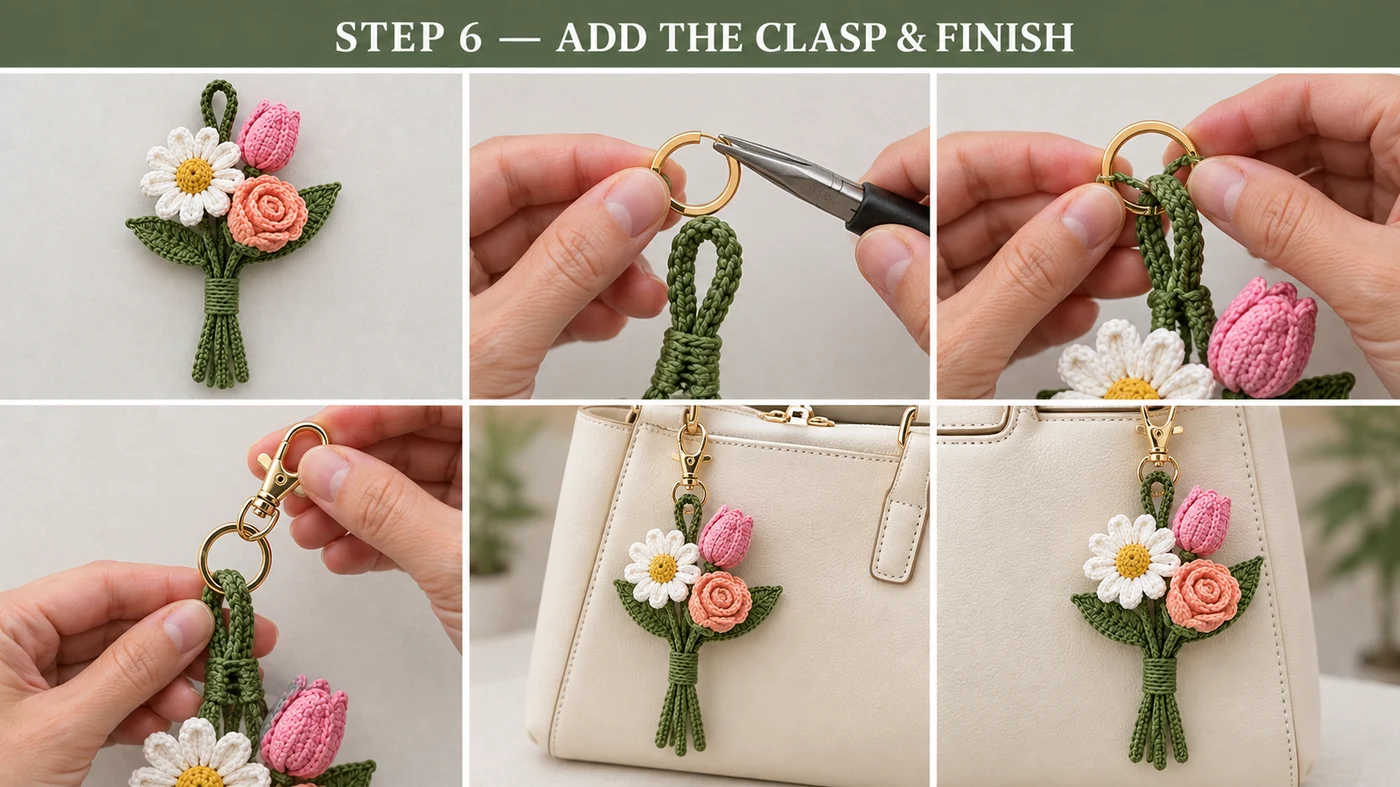
Most lobster keychains come with the split ring already attached. If yours doesn't, twist the ring onto the clasp's bottom eye first.
Twist the split ring onto the green hanger loop. Open the ring's end with split-ring pliers or a fingernail, slip the loop onto the spiral, and turn the ring until the loop sits on the main circle. Check that the loop isn't caught between the coils.
That's it. Clip it to a bag strap, a belt loop or a zipper pull.
No-metal option: crochet a 10-inch (25 cm) slip-stitch cord in green, the same way as the stems. Thread it through the hanger loop, fold it in half and tie it around your bag handle with a double knot.
Safety and care
Not a toy. This charm has a metal clasp, a split ring and small sewn pieces. It isn't safe for children under 3, because the ring and small parts are choking hazards. If you're making it for a child's school bag, use the no-metal cord and sew every flower on extra firmly.
Check the hanger. Every few months, look at the loop and the stitched band. Cotton stretches a little with use. If the loop starts to look thin, sew a second green loop beside it and join both to the ring.
Care. Cotton fades in strong sun, especially pinks and peaches. Spot clean with a damp cloth. For a deeper clean, hand-wash in cool water with a drop of mild soap, press it in a towel, reshape the tulip and let it dry flat. Don't tumble-dry.
Easy variations
- Tulip trio: skip the rose and make a second tulip in peach, so the posy has a daisy and two tulips. Give the peach tulip a rose-length stem (ch 18) and put it where the rose goes.
- Spring pastels: try a lavender tulip, a pale yellow daisy with an orange center and a blush rose.
- Mother's Day posy: make the rose in her favorite color and tie a thin satin ribbon bow over the green band.
- Mini version: use a 2.5 mm hook and sport-weight cotton. The whole charm shrinks to about 5 in (13 cm).
- Brooch: skip the hanger and clasp, trim the stems to 1½ in below the band, and sew a pin back behind the daisy.
Troubleshooting
The daisy petals ruffle
Your tension is loose, or your cotton is on the heavy side of DK. Drop to a 2.75 mm hook. You can also swap (sc, hdc, 5 dc, hdc, sc) for (sc, hdc, 4 dc, hdc, sc).
The tulip leans or collapses
It needs a little more stuffing near the bottom, or a firmer fabric. Add stuffing through the top before you close the bud, or remake it on a 2.75 mm hook.
The rose looks like a spiral, not a flower
Roll the first two shells tighter, and keep the flat edge level as you roll. Then sew through every layer at the base, so the center can't slide up.
The bouquet tips forward on the bag
The flowers are heavier than the hanger at the top. Add a few tacking stitches between the back of the daisy and the hanger legs, just below the loop.
Frequently asked questions
How much yarn does the bouquet bag charm use?
About 40–50 yd (37–46 m) of DK #3 cotton. That's roughly 20–25 yd of green, 7–8 yd of pink, 6–7 yd of white, 5–6 yd of peach and 2–3 yd of yellow. Scraps are plenty.
How long does this crochet bag charm take?
About 3 to 4 hours. Plan roughly 1½ hours for the daisy, tulip and rose, 45 minutes for the leaves, stems and hanger, and 45 minutes to build and wrap the bouquet. It fits into one long evening.
Can I make it with two tulips instead of the rose?
Yes. Make a second tulip in peach or yellow and give it the rose's shorter stem (ch 18). It sits in the rose's spot, below the pink tulip. Everything else stays the same.
Is it safe for kids?
Not for children under 3. The metal clasp, split ring and small pieces are choking hazards. For an older child, use the no-metal cord in Step 6 and over-sew each flower to its stem.
Can I sell the finished bag charms?
Yes. You're welcome to sell finished charms made from this free pattern at markets, on Etsy or as gifts. Please credit "Pattern by Wavode" and link back to this page. Please don't republish the written pattern or my photos as your own.
UK terms note
This pattern uses US terms. In UK terms, sc becomes double crochet (dc), hdc becomes half treble (htr) and dc becomes treble (tr). The other abbreviations don't change. DK is the same yarn weight on both sides of the Atlantic.
Related patterns on Wavode
- Crochet car mirror charm: a longer hanging bouquet of seven flowers for your car.
- Crochet mini rose: a 15-minute rose if you'd like a few more for this charm.
- Crochet lily bouquet: a full-size bouquet of purple and pink lilies.
- Crochet keychain flower vase: a mini daisy in a pot for your keys.
- Crochet mini bow bag: a small bag that looks sweet with this charm clipped on.
Made a bouquet charm? Tag #wavodecrochet on Pinterest. I re-pin every finished make and credit the maker.
Pattern by Clara Hartwell for Wavode. Questions? Email me at support@wavode.com.